

"Top Cat"...
Triumph Cub Trials...
Year is 2009...for the Build...
Top-Cat-Cub Story. Inspired by the frame built originaly by Pat Slinn.
Photos Courtesy "Otterman".
Well if you can remember I am also building a Scott Ellis replica BSA, which is just back from the powder coater’s, in the nearest shade of British Racing Green that I could get? Well it is British. Anyway just as I had finished that frame with all the appropriate bits, Tiger Cub Swinging arm, and sub frame Etc. Pat Slinn put a photo of his bike on to Trials Central as he had just restored it after 44 years. Blow It I thought, that was the frame that I had seen in the St David’s trial in 1965, and dreamed of building one in the future. Well I e-mailed him, and he sent me some pictures of the frame, several, and I knew I had to build one of these frames as well. Between our correspondents since then, Pat has given me enough information about the BSA Competition Department to write a book? Yes I am thinking about doing that as well, one day. Anyway, all of the BSA C and B engines that we had were tied up in other projects, but I had a late Triumph Cub engine, but had not decided which frame to build or buy for it. So the obvious answer was to build a replica Pat Slinn frame for it.
Now called “Top Cat” as it was a Tiger Cub, and Pat, was number one man sorting the racing Du”cat”i’s in the golden years, Tony Rutter, and the Great "Mike The Bike Hailwood", no less...
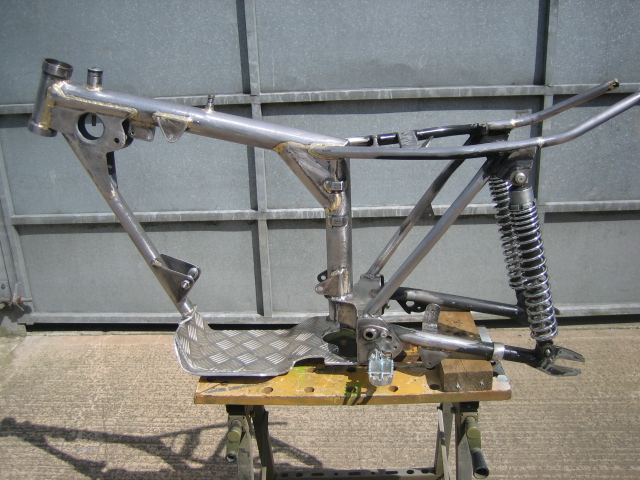
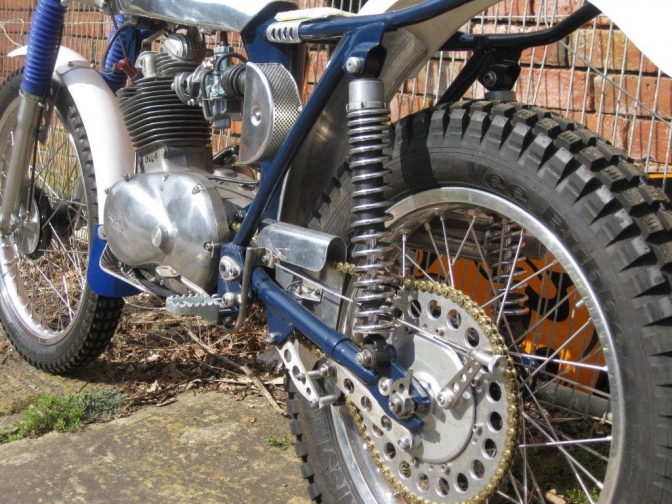
Yes, I have machined and built most of the frame, except the swinging arm and sub frame, where I used Mk two C15T parts, the same as Pat did, on his bike. This was what made the frame so good in my eyes. I actually used the tubes from a WD B40 frame that I had, which are the same has a C15T...
~~~~~~~ The main tubes for the frame are T45, the swinging-arm box is in stainless steel, which gave me problems, but that is another story. Yes it is oil in the frame and even the seat tube gusset holds oil. I know it would be frowned upon by such event's as the Pre 65 Scottish two day trial, but the Manx two day and others would probably be OK... But I don’t care I just wanted to build the thing.
I said I had a late Triumph Cub engine to put into the frame. Well my brother came home from one of his trips and told me to look in the boot of his car... I opened it, and found there was another late type 1964 Triumph Cub engine inside, with Alloy barrel, and most of the internals new, bronze guides etc Surflex clutch and the appropriate sprockets fitted. It had come from Keith Horsman... It may be a 230 or 250 I don’t know, I can see it has a new piston fitted, but I can’t see the sense in stripping the lot out.
Photos Courtesy Otterman... I will try and fill the bore with oil to find out one day... This means that I will be able to complete the build quicker. The frame has now gone to the powder-coater. I asked Pat to choose the colour, “Nutleyblue” he said, as BSA had to tart one of the C15’s up in that colour for the USA, to stop the Japanese bike invasion at the time, don’t think it worked though do you... Anyway, I had rushed the pair of hubs for the plot off to “Behind-bars” in Kenilworth, as my brother had arranged for them, to spoke these up for me and fit tyres. The back hub was one that I had widened for the Scott Ellis replica bike, and then got it powder coated the wrong colour “Black”, when it should have been Silver, so that fitted in nicely.
The front hub was a Grimeca, that I had for another project, but hey, lets get this done first now, I thought... Then the bomb- shell so to speak. My brother had organised a “Big Boy’s Toy’s” event down in “The City”, at Broadgate London. And said he would like to take the Triumph Cub along with a few more of the bikes from the collection, but this was in only one week’s time. Finger out then I thought...
A list was prepared for the rest of the bits I needed to finish the bike, and I e-mailed it to Amanda at TrialsBits.(Sadly now closed)2023... A day later a large box arrived by DHL, now I thought I had everything in this box for the build, but knew also in my mind that I bet I was wrong, and something would be missing...I usually am wrong you know....
The forks were fitted after I had made bearing, bungs, through bolt, and lock stops. By the way, the forks were new, and are period, as they were made by Bonazzi & Gambetta, later to be taken over by Marzzochi in 1966. Fitting the front wheel to them, entailed making a spindle out of stainless steel, some alloy spacers, and machining off one of the back plate tongues, on one of the fork sliders. The Grimeca hub then just slotted in has these forks were designed to use this hub.
So I had a rolling chassis, when I had slotted in the back wheel, and fitted a good second-hand pair of, I think Falcon shocks... The bars and controls and cables just seemed to fall on, and I even made up the silencer and seat in the same day. But then came “Grim Wednesday”... Firstly I could not get the back mudguard parts to fit nicely, on-off, on-off, several times, and the tail part still did not look right, and was over to one side. I should have gone home then, but thought, i’ll just fit the chain and tensioner that has come from Trials Bits, and then I will call-it a day early... The chain fitted over the sprockets OK, and I was well pleased with how it lined up. Then I lost the Fish clip, and spent ten minutes looking for it to no avail. Are well, I’ll just fit the chain tensioner, that shouldn’t take long. Bend, cut, on, off, again several times, and I was getting knowhere. So I scrapped the lot and made one out of stainless steel, but this did take one hell of a time. I left the workshop at ten o’clock, and then had to drive the thirty plus miles home, nodding off most of the way, even with the windows right down, and Alice Cooper turned right up high.
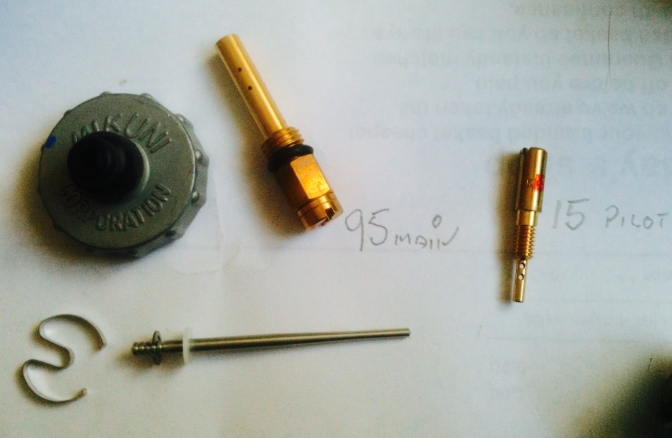
OK... The next morning it was time for a few final decisions. What ignition was I going to run on this “Bad Boy”. Well there was only two alternatives really, run a bog standard points ignition with a battery running at total loss, or a Boyer-Bransdon system, as it was to late to fit PVL, as the crankcases need machining to fit this system, (And no Electrex-World unit yet I suggested to them to build that later...2011...) and has I have said, it is just making work, to strip the engine after someone had put it together with so much loving care... “Fit the best” my bruv said, so I plumped for the Boyer-Bransden Micro-Digital system, and intended running this off of a power box taking the power from the Lucas alternator. So this system was promptly ordered from TrialsBits, along with a couple of other parts I had forgotten. The other problem that needed solving was what carb I was going to use... Now, I have a thing about carburettors, and have a selection of most, from a Villiers type 22, to a Wal Philips fuel injector. Naa can’t fit that, I had enough trouble trying to get my Goldie trials outfit to run on that way back in the sixties. But I know Chris Leighfield, and myself had done the research into the Japanese carbs fitted to Honda’s in the early sixties, and had found that the ones fitted to the current crop of “Pitbikes” were nearly the same pattern, although probably not made in Japan?( well there are a lot of unbranded ones flouting about... The ones with the name Mikuni on the cap and on the body and Japan TA are probably genuine) So why not fit one of these? And I had one with 26mm bore, a VM 22.Mikuni,with 1" bore manifold side. The Carb settings on these can vary and even to who you ask, but fitted originally into the Pit-bike carbs are a 95 main jet and 15 pilot, these are said to run better on a Triumph Cub with a 100 main and 30 pilot, But there are other views to this like this one from the Triumph Cub and Terrier Club, member. Here are the settings for VM 22 carb for a TriumphT20.MAIN JET 140.PILOT JET 25.NEEDLE JET O6.NEEDLE JET 4D8. AIR JET 1 TURN OUT. SLIDE CUT OUT 2.
If you want to buy a genuine Mikuni Carb for fittment to a Trials Cub, Meriden Offroad have them for sale at £125,VM 24. ready set up to fit. But the best place to go if you have money to burn, on a genuine Mikuni, and the use of all their knowledge on these, go to motocarb.com PS. there are two types of pilot jets on the VM22 carbs the old type were shorter than the later ones, and some of the copies have the earlier type, so be warned.
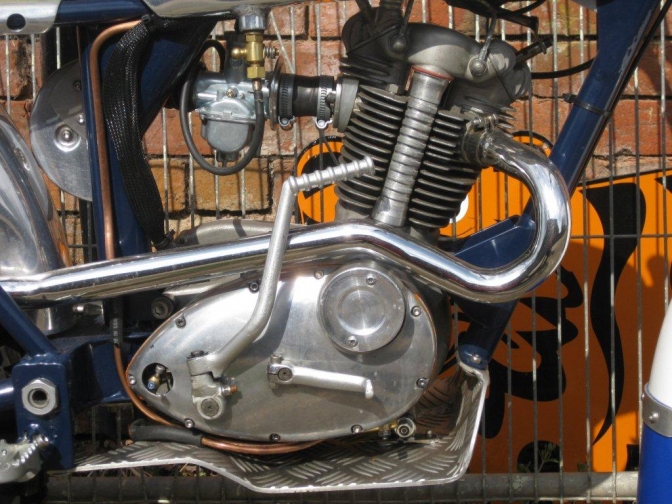
So the next three hours were spent machining up the manifold parts to fit this carb to the bike, the alloy parts were easy, but do you think I could find a short length of rubber hose to do the job, must have spent an hour looking, eventually finding just the bit in the box of spares for the stacker truck. This fitted I had to decide what air filter to fit. Well I wanted one that was period, so after a couple of minuets thought, I decided to make my own... Firstly, I had to machine up mandrills of the appropriate shape to fit the fly press to make the indents in the side panels, then routed a lump of wood to the D dimensions I needed for these side panels too. An alloy stub was machined out of solid, as I could not find the right piece of tube, and this was quicker than looking. I was just contemplating what to use for the meshed part, intake, when mate Paul Ellis walked into the workshop. I showed him what I was doing, and the Fulcrum for the back brake that I had hand carved, with a bit of help from the old lathe. He peered over the top of his glasses, as he does, and suggested he take the fulcrum away and see if he could make a better job... Well I knew he could, cos he is “The boy” when it comes to fabrication.... His intricate work is unbelievable, but then again he can be like an animal with the heavy stuff, just give him a sledge hammer and see, he is not nicknamed “Gonzo” without a reason. Anyway he also suggested he would set up his little mill, to perforate a chunk of alloy for the filter, and I could have it tomorrow ... (which would be a first) So fingers crossed, he went off on a mission, and I drove home fairly happy with what I had achieved in a day, to the tones of Lionel Richie...
Photo Courtesy Otterman... Just sipping me cup of tea, and taking a long hard look at what I had taken on, to finish this bike in two days... When firstly my brother arrived through the workshop door, with another box of presents for me. The ignition had arrived from TrialsBits, and also the two rocker oil feed pipes, and front header exhaust pipe, from Graystone Tiger Cub..., Two Rocker feeds?.. Well I might mess one up fitting it. Ten minuets later Paulie arrived with a most superior brake fulcrum, that he had made, and even fitted one of our stainless brake arms to it, and the length of perforated alloy. I made up brackets and fitted the ignition coil, box, and engine trigger, and even fitted a Pit Bike engine cut out onto the bars. Then I spent an hour and a half making up the air cleaner. The little seat was going to be a problem, because I had set my mind to making the covering out of reversed cattle hide, as I had all my seats for trials and road racing in the sixties. Time was short, and messing about getting a leather off cut from somewhere was not on. Looking for a stainless bolt in the racks, I came across a dirty old artificial chamois leather. Now if I had a proper one that would do the job. So bruv was sent up the road to an A1 Motor store to purchase one. Meanwhile, I had got mothers old sewing machine off of the top shelf of the dusty cupboard in the work shop, and set it up on a trestle table. Within the next hour the seat was sewn and fitted.
The Victor type tank that I had ordered from Terry Weedy had still not arrived, and I needed to fit a tank. I had given Terry short notice, because I knew he was still in pre production of the alloy tanks. Well I had a Wassell tank, it was earmarked for a BSA Bantam that we had in the pipe line, and it was only sat on a shelf harbouring dust, so why not use that? Anyway, I had no interest in the project, because I don’t like two strokes... Brother agreed, has long as I did not paint it, as I had planed to do with the BSA Victor tank. Nutley blue if you remember. Do you know, that tank sat straight on to the frame, as though it was designed for the bike... Should I fit the Triumph badges that I had for the bike? Well there was no time to get more, but these were silver to stand out on the blue. Well the tank was polished and the graphics slid into place. Now the first comment I got from a very good friend, Geoff Bird was how well they suited the bike being very understated. Made my day that did....
OK... It has been more than a week, since the last update but you know how busy I have been, I will finish the story very soon, honest.
Look at the New pictures of the "Top-Cat-Cub" in, A Few "Otters" to View Page...
11/11/2011...
OK... the "Top Cat Cub" has had a bit of a Makeover. Nothing to Worry about, just a few cosmetic changes... Firstly, I have fitted a further mudguard stay to the front, to support the mudguard better.
Now you know I am on with the Faber Framed Cub, and needed to fit PVL posts to the engine for this unit.. So, after a long length of thought and knowing that the "Top Cat Cub " ignition was never going to work without a battery. I took the plunge and bought one of the Electrex-World units that fit directly into the chain-case without any machining. ( Could it be that simple?).
Well the unit seems to be made by Horse Power Ignition, from Belgium, but then modified over a period of time by Electrex-World, to get it right. It seems as the guy's there have done a good job, because I fitted the unit that arrived (making better spacers etc) but that is me, is it not?
But basically fitted the unit following instructions, and have a spark that should light the little Kitten up. Other mods were to the breather system, and clutch cover mod's. We will See next week if the system works, fingers crossed.
15/06/ 2013...
OK... it is not next week, but two years down the line!
Time just flies when you are situated in a yard that is in constant panic? Well if you are in the exhibition industry you will know what I mean.
And you remember about the Olympic Games last year, and of coarse the really bad winter/spring we have just had. But enough of the excuses...
The "Top Cat Cub" now lives! It has been a long birth I know but after a week on snatching a couple of hours a day we have the Baby running, after a few unforeseen problems.
Last Saturday, Malcombe Kew and I had a bike day, after the weeks panic at work before...
He worked on his Beemer, and Kwakasaki, I dusted off the "Top-Cat-Cub"...
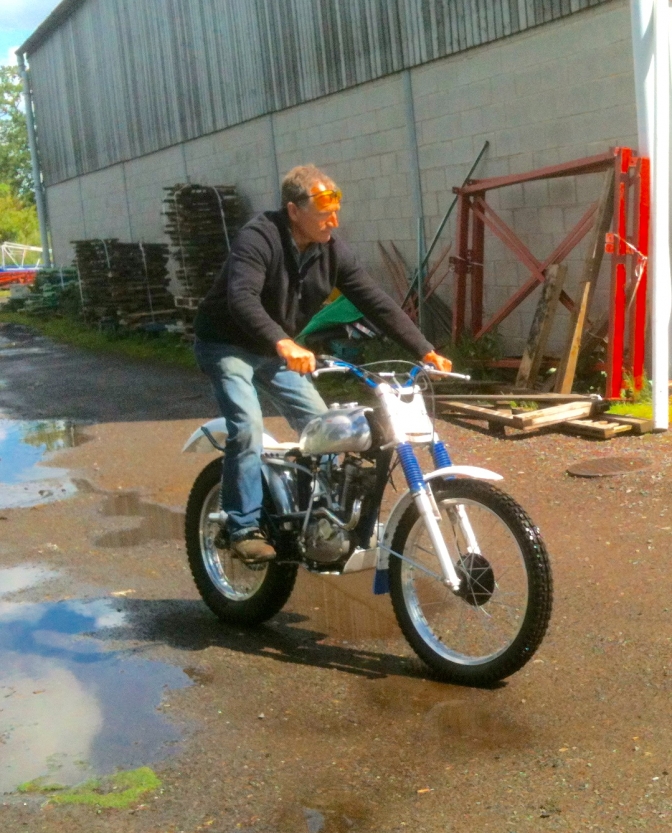
Photo's Courtesy Otterman... First Ride on the newly fired up "Top-Cat-Cub". Join the Kew Malcombe said... ~~~~~~~ I will just put the oil and fuel in Malc, and then you can kick the Kitten into life. "Should there be oil coming from under the engine" he said. You are joking? No! he said... I peered and rubbed the oil away with a rag, but still it ran.
The oil connection was slightly loose, but the oil was not coming from there. Sump plate off and onto the lift, it looked like the oil was coming from around the flange of the bottom swinging arm box. Oil out and a small scraping from the new (well now old) powder coat revealed a small pin hole weep. Pressurised with the air line the problem became apparent... With the rush to get the bike done for the show in London, gave me no time to check the frame before it went off for powder coating. The situation was resolved, by just welding the seam with the mig welder, and then re pressure testing the frame. I then made a better job of the pipework, while the sump plate was off... I also fitted a nylon rub-plate to the bottom of the swing-arm box, for the chain... Fourth kick, on the Wednesday morning the little bike fired up, but the carburation was rough. I faced and sealed the surfaces on the inlet track, better but still not running correctly...
After a few hours of thought, and a bit more homework on the Mikuni VM22 carb, I realised that when making the manifold to carb alloy section, with heat dissipation plate, I had inadvertently blocked the air hole to the idling jet, so a hole was drilled through the plate to match the jet of the carb, and that solved the problem... Malc fired the little bike up on Friday, and rode the bike for five minuets... I could see that he liked the little bike with the grin on his face, and did not want to get off. I eventually climbed aboard for a quick spin. Absolutely brilliant!! But I always knew it would be, it steers like a Gem, and the motor is superb, just can't wait for a better ride.
Slight problem with the kick start lever but I have had this before with the same make of lever.
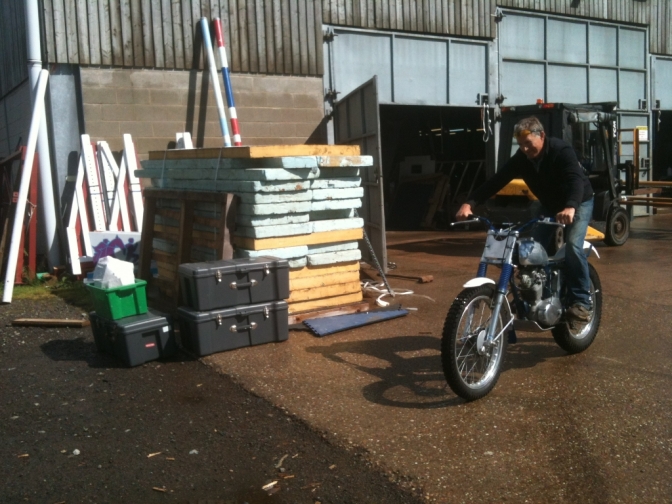
Anyway here is its Birthday Photo. With Malc aboard. Long live Top-Cat-Triumph-Cub...
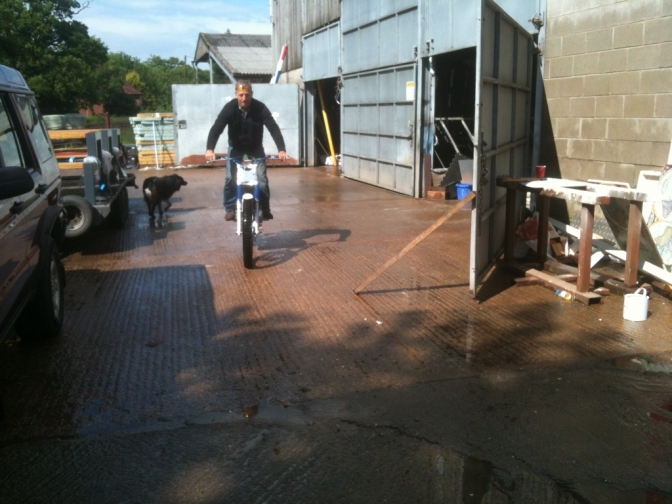
Photos Otterman... You Note the typical English Summer weather... Well the rain was warm, and Malc and the Bike needed a Good wash.
Bike test and a Video for the bike in a short while, then you can judge for yourselves how good you think it is...
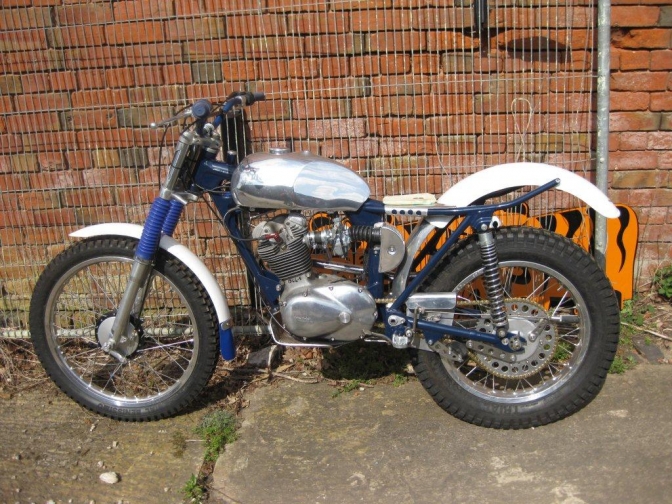
Photo"Otterman"... Just a bit different to the normal crop of newly built up Triumph Cub's... _______
|
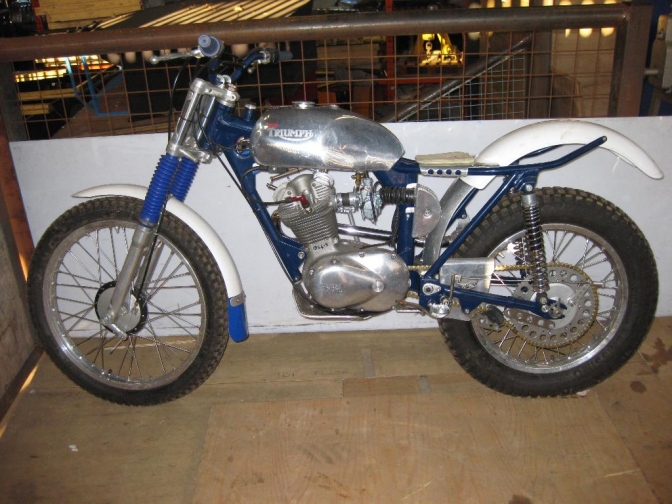
Photos Otterman 2009...
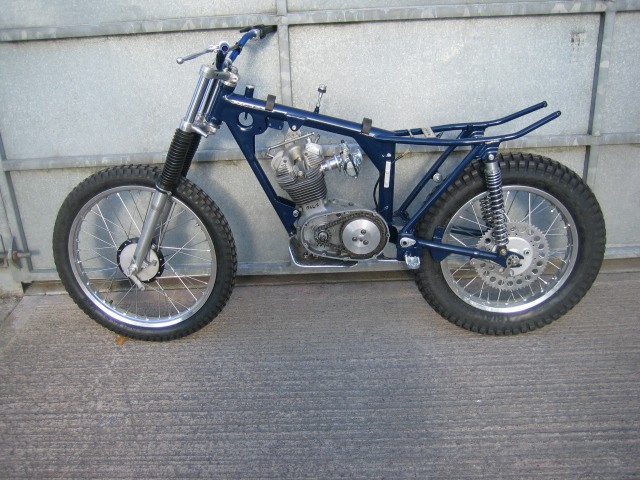
Top-Cat-Cub, One of the first photos of the finished bike, when it was firstly built.

You can just see the head steady I made that seemed to work and stop any vibration from the engine.
~~~~~~~
23/06/2018.
Since the "Top-Cat-Cub" was first fired up and ridden around the yard,
it has just sat in the corner of the workshop.
The thing is, I never did build the bikes for this site to ride, because of my illness, they were all built as an exercise of what you can do if you have a plan in your head, and are driven to get something done, as it was in this case, where we had a show deadline.
I agree it is criminal to just let the little bike just sit out it's days in this situation...
So there is a little show (I am joking it is now vast) at Brackley in Northamptonshire in August, and I have said that I will take along a few of the "Otter" bike collection.
So the "Top-Cat-Cub" will be one of them.
In the meantime I need to clean the little bike, refit the fuel tank that was taken off to dispose of the horrible fuel with ethanol in. And fit a new kick-start lever as the one I welded together broke.
Terry Weedy now does a nice little Triumph Cub kick-start I am told.
So watch this space another out of the back of the shed.
So update later with progress on this challenge.
21/08/2018.
Well we took the "Top-Cat" to Brackley show, and despite the wet weather, there was interest in the stand and the bikes, and two nice gentlemen wanted to buy little "Top-Cat", but I had to decline the offer, as I just can't live without my little collection of machines I have built from scratch.
After enjoying the weekend so much, we next year will visit more outside shows with the "BSA Otter Club Stand", and we hope we will encourage more of you that own a "Otter" trials bike to come along and bring your machines too...

Photo Courtesy Otterman...
BSA Otters at Brackley Festival.
"Top-Cat" also met its older brother at the weekend, but unfortunately he is going to live somewhere else shortly. But it was nice to build him into a replica of my first Triumph TR20 Cub from 1963.
PS, Brother has now kept the TR20 bike..."To good to sell" he said... Sorry Now Sold...
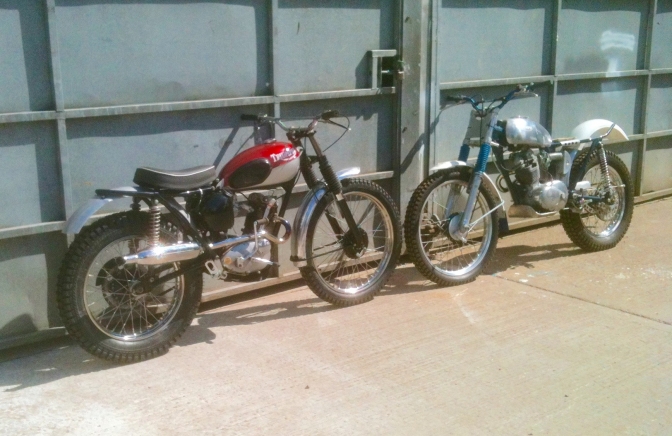
Triumph TR 20 Cub 1963 replica. And Triumph"Top-Cat-Cub"1964 engine...
More Later.
updat2025/11...24.11
| Visitor Counter: | ||||||||
 |  |  | |  | | | ||