

"Clutching at Straws".
The BSA Unit Single Clutch.
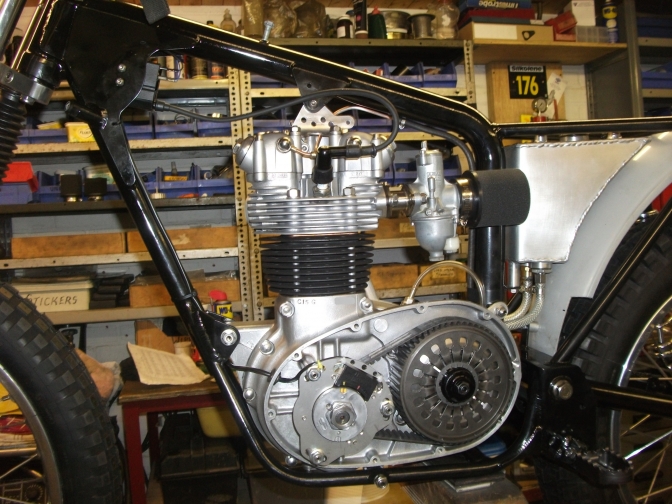
Will you end up fitting one of these?
One thing you can say that this item on a BSA or Triumph unit single does cause a lot of discussion, and usually not the praising type.
So we will take a look at what we have got with this unit, and see if there is anyway to make it WORK, or even make it better.
Or do you start adding up the cost of replacement parts, and the stress of trying to get it to work with the time factor involved, or do you just save your money and go and buy one of Pete Kirby's Belt drive diaphragm units?
Like most parts of this humble engine the clutch was a bigged up copy of the Triumph Cub, with another spring and a duplex chain fitted.
And this same clutch was still used on the Famous BSA unit Scrambles bike of bigger capacity used to win a World championship in the hands of Jeff Smith...
So like everything to do with BSA -Triumph all parts were built down to a price and not designed up to work efficiently.
Where do we start, "If you has one you has to make it work" or take the opption above I have given you.
To start with if you were working in a design office and had come up with this unit you would have been told to stand in the corner until you could come up with something better.
Enough rambling, lets see if we can solve a few problems with what we have.
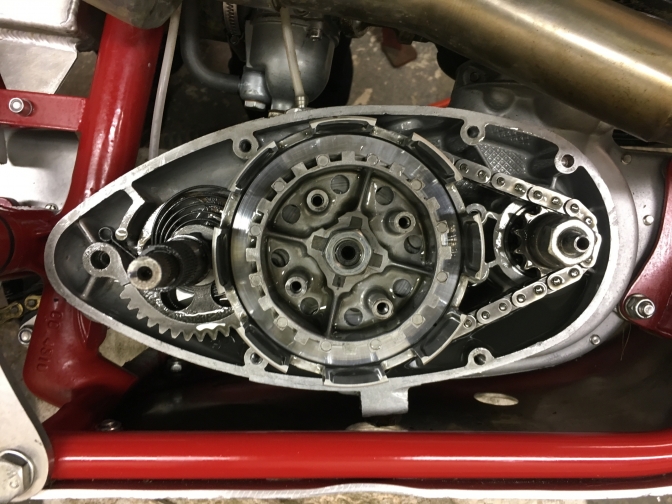
As you are probably aware there were two types of this clutch the Four Plate and the compromised Five plate, that was just a botched up version of the Four.
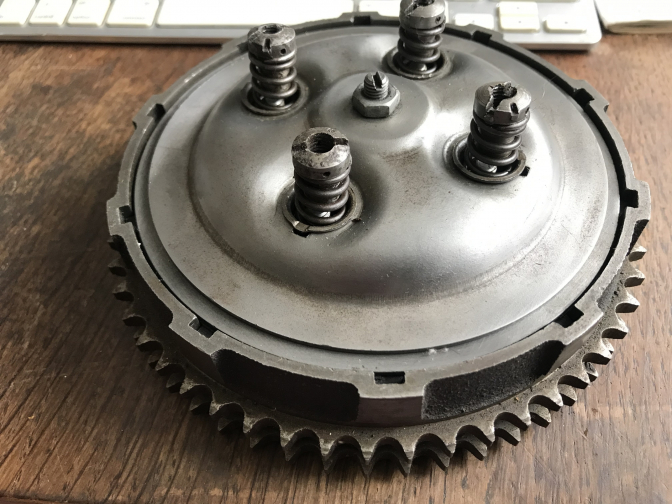
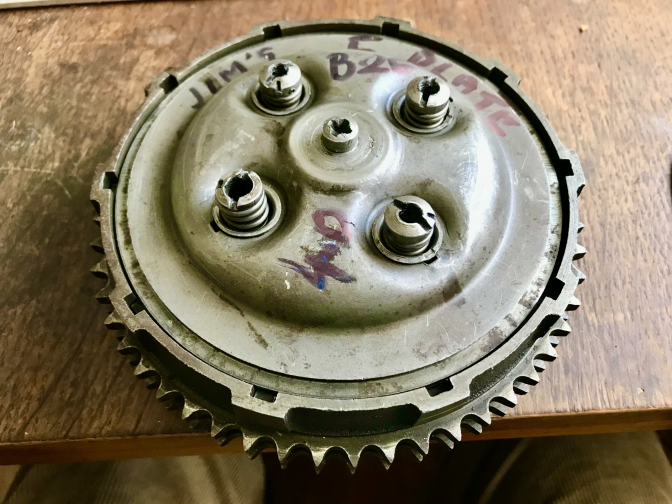
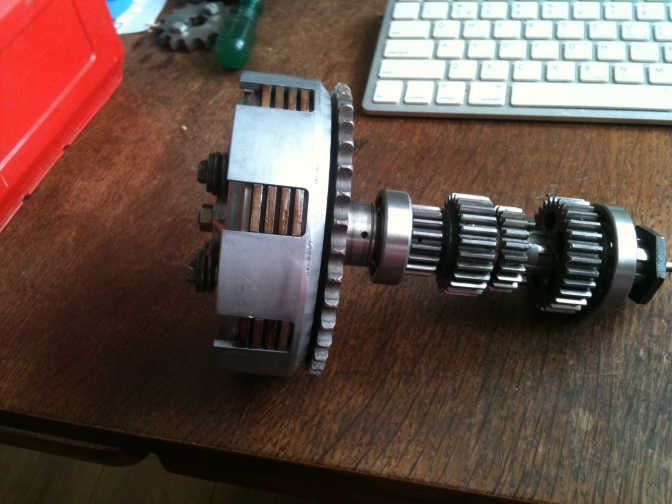
We will start going in from the top of an assembled clutch unit.
If you have what you should have a clutch that has lock-wire through the clutch adjustment screws, snip that wire out.
Then take your modified large screwdriver with the centre part ground out and start by undoing the nuts? Not wired? Oh Dear, are the nuts still there?
You will probably need to release the spring with another flat blade before you can release them then. If not you will distort the springs?
Why: well if you have a clutch that is up to stage three or was it four? of BSA's attempt to stop the clutch springs undoing you have knobbles on everything...
Nuts, spring carriers notched into the pressure plate, and knobbles that wear off quickly in the bottom of these to stop the spring turning in them, non of this so called development worked, and it had taken people that were paid a wage to come up with these modifications over about a five or six year period, when all they need have done like the Scrambles boys and Pat Slinn in developing the WD BSA's, "Lock wire the Bleeding things", like we had done for years on race bikes...
So my tip is literally that, when you buy New springs and make sure they are right hand wound and not left, like I had with one set of Pattern Part springs, the guy could not understand my concern either, You try adjusting them up then I said...
Just round off the sharp edge of these springs so that they don't catch on anything, this will stop then trying to distort if they are free in their holders and give a better feel to the clutch, and then when you have spun the clutch up making sure the pressure plate is running true, Lock-wire the nuts OK...
I have used Alloy pressure plates on a couple of the bikes, of my own design and-ones bought in.
But the only one that works OK is the one on the Four Plate C15T,
The others fitted to the Five plate clutches I have removed and refitted steel ones.
I think the Alloy was just too stable without distortion like the steel plates, and with the extra distortion you get with the Five plate conversion, the steel seems to work better.
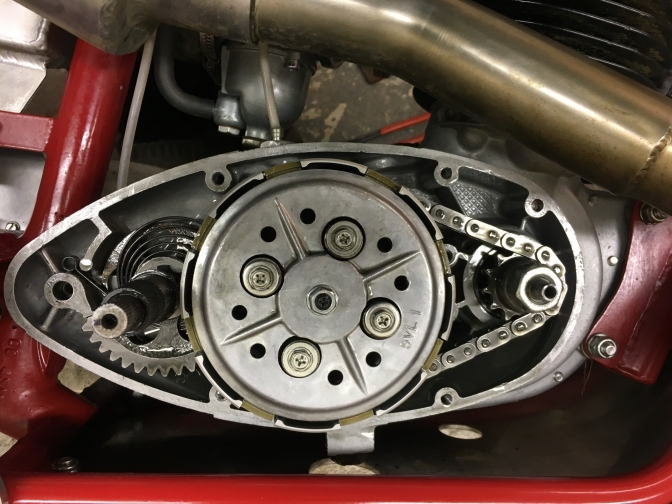
Right you now have the nuts and springs removed haven't you.
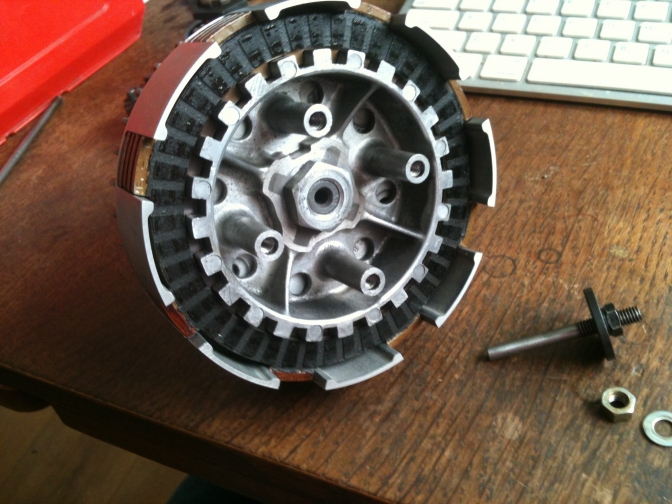
Take a look at the pressure plate, is it shiny all over the pressure surface? If there are little black patches the plate needs truing and facing, best done on a facing table. Also check around the edge of this pressing because sometime you do find small cracks, if you do bin it, some nice chap in India will be making New ones.
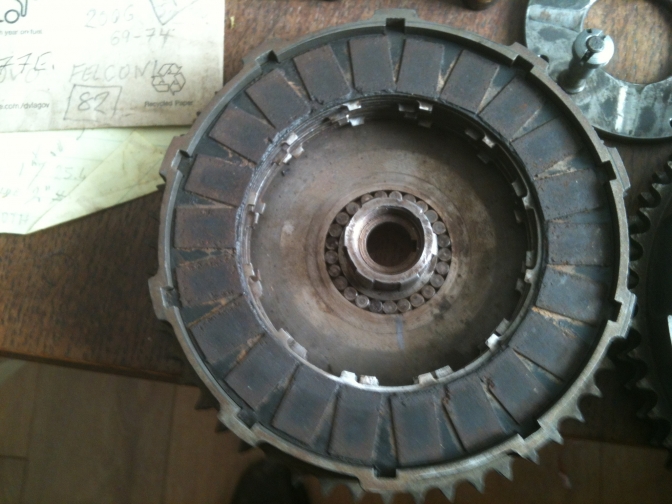
Remove the plates, not easy unless you have a couple of little magnets and then it is simple.
Worn out? Probably, with missing lining and chewed ears, and again if the steel plates have black patches and chewed ears, they need replacing too.
I take it you already have the clutch off of the bike? If not use the proper puller to do this, they are cheap and save one hell of a problem.
If you are replacing all of the plates do so with the best you can find, and if you are using the bike for frequent competition, fit something like Surflex as these should work better and last longer.
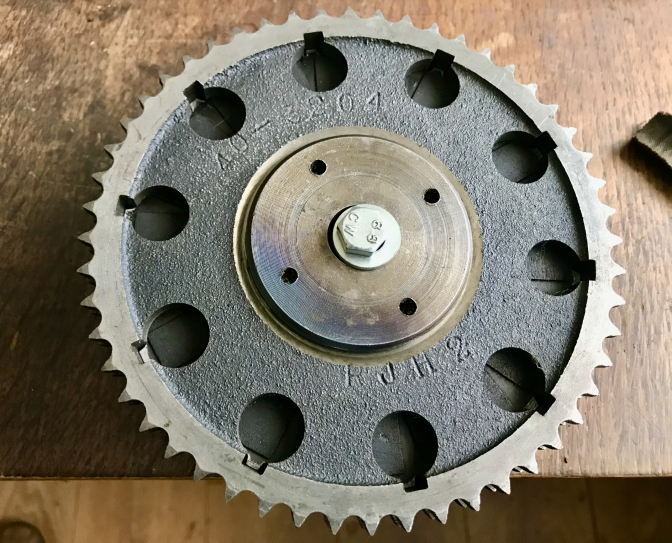
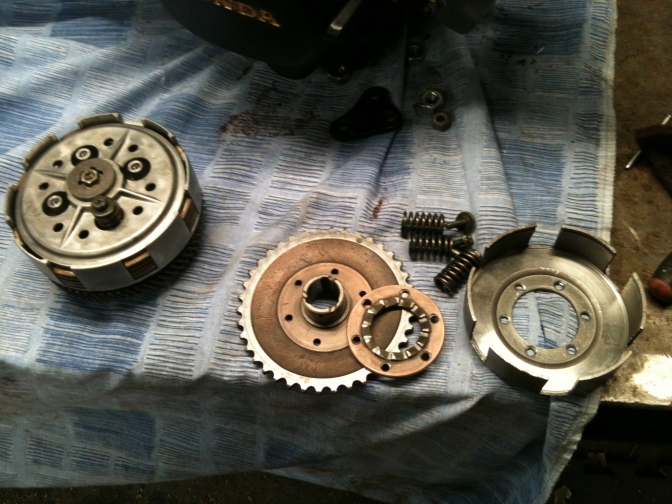
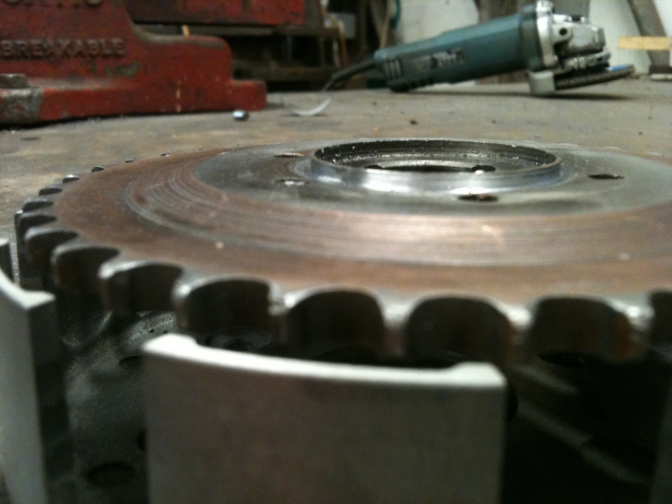
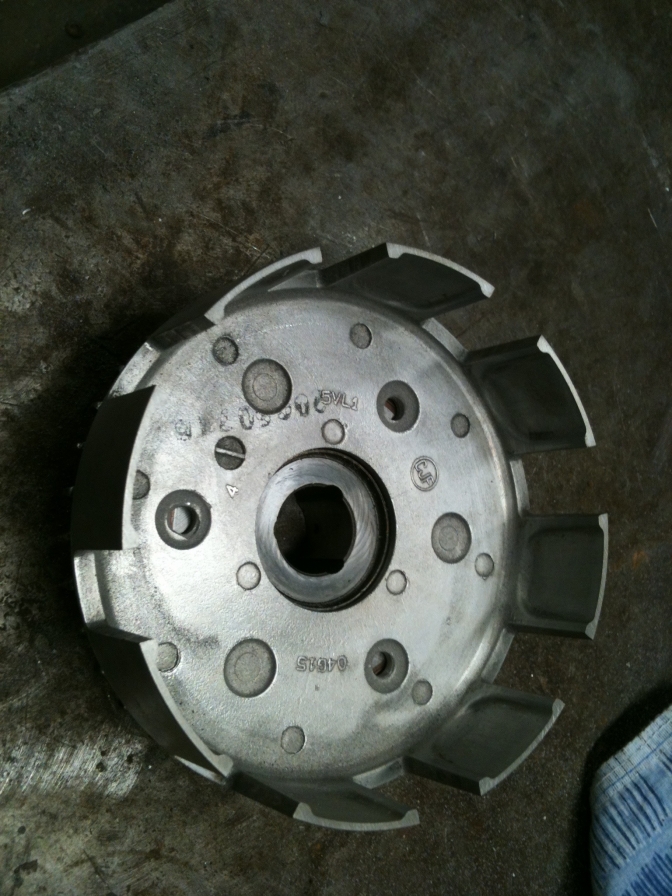
Right, you now have the hub and basket-chain-wheel assembly don't cut your hands on the sharp sprocket teeth? Bet it was running out of line.
Have you lifted out the hub? and dropped all the 25 rollers onto the floor?
If it came apart that easily you will need to Loctite it back in on assembly.
If not just gently tap the centre from the hub with a soft drift, and watch those rollers, even though you will probably replace them. But one might come in handy if you drop a new one.
Right you now need to check what you have, clean all the parts up with cleaner and then you can take a proper look.
If the hub assembly has any movement, and it will, this needs to be stripped too.
The screws will have been riveted over or if it is a B50 they are rivets.
But if they wont budge drill the screw heads off, I have found this easier, then you can screw what remains further in remove the burs and then unscrew you will need 2BA countersink screws 1" long to replace these.
Check for any excessive wear on the parts, if the hub has suffered with notching, and it is not too bad, this can be dressed with a fine file. But you will of course make the slots a bit bigger. Throw the rubber Smarties away and buy new, seriously if you put the old ones back you will get more rapid wear.
Check the spider and centre for wear next, if when refitting the clutch and you get too much end float, you can face off the spider to bring this back in line. "But they all do wobble sir, and that's an end to it".
If you have the Four-plate clutch this will have the smaller centre, about 55.48-55 mm.
These seem to wear less than the more aggressive Five plate, less pressure and distortion I feel.
Check the roller track, and the one in the chain wheel if it is to be used again, and make sure the hardened ring in some of these, (and there are ones without) Pattern Parts again, is not loose, if it is, you may get away with just Loctite-ing it, or if it is good as far as plate spigots are concerned silver solder or bronze could come into play.
The Five plate conversion, and they were all just that, an afterthought of just trying to make something work with the extra HPs of the later bikes without spending on an outside force by now, to design a New unit...
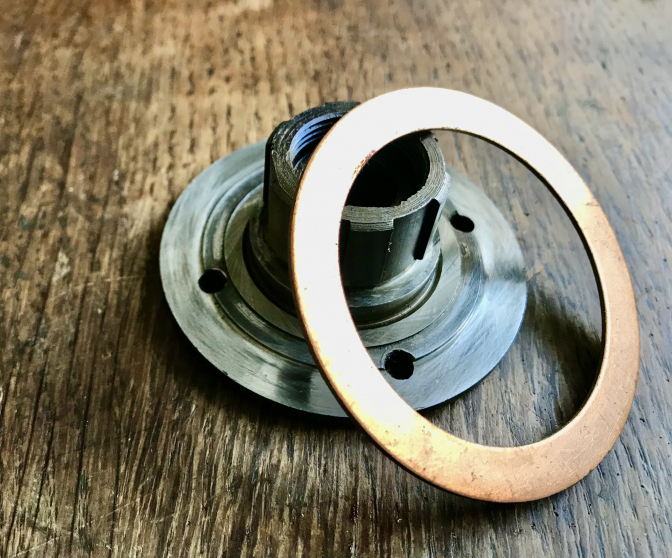
Anyway, the centre is bigger on these at 66.59 mm,(2 5/8")
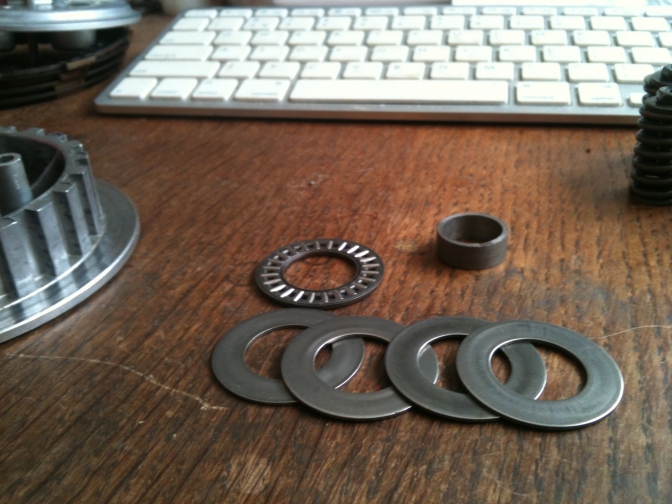
there is a bronzed faced steel washer Part No (57-3931)..."thrust for the doing of" between the "centre-hub-sleeve" and the chain-wheel, to try and cure the wear and the wobble, does it work, not a lot, but it is better than the thing just grinding itself into dust every time you pull in the clutch lever, by the way fit this bronze side down if the clutch is on the bench, and check that you have the right machined chain-wheel for this to run on, or you will be down to your local engineer with a BIG lathe to face this off too...
OK... we have Pulled this clutch apart in more ways than one, so part Two will be sticking the thing back together, and trying to make it work the best it can.
Part Two. BSA Single Clutch
Putting the thing back together.
So have you got all of your New bits that you ordered, or bought from ebay?
What did you replace and what did you keep?
I must say a couple of times I thought I was being clever and purchased two clutches complete for B25’s that were said to be in good working order, but when I took them apart they were hardly any better than the ones I had removed.
One was from a Mr. Stanley Wonder! I have often wondered if he had a famous brother?
Right bottom up this time.
If you are using the same centre hub sleeve? Part No (57-3929) I hope you checked to see that the keyway and the taper were OK?
Right grease the roller track and stick on the 25 new rollers you have, not 23 as I have heard told, if you have a gap and one roller turns over, you have a nasty noise and another wrecked clutch...
And I hope you checked that on your Five plate there is a thrust washer (Have you tried getting these?) I will have to have a word with my cousin in India, or the one in Taiwan.
Right gently turn on, yes turn! the checked out, or New chain wheel over the rollers. Stage one. Simples.
Now did you strip down the Hub or was it OK?
As I have said I have dressed these, and faced off the spider back until it is the same level has the bottom plate of the hub, this should help with saving a bit of wobble.
And if the parts are New just check that these match up, don’t take it for granted because they may not.
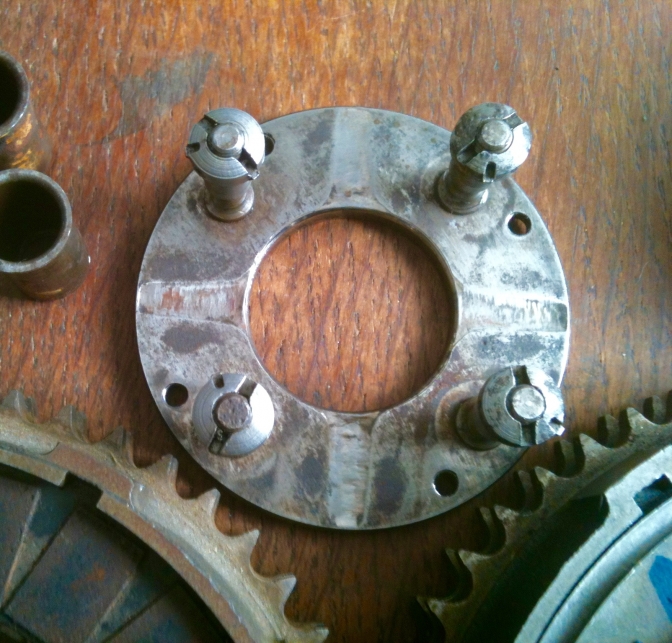
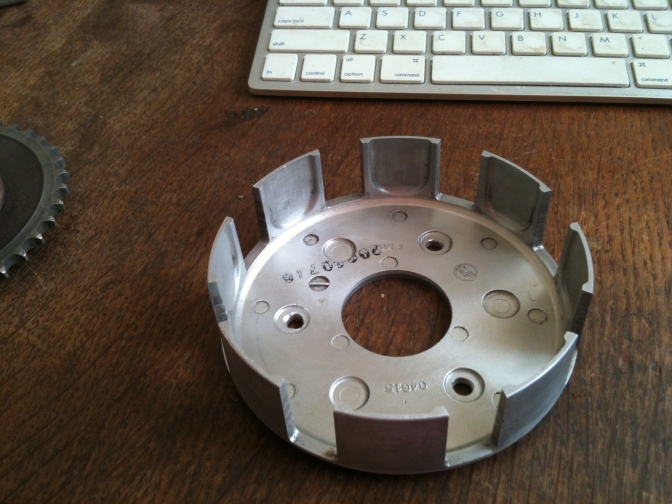
Right if you are using the same stud plate or even if it is New run a ¼” BSF die over the treads and a Tap the same through the nuts. And also run a 2BA tap through the retaining screw holes. Did you order the New screws? Mike Waller would have forgot these...
Fit the new Smarties either side of the spider with the help of a drop of washing up liquid, or soft soap if you have a dishwasher, and don’t do the washing up job manually for relaxation...I do...
I hope you checked that the studs were true as well?
A tight fitting mandrill you have made is the best job for this.
( just drill a hole the same size as the studs into a 6" length of 1/2" steel rod the depth of the studs, lower this over the studs and work gently back into upright)...
You can now screw the hub assembly together with the New 2BA Posidrive screws or did you get slotted? I sill can’t seem to find Allen screws with this thread.
Fit the hub onto the centre, pulling the two parts together with a large nut and bolt (1/2") and a couple of clutch retaining washers. And watch those rollers are not popping out. Put the 1/2 inch Bolt into the vice and one washer, lower the chain wheel centre over this, place the hub on, then another washer, and the nut, and gently tighten, you should not need that much pressure, but if it just slides on you need the Loctite.
I find it best to build the rest of the clutch up on the bench as a dry run, and then you can spot any fault before fitting it onto the bike, and you can also get the parts to go together sweetly.
Plates should all fit without force and be smooth.
As I have said I knock the sharpness off of the New springs,(with a file) and yes fit New.
Because we know we are going to wire the nuts don’t we?
If you have difficulty starting the nuts onto the spring studs.
You can make up a tool that just screws into the top threads with a lock nut, short shaft and a Tee handle It does work and you never have springs and nuts flying all over the workshop, and spending a half hour looking for them.
Once you are satisfied with what you have put together. And I am fussy, the next stage is fitting the unit onto the bike, checking the chain line, and trying to set every thing up so that it works without clutch slip or drag. And also feels light and smooth on the clutch lever.
Part Three will be this.
And seeing what alternatives there are.
Part Two "B".
Five Plate Conversion.
Right you have a Four-plate clutch and have time on your hands to play at engineering...
"I will turn this Old clutch into one like the BSA"Works" boys used for a while", you say...
So what do I need, spending the less cash as possible?
Well, I take it you have a serviceable chain-wheel, centre with New rollers? Come on, you are not that tight surely?
And a couple of-sets of old plates that you can juggle to find the best.
So next step is to strip the hub out and dress it with a file, if it is not that bad.
You then need to take it along to your mate with a BIG lathe, and if you are really flush and have bought a New larger centre (57-3929) you need to take the chain-wheel along too?
Right your mate has plenty of time on his hands to play with his big lathe, because they are never busy, this type...
I hope you took him a couple of cans along for payment?
Well ask him nicely to turn off the last plate retaining spigot so that it is flush with the rest of the hub, and to face off the back of the chain wheel a bit larger than the area already done, so that the New hub and bronze faced thrust washer you have taken along has something smooth to run on.
If he refuses to cooperate with you, you needs to revert to Plan "B" and grind the spigot of the hub off and it realy is Plan "B". As for facing the chain-wheel forget it. Plan "B" for this is to use the original centre and hope "it don't wear out too quickly."
Right you are on a roll now, get your heap of plates and select the best and start assembly,
(I take it you have put the new rollers on the centre and "turn dropped" the chain-wheel over and pressed in the hub, with the "bolt press" I said about?)
You bought new plates and the extra drive plate Whoow.
(4.2 mm thick)
So drop the first drive plate into the bottom of the chain-wheel, well it works but what a waste, I sometimes use a plate with some of the friction pads missing on one side, Yes I know it makes it then tend to not distribute the weight evenly, but by how much? And half of them are over holes in the chain wheel anyway. But if you are contemplating doing a SIX Plate conversion? You will have to take all the linings off one side, and bend the ears up slightly on the first plain steel plate... Naa! Later...
Right now a plain plate, friction plate, to the top ending with the plain plate, this last plate should be nearly flush with the top of the chain-wheel, but not sticking out or you are in trouble, it wont work, and it will jamb up.
If there is room for another plain plate to bring it level you can fit it, but I am not too keen on this idea, the friction plates you have bought "must have" thinner linings, not 4.2mm thick. It is all about Pattern Parts again some are a lot thinner, and these are the ones you need... For this conversion, if you can call it that...
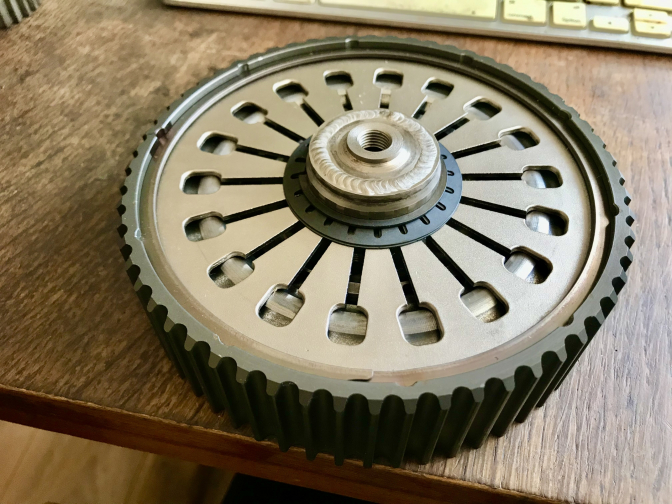
Dry run the rest of the build-up and there you have your BSA "Factory" Five plate clutch...
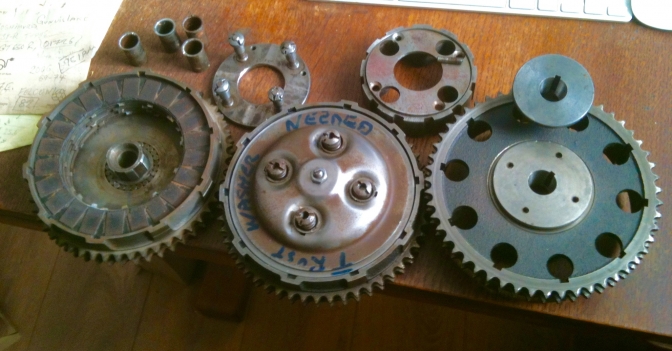
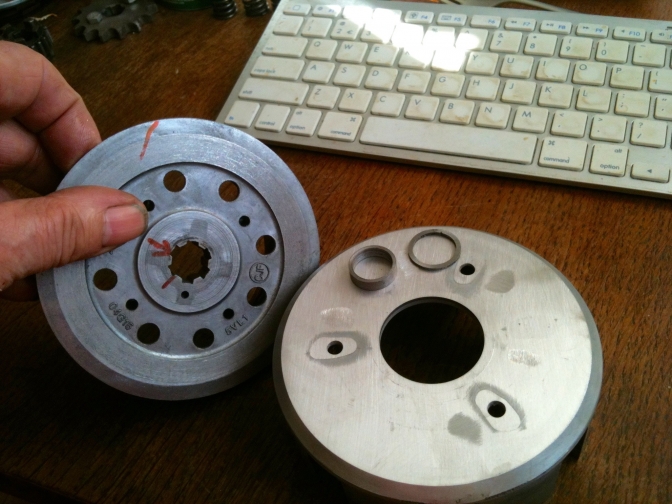
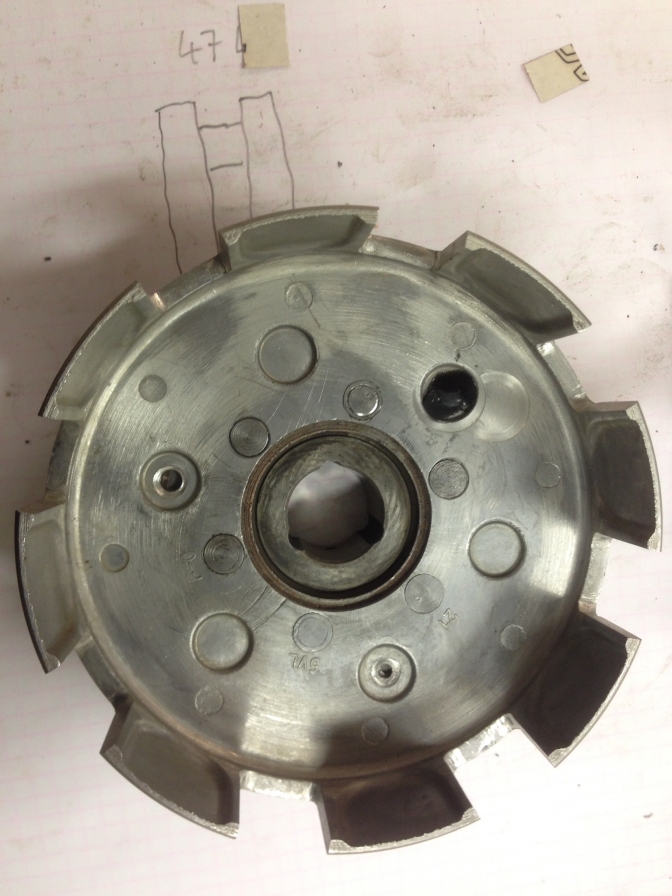
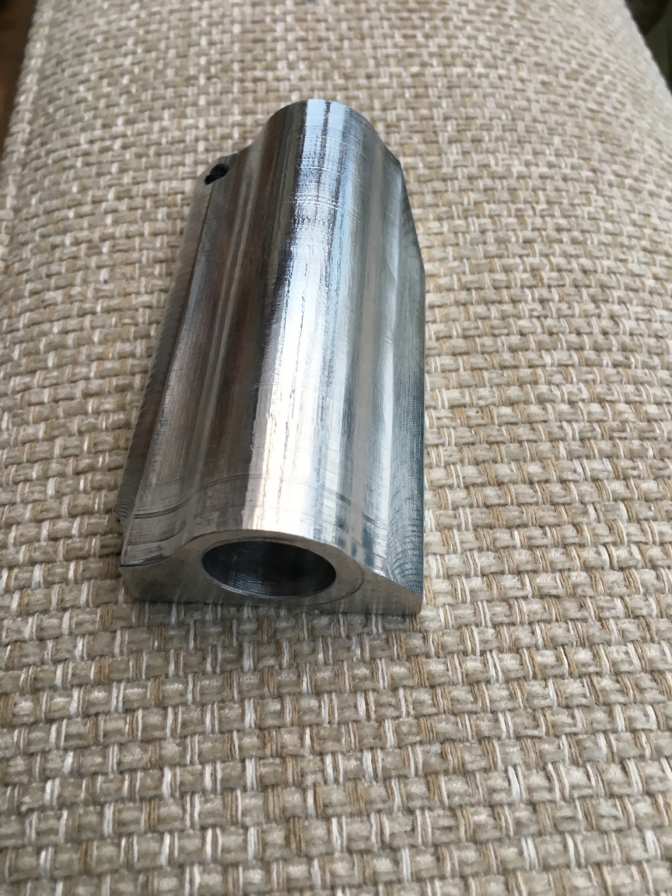
You can see the difference in the size of the two centres, Larger one Five plate, and like it says, Don't forget the Bronze-faced thrust washer.
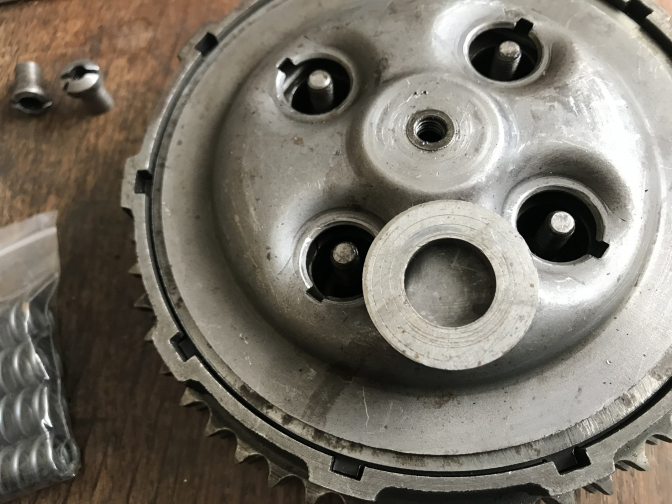
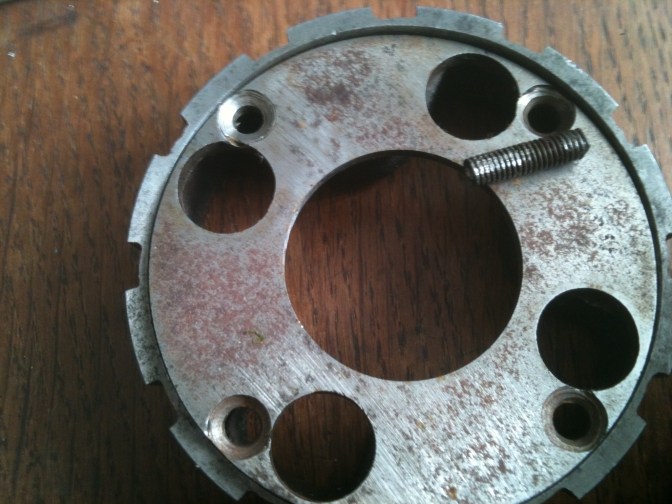
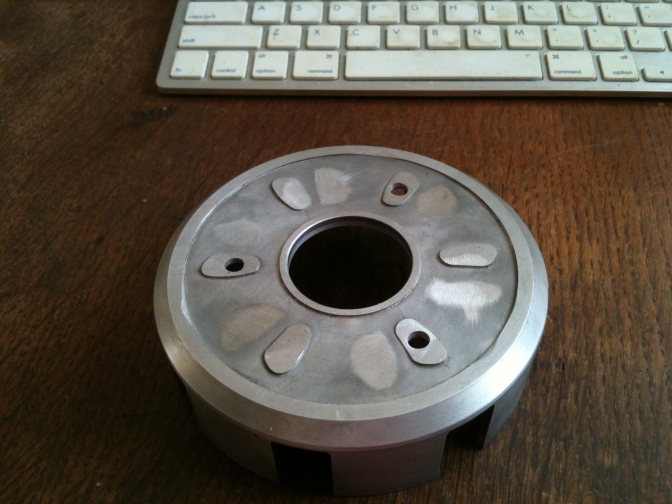
If you tap out the four "Oil holes"? to probably 2BA, you can use four of these bolts to act has a puller or pusher as may be, to part the hub from the centre. Good Ahy... That is if you intend to fit a new thrust washer.
This is a clutch using a Four plate centre on a Five plate chain-wheel. Why? I am experimenting with this to see if I can come up-with a better thrust bearing solution...
The bronze faced thrust spacer, that I would like to replace with a needle-roller assembly... but need some more machining...
This is the thick clutch retaining washer that I have just made a batch of, the originals had a small ridge to help turn up the locking tap but in my mind that compromises the retaining face...
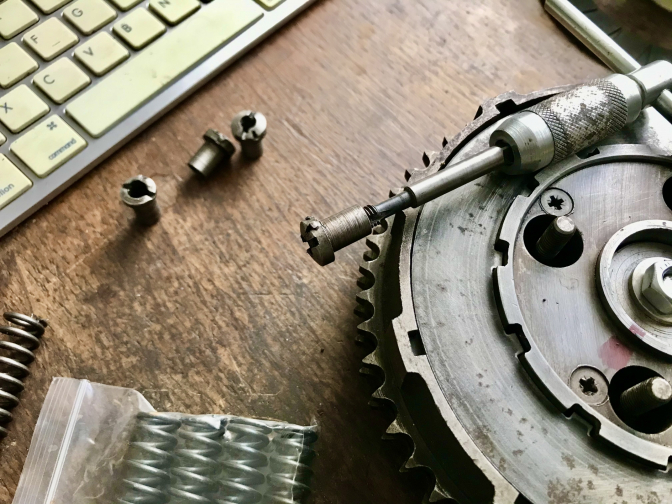
Did you remember to run a tap through the retaining nuts, and made sure they have locking wire holes drilled...
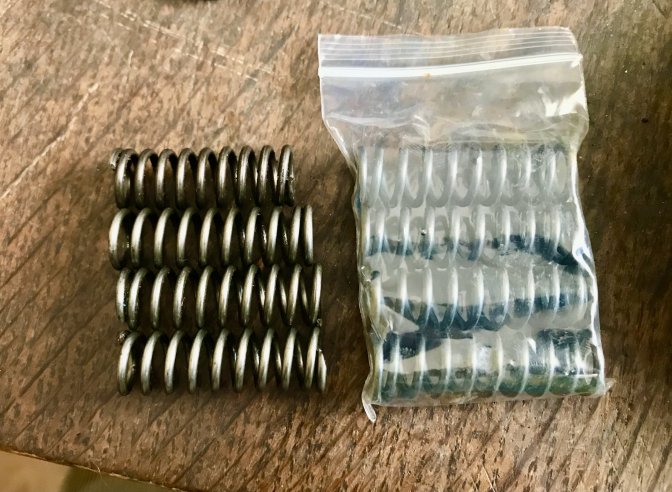
Good old pattern parts again... the springs on the left are from the clutch that arrived today 24/05/2022... You can see that one is too short... the springs on the left are new, but just too long they would become spring bound if you could ever start them...
The fully rebuilt Five plate BSA B25 clutch that arrived 25/05/2022... yesterday after the four hour rebuild...
New chainwheel fitted...
Watch this space.
You can see the drilled out 2BA fixing bolt as stated above, and don't forget to run the threads down on the spring adjusting studs and nuts...
More later, about adjustment, and extending the clutch actuating arm on the side points models.
Just take a Look at the latest Mike Waller Video.
Britannia Motorcycles.
Episode Sixteen, Part Seven.
for a bit of "Clutchery".
~~~~~~~
Hi.
~~~~~~~
Hi,
I did my own Yamaha clutch conversion a couple of years ago using a second hand clutch for £25! In case I’d didn’t work.
I made some steel rivets with countersunk heads which worked fine. I also turned bits off the basket left right and centre.
I got the splines to fit quite quickly, but think I bored out the centre slightly, I also made a stepped nut and counter bored the clutch centre so I had a full nut width of threads.
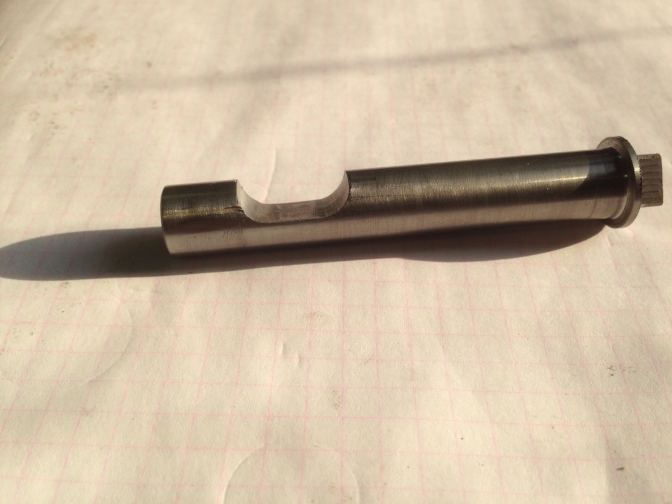
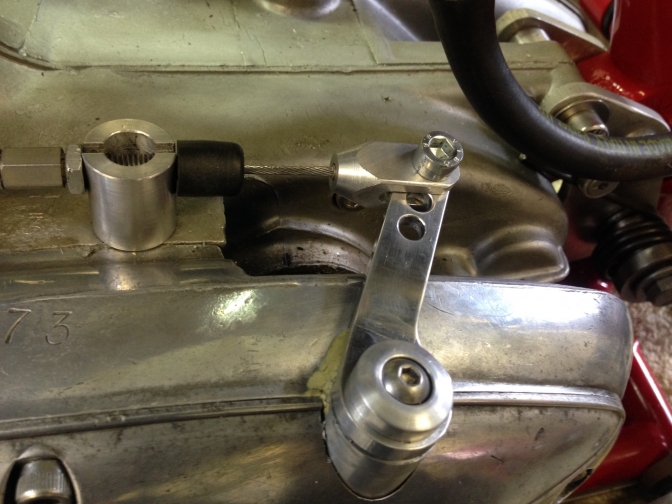
I made a new push rod from silver steel and a custom cam type actuator that works really well.
It’s been in over 2 years now and has done over 50 events without any issues.
Here’s a few pictures
Ian
A little more info ....
The actuator shaft was made out of 12mm silver steel and hardened (I think), the top is machined to fit a standard Bantam front brake arm as it’s just the right length. Charlie~Oo> Like that Ian...
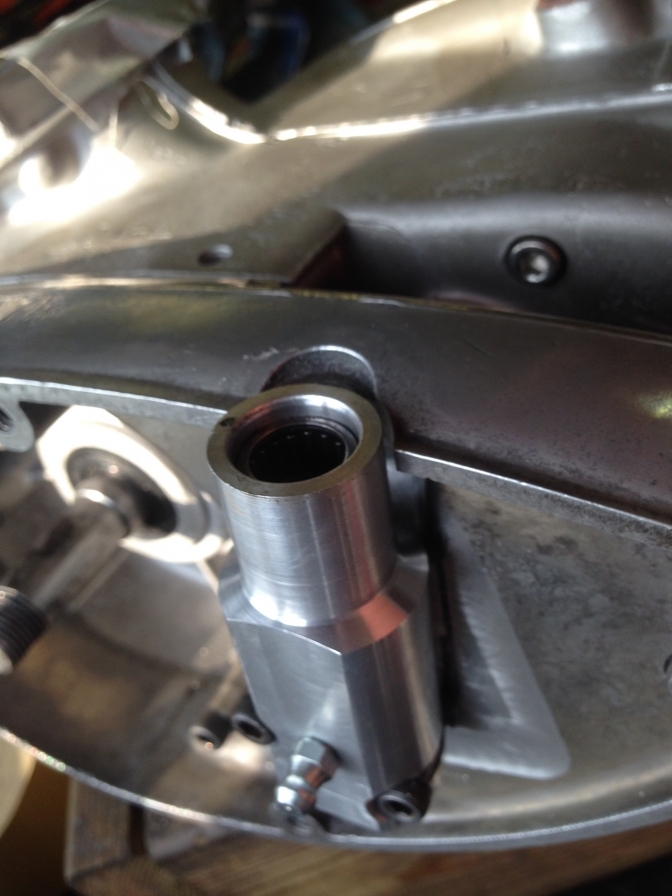
I also fitted a bearing in the outer casing and this holds a nylon shaft that pushes into the gearbox output shaft, there is an o ring on the bearing end to keep the water out. There is a hole in the middle to steady the clutch push rod with an o ring in, to keep the oil in!
Here’s a few more pictures
I was waiting for the wheels at the time so a had a bit of spare time!
Ian...
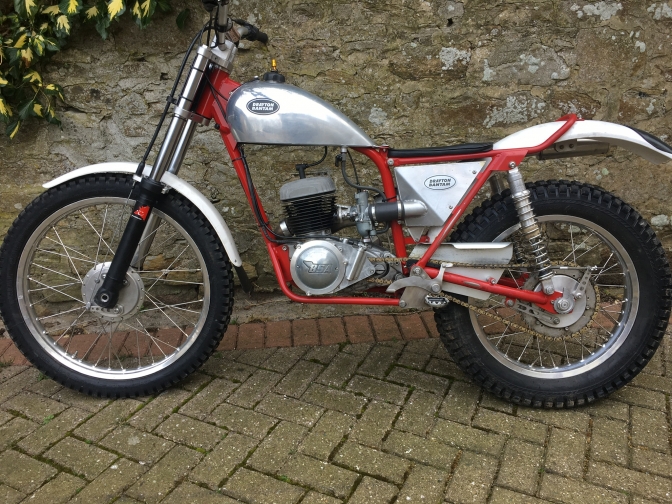
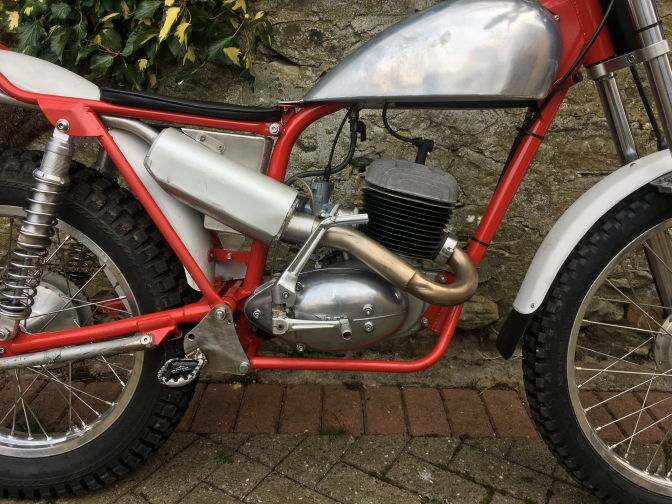
I thought it was time to give the Bantam a “face drop”.....by fitting some bits that were made before 1965!
I’ve replaced the clutch cover and fly wheel cover with Bantam D7 versions, this meant making another actuator housing and machining many bits of the cover, making a mount for the stator, a new outer cover!
It’s about an inch slimmer and looks a bit different.
Here’s some pictures
Ian
| Visitor Counter: | ||||||||
 | |  | |  |  |  | ||