

"Mini-Otter","LO-CU-ScT" Build... Or Mini-Otter number "Three" and "Four"...
Here is the Mini-Otter... Number Three... Lo-Cu-Sct... Resting in the Autumn sun of 2022...
Lo-cu-Sct badge design...
Copyright,© Lee Prescott. --Lo-Cu-ScT.®
24/08/2018. Now I have more interest in the Mini-Otter Super-Cubs, I have decided to use the engine from this project that was abandoned some time ago now, and use the engine in Mini-Otter Three. I will still keep the badge for the project as the engines are a Honda copy, and Honda should have some credit for introducing them into the C90 Super Cub all those years ago. So the build of Number Three will be now on this page. I will leave the original wording on the page, so that you can see the dilemma I was in at that time, when being dictated to by the governing AC-U, before we realised that they have no interest in promoting any sort of motorcycle trials any-more. And as "Number Three" bike is for me to use to show people what the little Mini-Otters are like, because the first two now live in the Isle Of Man, for a while. This machine will be built at Lo-Cu-ScT.
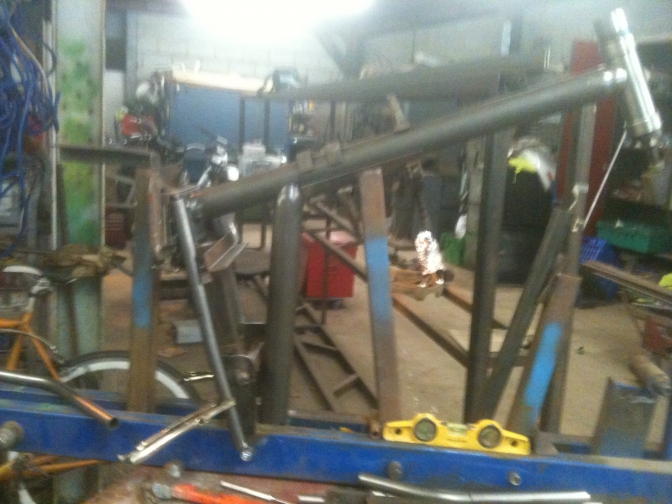
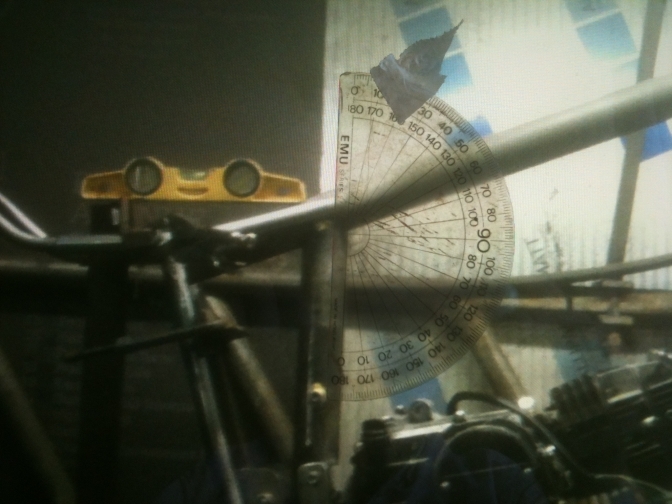
So I have found out all the jig parts and set it back up, as the second frame was going to be the last I built. And as you can see I have made a good start on the frame, as I need this to be a quick build as I have other Otter's to finish. The use of the Joint-Jigger hole saw helped get the two main joints spot on without any filing. I managed to get the angle of the main two tubes right by placing a protractor onto the computer screen, and getting Brian to check that was the right angle by checking the two bikes he has. Well I had lost all drawings I did, and the cad programme from the first set up had been lost too.
Yes 113 degrees was right. And it turned out right when set up on the hole-saw notcher jig. I have again used T45 tube for the main frame tubes, and after bending one of the seat tubes from the same material, decided I would stick to the format of the second frame and use 7/8" 16 gauge ERW tube for the sub-frame as this looked better on that build.
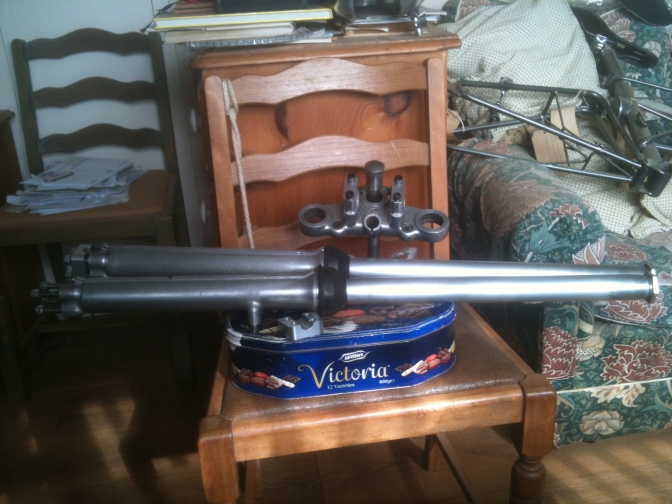
."Mini-Otter Two" With the bolt on under-run rails of Number Two, that tuck up close to the engine to not restrict the exhaust line, this layout with the bolt on footrests turned out to be a very good job. So this is the format for Number Three. I have built a set of Triumph-BSA Four-Stud forks up out of what I had in stock, along with having to buy new billet fork caps and springs, but this has meant that I can put forks on like the first two, but I also have the Gas Gas forks has you can see further down the page, and I may try them at some stage when we Have "Three" up and running.
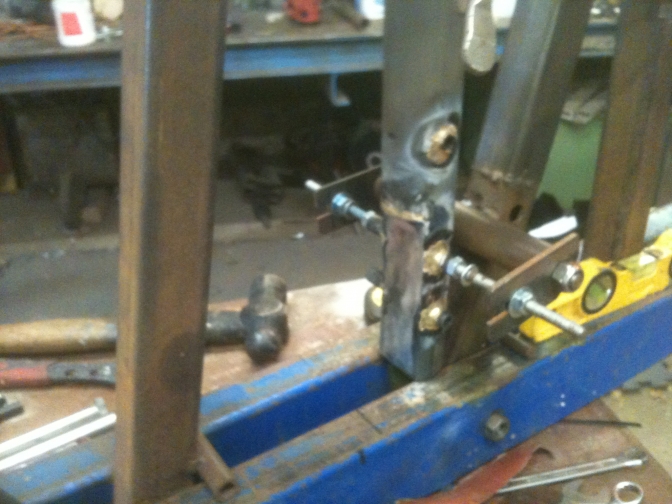
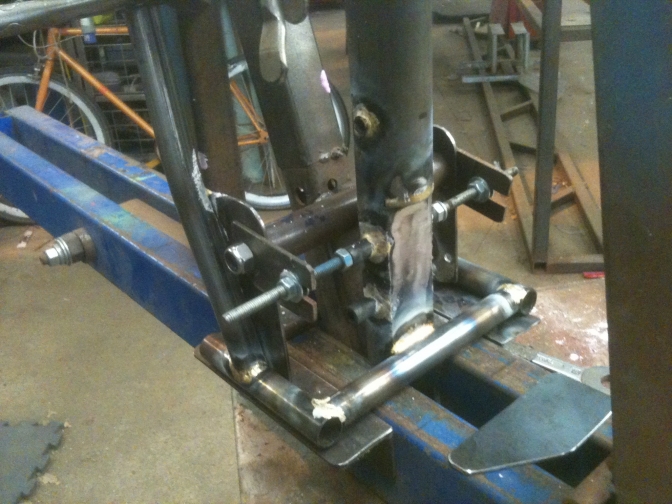
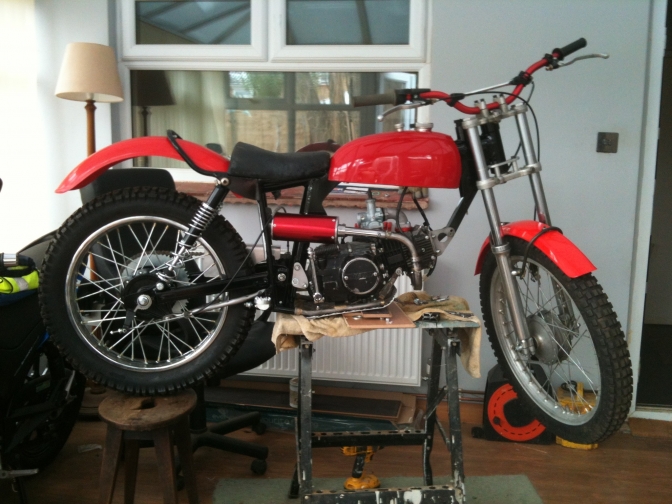
Triumph-BSA Four Stud forks. 04/09/018. So another good week at the workshop, and good progress has been made on the frame Number 3. I have been told by Brian to get this one right, in case we do a production run. So every step has taken longer as each was checked and double checked, and we were not satisfied with some parts, so the jig was altered until it read right. I had Stuart help me all weekend has he now works over here, "Off Island" as they say in the IOM. So that helped in getting things right, he works on aircraft parts all the week and they have to be spot on to a 0,00 of a thou. I worked yesterday re-jiging the footrest mounts and bottom cross brace, and I am now satisfied with this part of the frame. I also made a tube stretcher to get the seat tubes parallel for the rear mudguard loop.
. Seat tube assembly now totally lined up with the swinging arm spindle, and centralised on the jig.
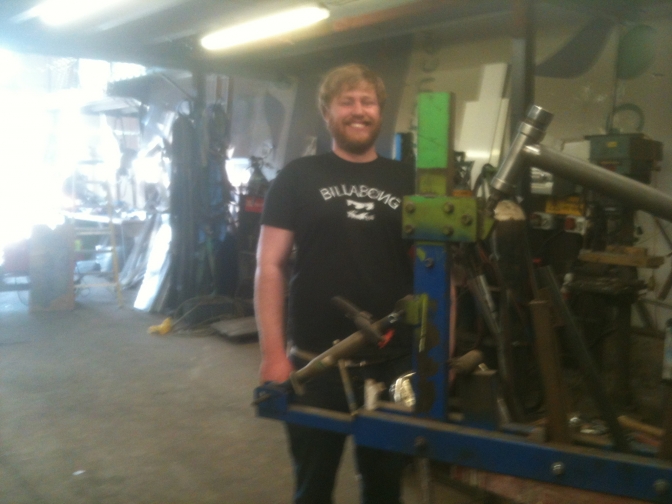
. Stuart Bedford. was a good help all weekend, and we eventually got all of the tolerances right, and to our satisfaction.
So this was where I had got too on the third of Sept 2018. Front down tube and seat loop on Wednesday.
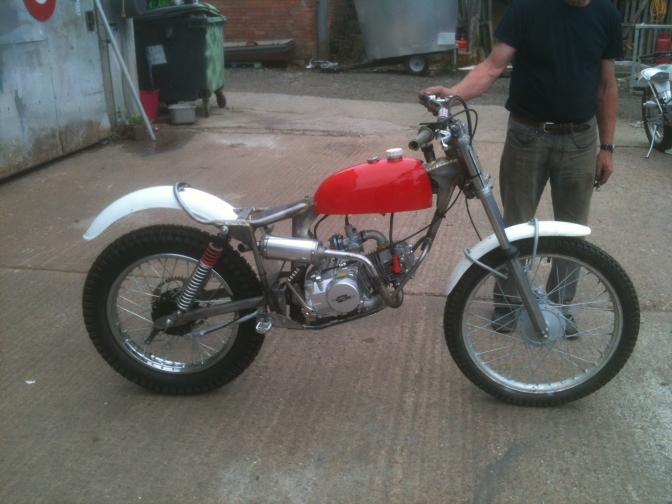
07/10/2018. The frame for the Mini-Otter-Lo-Cu-Sct, is now finished and off to the powder-coaters this next week. I have spent a lot of time on this frame in preparation to do a batch of production frames, so every thing needs to be right if I am using it as the master frame for a production jig to be built from. Son Lee is now interested in the project which is a bonus for me as he has to have every little detail right on the cycles that he builds. So updates on the build later in the coming weeks.
Frame ready for powder coat..........
Now back to the page as it was in 2015. More of the Number "Four" build at the bottom of the page. ~~~~~~~ 2015. Look Guy's this is the bike, I only started to put together a week ago . It was not scheduled as a build this year but, with the ruling by the AC-U on the Sammy Miller Championships, that outlawed the "Mini-Otter SCT" I decided to build a bike using a similar power plant that would be acceptably.
Then while I was gathering parts for the build the ruling was amended.
This means I now have all of the parts to assemble this machine, and it is looking good, with what I have.
The exercise will be to put a competitive little bike together for as cheap has possible, without the need to spend a fortune rebuilding a worn out twin-shock. And a bike to ride out in a trial for fun on a Saturday afternoon in the summer, or on a Sunday morning for the rest of the year, without breaking the bank. The machine will fit nicely into the "Specials Class" at any trial, we are not building it for anything else OK. ~~~~~~~ Just had the forks and New brake plate arrive whilst writing this . So On With The Build.
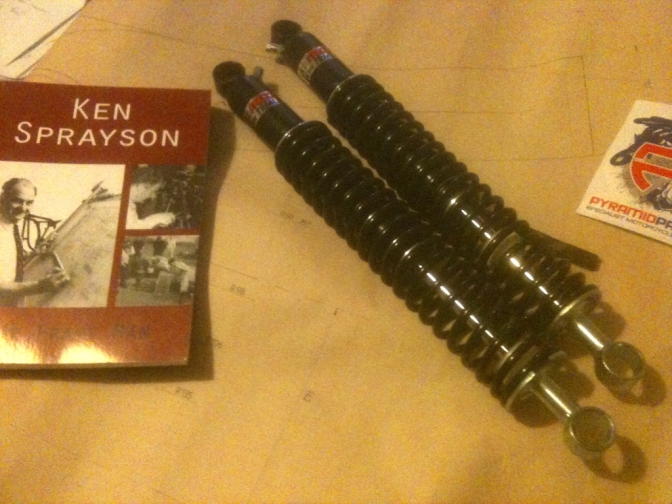
Fourth of Feb,2015 I spent a few hours at the workshop yesterday machining up the steering head sleeves to fit the Gas Gas forks into the TLR steering head, has I had received the 48.5 mm bearing in the morning from Pyramid Parts, the only place to buy these bearings at a superb price.
Today the rear Falcon Shocks have arrived, built to my spec in a week, absolutely first class, we are building this little bike using the the best parts for the best price and these shocks are that in a nutshell. I now need to build the bike into a rolling chassis, before finally deciding where to cut the frame front down tube to fit the New engine I am using.
The whole exercise is to fit this unit without a lot of work! So if any of you want to carry out the same exercise later, it will be possible to do it without major frame changes?
We are working on a kit that bolts to the existing Honda TLR frame needing one hole drilling and two small mig welds. It has taken me over a week to come up with the right system, (in My Opinion), and this should work very well indeed.
If this bike turns out the way I envisage, I may decide to produce the kits for sale OK.
The full build sequence with pictures will follow after I have established the method of doing this job. And a full run down of the cost to build the little bike will be a priority.
Sat 7th March 2015. Its has been a long week working on the frame modification to fit the power unit of our choice into what was a standard Honda TLR frame. Firstly I steepened the steering head angle slightly. That was stage one in the modifications. Stage two, was to remove the lower part of the front down tube, to the length I needed, a new engine front yoke was fabricated to the spec I outlined above, this means the TLR frame is not destroyed and could be re-instated to the way it was originally without a lot of trouble. As I say it has taken nearly a week to get it to the way I wanted and intended. I now have the next week to get the engine mounted into this frame without destroying the TLR engine mounts, It will be done in the simplest manner that I can devise. Anyway here are a couple of photos for you. And yes I have tried the engine into position and it looks fine but want to get it bolted in before putting photos of this up. Next week hopefully and we may get to the rolling chassis stage if all goes well.
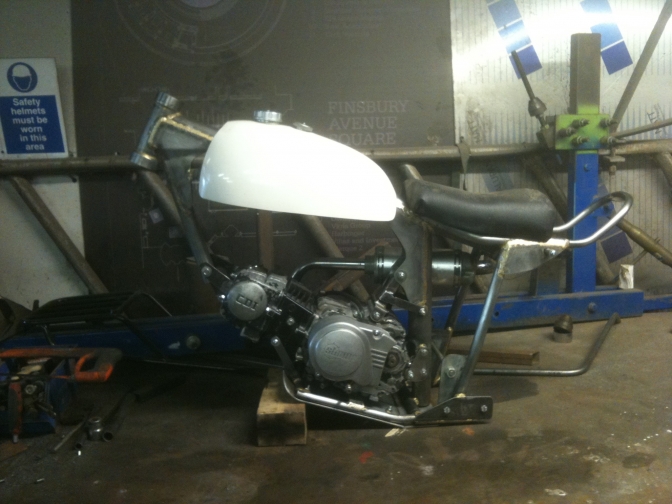
The Classic-Trial tank seat unit is very stylish, and gives a good riding position An Alloy tank will be fabricated to fit under the front part of the tank.
|


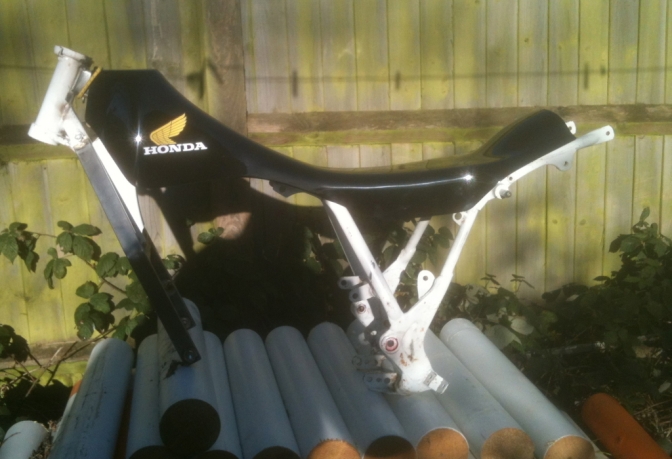

TLR Honda Frame.

OK engine In, the plates have taken me all week to get right, about thirty in and outs so far. But we are getting there slowly.
Rolling chassis next week and exhaust system.
After the amount of time and effort I am putting in on this bike, to prove that there is a way of not spending a fortune on making quite a competitive little bike up, I just hope it rides as well as it is starting to look.
I still personally like the "Mini-Otter" version of the "Super Cub Trials" better at the moment, but things could change when we set up a test for both of these little bikes, with a "Named" rider on them?
Lo-Cu-ScT Build On Hold?
More later OK.
After a week of discussion on Trials Central, there at the moment seems very little point in carrying on with this build in its present form, as the machine will only be alien to most eyes when it is finished?
I think the best way forward is to now fit a OHC Honda engine similar to the one fitted into a TLR or a engine of similar design and manufacture.
This should then allow the bike to be ridden in "Twin-shock" classes without the dispute.
The object of the exercise has again been to try and build a cheaper way into Observed Trials...
But it does seem as there is great opposition to this idea.
Commercial interest decries that you must spend vast amounts of money on your so called Pre65 or twin-shocks, before it is excepted into the fold.
15/08/2015.
The Build could be Back on and having been privie to the photo below.
From Deryk Wylde taken at the resent Dales Trial.
I now have two options but for now I am sticking with the original concept.

This is Peter Gaunt's latest creation.
The engine is a CG125 push-rod Honda, that has probably been increased in volume,
Some of the frame parts look like a TLM - TLR .
Tank and tank-seat cover are from ClassicTrial one of their EVO-units the same that we have for our project...
So this build has inspired me to carry on where we left off, well nearly.
But in a slightly different way, firstly the TLR frame will be made to fit the 250 Lifan engine I have,
As It seems a shame to just leave the build in limbo so to speak.
And I have decided that the only frame for the Pit-bike engines are the "Mini-Otter" ones...
Although I may not build any-more?
But I have got Two New engines sitting here.
More later, when I have given the project more thought.
20/03/2017.
After today on Trials Central and the mails that I have received, I have decided to re-jig this project later in the year, when I can find time.
I also need the use of the cupboard under the stairs back, where the project has been sat since 2015.
So the TLR frame will be put back into its original condition and the engine from our XL185 Honda, will be rebuilt and fitted into this, or the Lifan 250cc.
I need the XL frame for the second Charity SideCar-e project. as a spare anyway.
02/01/2018.
When I find Time
A new frame will be constructed with the same dimensions as the
Mini-Otter frame.
With the top tube of 2" section and contain the fuel like the other Mini-Otter Super-Cub bikes.
A rectangular section swinging arm will be made similar to the TLR,
twin small diameter tubes will run from the steering head down and under the Zongchen engine to the cross tube that the swinging arm /footrest plate is attached too.
Or I may do away with the tubes and mount the front of the engine the same as the second Mini-Otter.
Simplicity again will be the keynote.
But the tubing will be of a cheaper grade in some parts..
When I get the frame built.
A good project to do in my shed at home on wet days.
Second Mini-Otter frame.
And It will be Named a "Mini-Otter Lo-Cu-ScT"
Well as you see from the first article above the number three bike is now built, so we move onto Number Four...
~~~~~~~
"Mini-Otter,® Super-Cub."
"Four"...
Photo's of "Four"...

Mini-Otter "Four" in the dappled autumn sun 2022...

Neat and lightweight little bike...

14/11/2018.....
Well for the past two weeks, and while I felt well enough and the weather was not that bad either, I decided to build another Mini-Otter frame for the Lifan 125 engine that I have had for a while.
This bike would be for me to mess about on and see what the Lifan engine was like, as it seems to be built to a more robust design than the current engines.
I am not saying that there is anything wrong with the current YX140 engines, far from it, and what you get for your money I still can't quite believe the quality.
One or two tweaks on the design front of frame four, you should never decide something is right until it is in your mind.
The jig was still set up for the third frame so that was a good start.
And I had lengths of T45 tubing that my brother had got for making steering heads, enough for about one hundred.
So I used that 2" and that left me needing tube for the subframe, and I was out of lengths of ERW, but had the 3/4" T45 got for another frame, so went back to using that the same as the first frame.
The stuff is that stiff that you struggle to bend it without heat, so two of the bends were done hot and two cold.
This meant I had to make extra bosses for the rear mudguard loop as this would not now slide into the seat tubes.
Other changes were the front down tube, I used 1 1/4" 16 gauge square ERW, as I had run out of round T45, and when done I wished I had used this from the start on the other bikes.
After using the only ERW I had in 5/8" for the seat loop bend, I was encouraged to go back to the earlier engine mounting I had tried using the cylinder-head studs for a front mount.
At least it will prove that the system works or not, this time.
So there we are, I have fitted the engine into the frame this afternoon, pictures below.
I shall have to ease up for a while and then start on the five production frames in the new year, if we get time...

Engine fitted 14/11/2018.

1 1/4" square ERW front tube.

Photo Courtesy Mal-Kew.
This is the first time I tried the front cylinder head frame fitments on the second frame, and then discarded the idea.
Update later and more photos

The seat-mudguard jointer bosses makes for a much more tidier job with added strength to the joint.
These were turned up on the lathe out of solid and then matched to both inner sizes of the tubing then drilled for lightness through the centre, time consuming but a better job...........

Another modification on this frame has been to substitute the bottom round cross brace tube with two 3/4" square tubes bronze welded to the sides of the seat down tube, this makes for a stronger job in this area of the swinging arm......
Footrests on this bike are going to be weld-on as it is for me, and the first bike had the footrests in this position.

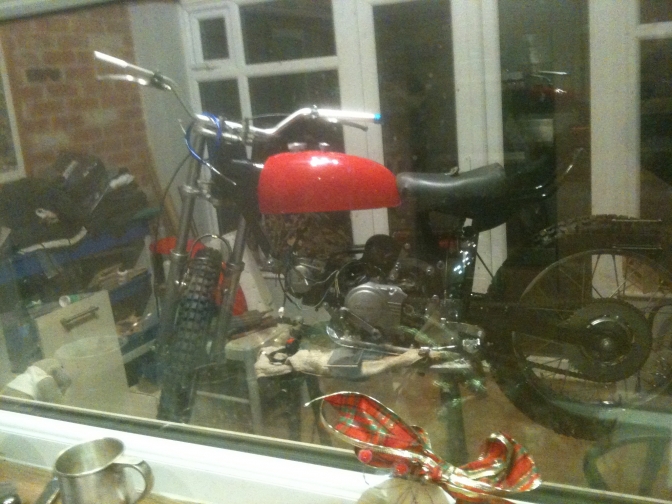
So I got one of the tanks from stock and decided to use that on this build, but keeping the red colour theme but this bike is also having red mudguards, as I have had the rear one since 2005, and it is time it got used on a project.
The Lo-Cu-Sct bike is going to wear a black tank and guards as this colour suits the graphics better.....
More later....
Need to sort out another set of forks, wheels etc, and make two more GF fuel tanks. I have already made a batch of front mudguard stays.

Triumph-BSA Four-Stud fork mudguard stays.

The last time I used a square front frame tube was when I built the SQ frame many years ago.......
04/12/2018..
Well at the end of last week I took the engine and frame back to the workshop to finish the last few welds on the frame, and fit the footrests and brake pedal...
And also fit the under-frame and bashplate that I had started two years ago when I tried the cylinder head mounting before, anyway this time I have modified and fitted it.
So just the swinging arm to do... And then I bring it home for painting with Por15 like the first frame, and hope to assemble the bike over the holidays....

Footrests on, and under-frame fitted....

I think this brake will work, it has taken six different attempts on the four bikes built to get this far.... Development I think they call it....

A better shot of the rear brake assembly...
02/01/2019.
Brother and I spent Christmas eve priming and spraying the frame of number "Four".
I did the sanding and masking and left him to do the spraying, primer Christmas eve, topcoat Black on Christmas morning...
Why I hear you say.. Well Brian was over from the IOM on Boxing day, so I nipped over to brothers to pick up the finished frame so that we could build the bike up over the few days he was here.
On the 27th December 2018 we set too, to put together as much as we could, building a pair of forks from stock.
Friday I spent the afternoon machining up the wheel spindle spacers, in the workshop.
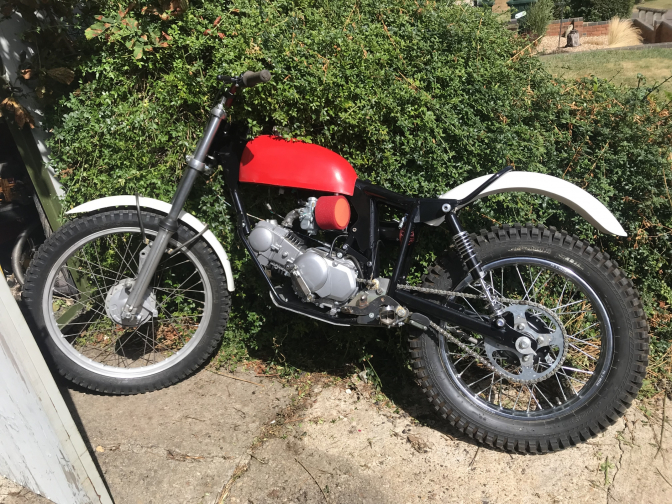
By New Years eve we had a three parts finished, machine.
I just have the fiddly bits to do now...
I hope the rest of the builds this year go as well...
You will note that "Mini-Otter "Four"... has been nick-named "Lego"...
(Well that's what you get at Christmas...)
Made more progress on the "Mini-Otter "Four" project.
Now I have most of the remaining parts on the way after the Christmas break.
And have spent a couple of afternoons catching up with the finishing jobs...

Getting there.......

We Have got on well with Number "Four" this week, and should have it running next week. And then to build up Number "Three"..... I always did work backwards.......

Here is a better photo of Number "Four"..
Just got to make up a longer clutch cable for this one, as the clutch is primary (on the engine shaft) on the Lifan engine, it will be interesting to see which works the best this, or the ones on the gearbox shaft.
More Later.......2021
Updat2026...03...23...03...
| Visitor Counter: | ||||||||
 |  |  |  |  |  | | ||