

| BSA Unit single, and Triumph Cub Gear Change Shaft Replacement.
Video at bottom of the page...
The difficulty I have found trying to find a decent gear selector shaft with the splines still in tact is very near impossible. And now after carrying out this shaft replacement I understand why? Well the forged steel used is very soft and the slightest mistreatment to the splines will destroy them. Well there are some replacement repair shafts drifting about the Net, probably from the Wassell catalogue. So with the need to replace one of these shafts, and seeing the bodge that had been carried out on the engine I had just bought, with an attempt at using one of these shafts, I thought I would have a go. So the photos and captions underneath should show the way I went about the job. And it seems to have turned out OK...
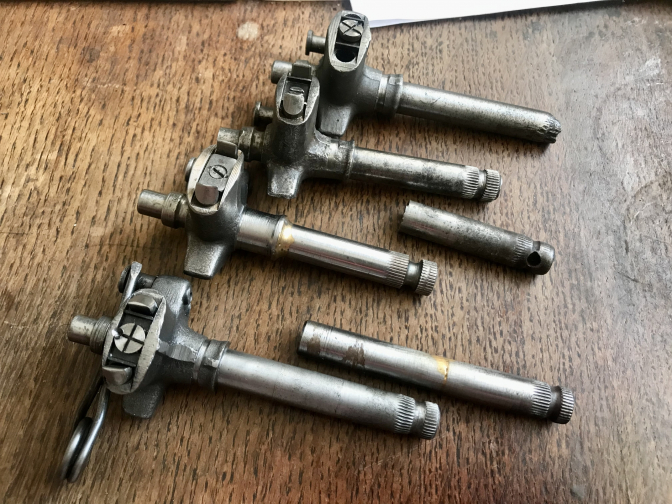
A Collection of shafts to repair...and some lengthen...
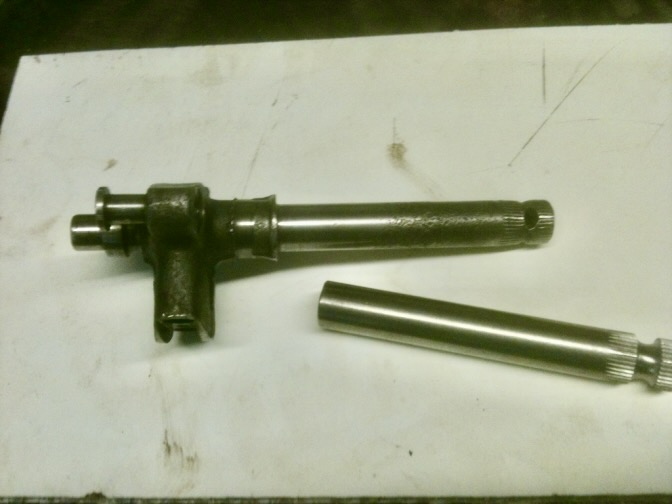
You Can see the damage to this shaft! splines all but gone and a hole drilled through to use a split pin instead. And the New replacement shaft.
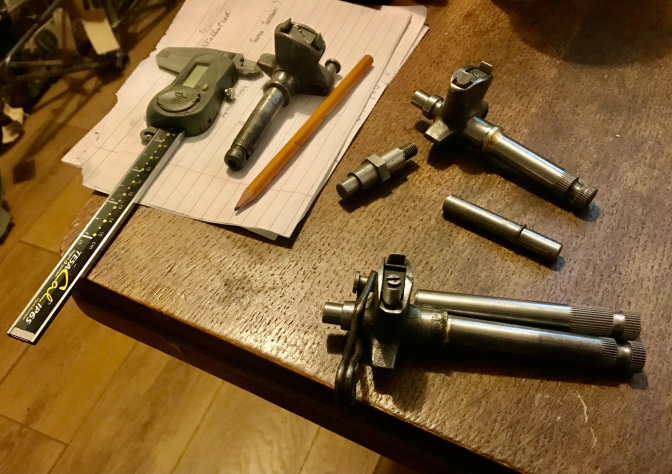
Before you start to do this opperation, measure the length of the shaft you need to end with, it is so easy to do all this work and make the shaft too short...
|
I firstly removed the spring stop spring, by gently taping it out with a small drift?
This is so that I could fit this end into the chuck on the lathe.
I then took an Hacksaw to the old shaft ( Yes it is that soft) sawing it off close to the boss.

Holding the Boss in the chuck of the lathe was tricky, making sure the flat of the 3/8" shaft was pushed up firmly against the jaws of the chuck.
I then centre drilled the remains of the old shaft, before drilling to the measured depth with a small drill, then drilling again with a bit bigger drill, increasing the size four times, before drilling out to the correct 1/2" for the shaft.
The stages of drilling were carried out, so not to put undue pressure onto the turning surface as the hold by the jaws was not that great, and it was better to be careful rather than sorry.

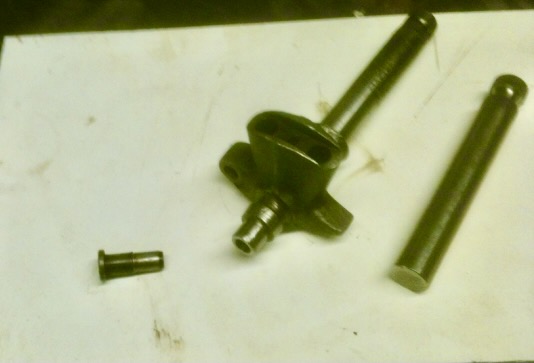
The shaft was then fitted into the boss, and the length of fit checked, and also trueness of line.

The heat used to braze this stub into the casting looks more intense in this shot, but as long as you let the item cool slowly the heat dissipates without causing problems.

The boss was gently clamped in the vice and the shaft painted with brazing flux before heating and brazing the shaft into the boss.
This was then left to cool while I walked the dog before it got too dark out side.
The shaft was dressed with a file and emery paper in the lathe and once again checked for trueness.
The spring stop was then pressed back into the boss, and "Job Done" ready for refitting the plungers and springs that had been removed at home.

Another part recycled. Good Hey.

There you go Mel's picture is better than mine .
But you should see the Snazzy Phone he has,
Well he is still looking for the old one he put down about a month ago, teach him to be careless, But that is a good Picky.
Much more recycling later.
updat2023...04...
- 2026 News Page...
- 2025 News Page...
- 2024 News Page...
- Ask Me.
- Contact Me.
- For your comments.
- BSA Otters FOR SALE and WANTED
- CLASSIC Bike Parts FOR SALE
- A Readers Page. Letters ETC
- Pre65 Survey page Yes No answers
- NEW YouTube Channel
- 70 years of AW Charlie Prescott Are you ready
- Lockdown Food Recipes
- The Richy Vida Page...
- A BSA B44 Foster Otter Trials bike build.
- Adventure Camera's
- Allan Jefferies XL 250 Honda.
- Ally Clift Where the Otter Story Began.
- Alloy fuel Tanks Methods of construction
- Amal Mk1 Concentric Rebuild.
- An Australian BSA Otter Build.
- Andrew Paxton's Winning Cotswold BSA B40.
- Another String To My Guitar.
- Ariel and Noriel Project.
- Ariel HT Factory Build...
- Ariel The other GOV's
- Aspen Fuel.
- A Tigress Tale
- Back to the Future The Foster Otter Returns
- Back Of The Shed. Ariel.
- Bantam Trials Saga.
- Big Fish In A Small Pond...
- Bill Todds Square Deal Special
- BMCA Year For Al....2019-20
- BMCA 2018-19
- BMCA Best Of British
- BMCA Film Camera Action
- BMCA New Season Film.
- Bob Forrest Faber Mk 3 B40
- Bonkey's Bantam
- Brian Browns Project 8x4 Peng Jian.
- Brian Martin and the Works BSA C15 T's
- British M&M trials scoring system
- Britannia Motorcycles BSA Frame Conversion
- Britannia New Projects Page With Mike
- BRITSHOCK'S Tools Of The Trade.
- BSA Bantam Rear Hub Made Wider
- BSA Bantams REDT1 and REDT2
- BSA B40 From Army To Victor-Y
- BSA B40 776 BOP
- BSA C15T Trials Test.
- BSA C15 F engine Build Duplicated
- BSA C15 Dizzy Upgrade To F type Conversion
- BSA Comp Dept's Last Stand. 92 HOH sidecar
- BSA New Trials Engine Build.
- BSA Otter Dot Coms Foster Framed C15
- BSA Otter OC Project
- BSA 300 ex works trials bike.
- BSA 350 the Elusive one
- BSA 's 2016 Manx Classic. Plus RAP Bantams
- BSA Unit Single Gear-Change Shaft Replacement
- Carol and Harry Fosters Triumph Metisse
- CCE Design Made In Italy.
- Charity Begins at Home
- China Jialing eRanger Ambulance and Pikilily
- Chris Leighfield Sprite to Vibsa's and more
- CLASSIC OFF-ROAD REVIEW
- Classic Trials Bike Scene a Monthly Column
- Classic Trials Show 2010 New Photos.
- Clutching At Straws Unit Single BSA Clutch
- Colmore Trial Revistation.
- Cotswold BSA s
- Cotswold Majesty trials bikes
- CoTTon Trials Mini
- Dave Wood's 320 Garelli trials
- Dave Wood's Mk3 Faber Otter BSA Build
- Dave Wood's Sherpa198 A Rebuild.
- Dave Wood's 1970 Bultaco Sherpa Model 49
- Dave Wood's Page.
- DeLong Way Round.
- Deryk Wylde Factual
- Deryk Wylde Off Road Review.
- Diamond Dave Langston
- Diego Bosis 125 Fantic
- Dirt Doc Guide to Twinshocks
- DIY Otter Frame Build Page.
- Don Morley The Name Otter .
- Ducati Trials bikes.
- Elstar Motorcycles 1965 to 1971
- Etienne Willems OTTER build page.
- Faber Frames 2020
- Faber Triumph Cub Project.
- Felix Eggenschiler's Foster B40 BSA Otter.
- Fiction or Fact BSA250
- Fitzroy What Have You Done.
- Five Very Rare Italian Trials Bikes
- For Beta-Or-Worse...
- Foster Otter Frame Register...
- Fraser Honda... A forgotten breed.
- From Russia with L ove
- Gallery A few BSA OTTERS to view.
- Gallery
- Gary Britton's Ariels..
- Gary Britton's BSA Faber Mk3 Otter Build.
- Gary Britton's Second BSA C15 Build.
- Gary Britton Number Three.
- Gary Britton Builds Bike Number Five
- Gary Britton builds a BSA B25 Trail Bike .
- Geekies Gizzmo Gaunt Suzuki 120
- Glass Reinforced Plastic Tanks.
- GOV132 Is Lost it is Gon
- Graham Dale's BSA BanStar
- Graziano Candidori's Wassell Triumph Rebuild
- Greeves BSA C15 T build
- Greeves Trials bikes 1958 to 1965
- Harry Stitt BSA Otter.
- Henbest Family BSA 's
- Herberts Austrian Built BSA Otter.
- Herbert's Second 87 KG BSA Otter Build
- Herbert Poelz BSA Bantam Builds.
- HJH Motorcycles Made in Wales.
- Home James
- Home James Too...
- Honda RTL 250S Trials...
- HOO 66H is Lost.
- Ian Ballards Foster Triumph
- Ian Ballards Page
- I Pad ETC 2016 2017
- IPaddled 2018
- Jialing JH125 rear wheel Transplant.
- Jim Susans BikecrafT
- John Draper Cotswold BSA & Replica
- John Hand Racing
- Justyn Norek's Greeves Anglian...
- Justyn Norek Jr Tests a CCM 350 Trials.
- Justyn Norek Junior's Triumph-Greeves.
- Justyn Norek's Whitlock Framed Ossa MAR
- Kerry Kebuna Stateside BSA Otter
- Len Hutty Just A Star.
- Lexmoto Assault A Star Is Born
- Like Finding Hens Teeth
- London Olympic's Penfold Pillar-box.
- MECATECNO MR 326 TRIALS BIKE
- Mick Andrews Ossa MAR Prototype Replica
- Mike Hailwood at the 1978 IOM TT True Story
- Mike Hailwoods 1979 IOM Formula One Ducati
- Mike's Back Of The Shed Build
- Mike's 500 Triumph Otter twin Build...
- Mike's BSA C15 T Copy
- Mike's Enfield Trials Build.
- Mike Mill's Legend Frame
- Mini-Otter Super Cub Project.
- Mini-Otter SuperCub Two Project
- Mini-Otter Three & Four LO-CU-ScT Build.
- Mini-Otter Five Six Seven
- Moto Parilla 175 Classic Trials.
- Moto Guzzi Trials Test.
- My BOK 228C Replica.
- My Very First Bike Tale
- My MK2 Faber Otter
- My Seven Best Builds BSA.
- Nelsons Column Bike Lift.
- Nick Draper the Return and TY Yamaha's
- Norman Hanks Big Beam Bantam
- Norman Trials Bikes B2 to B4
- OK Let's Build A BSA Bantam Trials Bike.
- Otter On The Cheap.
- One Off Trials bikes.
- One Step A Head
- Out On A BSA Prototype
- Painting Your Otter Frame.?
- Pat Slinn A Working Life with Sport Bikes.
- Patrick Elliott Honda one Off
- Pete Wright's Foster Otter.
- Phil Ives The Tale Of The Otter
- Pre 65 Rules.
- Reader's Gallery.
- Richard Clarke and Martin DeVries
- Royal Enfield 350 Crusader
- Rummage Through Your Draws...
- Sammy Miller Hi-Boy Honda TL125
- Scorpion Sportsters March 1963.
- Saracen Engineering Motorcycles
- Scottish Two Day Paddock
- Scottish Pre 65 Two Day Trial BSA Otters.
- Seven Best Builds Ariel
- Seven Best Builds AJS
- Seven Best Builds BSA
- Seven Best Builds Royal Enfield.
- Seven Machines that changed Trials History
- Soldering Pot ential
- Steel Cycle Building Construction.
- SuperCubs and C90 Adventure
- Swinging Arms is the design important?
- Tenaci-Wong TWC200
- The Bike They Call Otter.
- The British Rival Motorcycle
- The Butler Tempest Trials Bike.
- The Burian trials machines.
- The B40 Otter Named Bessie
- The Colin Dommett Page
- The Comerfords Triumph Cub's
- The Cost Of Building a BSA Otter in 2017
- The Cotswold Goes Dutch
- The Dan Shorey Bultaco Sherpa N trials.
- The DIAMOND trials bikes
- The DOT. Motorcycles Page.
- The Drayton Page
- The EXIT Trials bike...
- The Faber Otters.
- The Famous Ariel HT 786 GON
- The Foster Otter Triumph.
- The French Connection
- The French Motobecane. We take a Look.
- The Isle of Man BSA Otter's
- The Iconic Draper Family.
- The Jerred Honda
- The Mk1 Faber Framed BSA Otter.
- The Mud Plugger Build's Page.
- The Montesa Impala Trials Bikes
- The Original Foster Otters.
- The Ossa Plonker
- The River Otter.
- The Royal Enfield Crusader Gaunt Replica
- The Sammy Miller BSA Otters 2005-2008
- The Scott Ellis Page.
- The Smallshaw's and George.
- The Spanish BSA Otter's
- The Square Framed BSA Otter.
- The Steve Wilson Page.
- The Sun Wasp trials motorcycle
- The Top Cat Cub.
- The Triumph Of A Otter Ground Up Build
- The Walwin BSAs
- The Wasp RT4 trials frame..
- The Works Ariel Colt 200cc Trials bike
- The Works 350 HT3 Ariel's
- The Zundapp 200S trials bikes...
- The 1959 BSA C15T.
- Three Bultaco's
- Tigress In Your Tank Named VERA
- Trifield Trials Page.
- TLR Honda is it a Dream?
- Tom Ellis BSA's
- Traditional Motorcycles Association Trials
- Trials Lesson with Mick Andrews.
- Triumph BSA Four Stud Forks
- Triumph-Greeves trials motorcycles
- Triumph TR20 Tiger Cubs
- Triumph Twins are the ones that Wins.
- Twinshocks Back To The Future.
- Two BSA's
- Wilf Couldwells Motorcycling Tales
- Useful trials info links.
- Villiers 1966 A Villi Good Year ?
- Well Street Garage Buckingham UK
- Wheels and Spokes.
- WK CF Moto 650i race bikes
- Works BSA Trial Outfit XJO 277.
- Yamaha MAJESTY 320 Trials
- 1954 Dan Shorey Racing Cub
- 1965 British Experts Trial
- News
- 2011 News
- 2012 News.
- 2013 BSA Otter News Page.
- 2014 BSA Otter News Page.
- 2015 Faber Frame Page.
- 2015 News Page.
- The 2016 News Page.
- 2017 News Page.
- 2018 News Page.
- 2019 News Page.
- 2020 A New Decade
- 2021 BSA Otter News.
- 2022 News Page......
- 2023 News Page
- Chapter Five.The Cricket Match
- Hay to Threshing Tales From South Newington
- Tales Of The Fifties From South Newington
This web site is to encourage owners of the BSA "Otter" trials bikes, To Form a single entity, as a club.
This will be known as the "BSA Otter Owners Club". Anyone intrested in this development should contact me at'
©
Copyright Otterman 2010
This website was built using the InstantPro Website Builder from Freeola.com
| Visitor Counter: | ||||||||
 |  |  |  |  |  |  | ||