

The BSA OC-Foster-Otter...
(Otter Cheaper ) project.
~~~~~~~
The Otter OC (Otter Cheaper.) Project.
I have just got it into my head that there should be a bit cheaper way to have fun building up a Classic trials bike, of bits that are still available.
So came up with this plan.
To build a “Foster” based, and dimensioned trials BSA, but to buy parts of it from other sources.
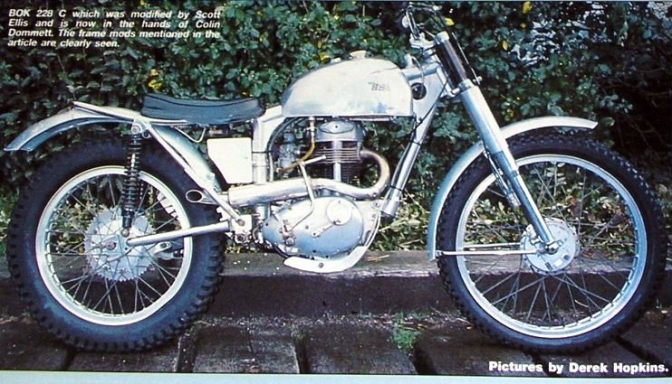
So to start with it is back to the basis of its original conception. And to copy the Scott Ellis BOK 228C machine.
First off I will build the front diamond part of the Foster frame in the Original Jig. This will be made to take an Original Triumph F6192, or proprietary Wide swinging arm. (Feked-Off) EG.
The frame will also except a standard Triumph Cub sub frame, or again newly made copies available for the Triumph Trials Cub. The same goes for the footrest kits available, these will be made to bolt straight on.
This should help spread the cost of putting a suitable frame together to except the BSA Unit single motors.

This is my first build copy of the Scott Ellis bike.
And very much to what I intend to build again, the difference is that the sub-frame and swinging arm will stay as standard, and not be widened by one inch like I did for this first frame.
And the top subframe mounting point will be nearer the top as the seat tube will be shorter to the swinging arm pivot.
The pivot will be like the available upgrade Triumph Cub trials frames available, and not the box, like on the Otter Frames.
This will enable a propitiatory footrest-rear brake kit to be fitted, to the bolt on engine mounting footrest assembly, that will go with the frame.
A steel shoe type engine under protector, will also just bolt on to the engine bottom mounting hole.
~~~~~~~
Engine mounting Alloy or steel plates will be used for the two bottom engine mountings, front, and rear, so that even other engines may be fitted, and give more adjustment to get chain-line right.
Oil will be carried in the frame the same as the original “Otter” frames.
Why bother with this project I hear you say. Just buy a “Foster frame", well you can, but there are people that like playing in their “Man Caves”, and can spread the cost of the activity a bit further, and take advantage to build something more unique than the norm.
Not only that looking at the bigger picture, there are still a lot of Triumph Mountain Cub and other models still very plentiful in the USA, so a front frame that the rest bolts onto seems like a very good idea.
But there is nowhere to ride a trials bike today? Well of course there is. But a lot of the fun is just being able to bolt a machine together.
And then experience the thrill of the first rides on a machine you have built up yourself. And to have something different than anyone else owns, priceless...
~~~~~~~
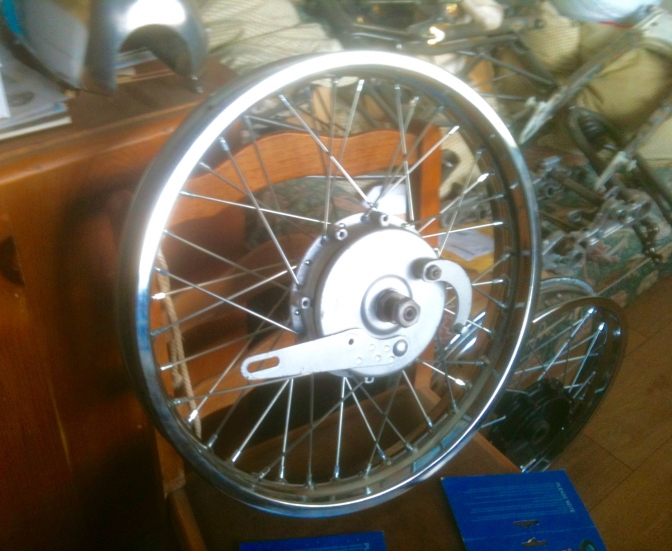
So for the past month I have been collecting parts for the project and have now got a new old stock Triumph Cub sub frame, and “has new” (F6192) wide type swinging arm, I also have a superb hardly used BSA D10 Bantam wide type (3”across flanges) rear hub, that I have laced into a New 185 wide steel rim, that was a very good price, that good, I bought two.
BSA/Triumph "Four Stud" forks will be used as I have managed to build a set from my spares, so has not cost me the £300-£500 you now seem to have to pay for these forks, but of course these have to be replaced..
Front hub and rim will be one of my Yamaha TY wheels that I have collected over the years, and now seem very popular since I started using them. Also again widely available in the USA...
One of my “Ray Small” Glass-Fibre tanks will be used, as the machine will run on ASPEN fuel.
A pair of my Glass-fibre guards will be also used, along with an Ossa type seat that I now have a mould for.
Engine is to be my third BSA C15 converted to “F" Type motor with Victor gear conversion, and modified B25 barrel and piston.
This engine will run a Mikuni VM 22 carburettor (pit-bike type) and a new modified ignition system from a pit-bike too.
A full cost of the complete exercise will be kept like the “Otter On The Cheap”.
And we will see how it compares in price, and more so how it rides.
And don’t forget this machine is a True copy of the Original Scott Ellis BSA BOK288C OIF Trials motorcycle.
~~~~~~
18/03/2018.
Triumph TR20 Cub swinging arm...F6192...
I have just spent a merry couple of hours reaming out the New swinging arm bushes to get the spindle to fit smoothly,
It is one of those jobs I hate doing, it is so difficult to do with only a adjustable reamer, and when you think your done it still needs one more pass to get it right.
And you know me by now the job, just has to be right.
I was watching "Steam Shop Dave" reaming and grinding Mike Waller's valve guides and seats, and, it was that same story with those, it just takes a lot of careful work to get right, and the time adds up.
But we have got there and I can now concentrate on getting the frame tubes together, for the Foster Jig. I have most components, in fact I just found a pair of steering head bearing cups that I had made some time ago, so we have a start on that.
I hope this bike is going to be one that puts itself together, you can only hope.
~~~~~~~
31/03/2018.
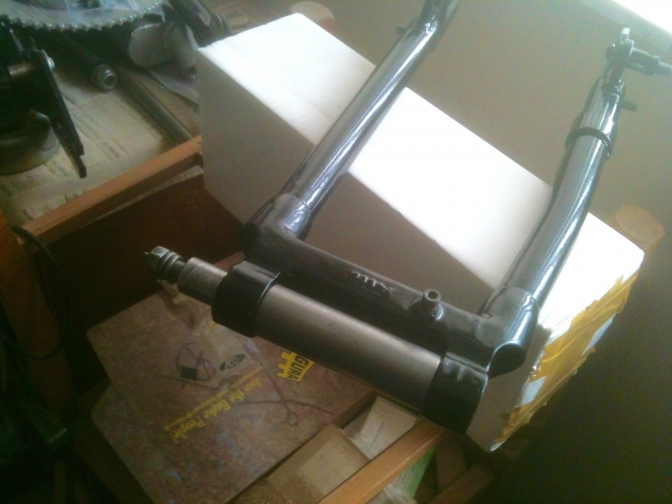
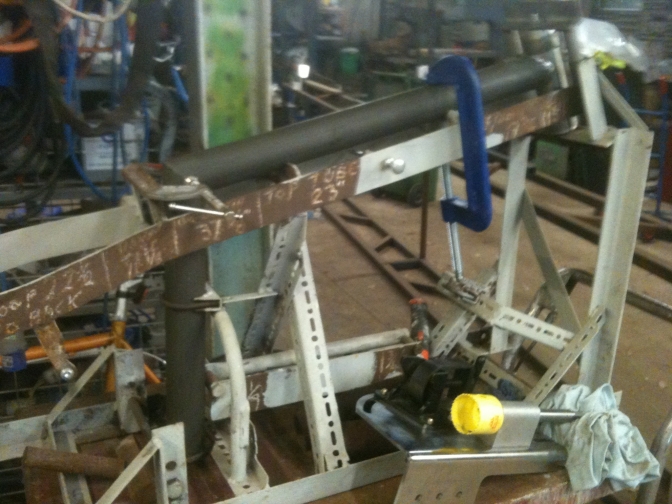
So I spent four hours at the workshop today machining up the swinging arm pivot for the Foster Otter front frame section of the bike, and also found the patterns for the plates that hold this section to the frame.
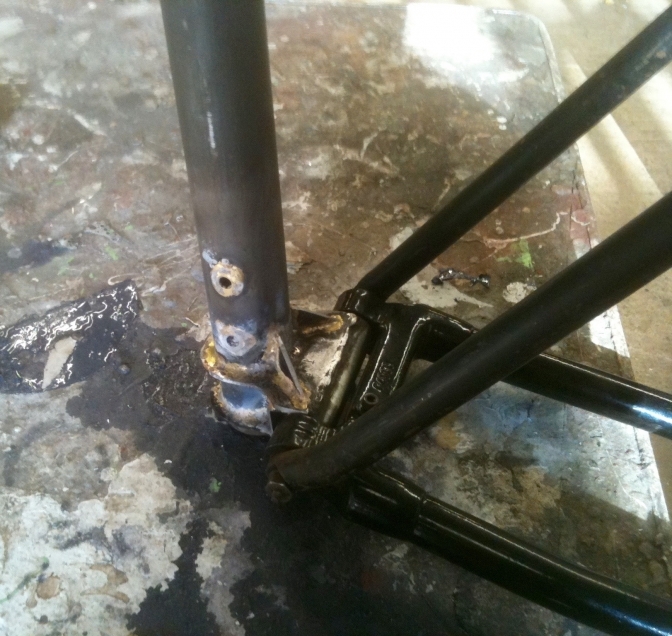
This swinging arm pivot unit will have the combination of bronze and Mig welding, as I feel that the pivot section will be a better fixture and with less distortion if it is Mig welded to the "flinch (gusset) plates" that surround the seat tube, and then that unit is then bronze welded to the seat tube...Photo Seven below...
This section as I said is designed so that any Triumph Cub Compatible parts can be fitted.
The two 3 mm steel plates taken from this pattern will be Mig welded to the pivot sleeve in the Photo Seven and then slipped over the Foster seat tube on the "Original Jig" and then bronze welded into place.
12/06/2018.
So after updating the "Readers Page" I thought I better press on with the "OC" frame, so head stock and main tubes in the jig today, and I am going to do the swinging arm junction tomorrow. So we may have a frame kit by the week end... Forks are now built too.
~~~~~~~
13/06/2018.
Photo Seven
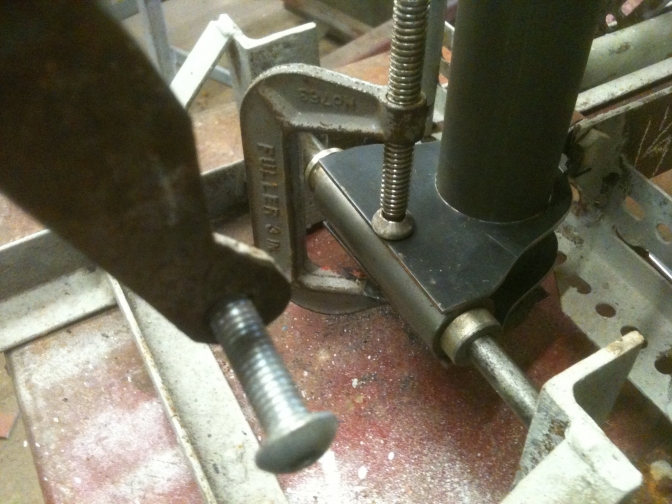
Photo Seven...
The thirteenth today and I was not expecting to get much done, I am not superstitious but, if it is in the back of your head, nothing seems to flow as it should...
Well after a struggle and I don't know why, I finally got the seat-tube joint right, or has good as I could hope for on today.
Then I made the two 3mm plates to hold the swinging arm section to the frame, and except for burning my hand, when profiling the two sections, and thinking about something else when I picked up the hot plate, things went really well, and using hand washing soap with a hole saw is one of those things that you would never believe, and it was only because I was feeling my bad legs, and did not want the journey down stairs to the workshop tap that I used it.
One for the future me thinks.
Anyway after machining two collars for locating the spindle of the Foster jig to reduce the size for the BSA/Triumph swinging arm spindle, and a mod to the frame jig to get the plates to fit, by the end of the day I was pleased with the result above.
More tomorrow, but I have got a pair of 40 spoke hole rims to drill and lace up so this could be a update for the "Wheel Building" page.
21/06/2018.
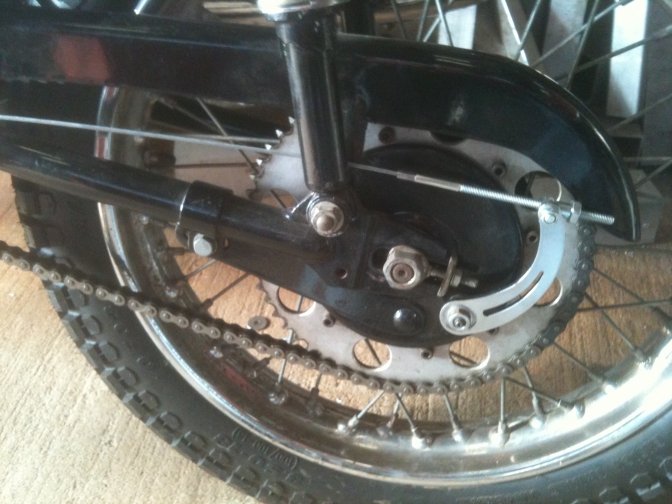
Well after an up and down week health wise. I finally took the "OC" frame out of the Foster jig yesterday and fitted the Triumph TR 20 Cub swinging arm and subframe, and I must say it went together splendidly.
And all I have to do is make the top mounting point for the subframe.
So today I will fit the oil filler cap and pipes along with starting to make the triangle flinch reinforcing plates.
So the frame may be finished by the week end, and then I need to build the rear wheel up and find a Yamaha front TY wheel out to get the machine into a rolling chassis next week.
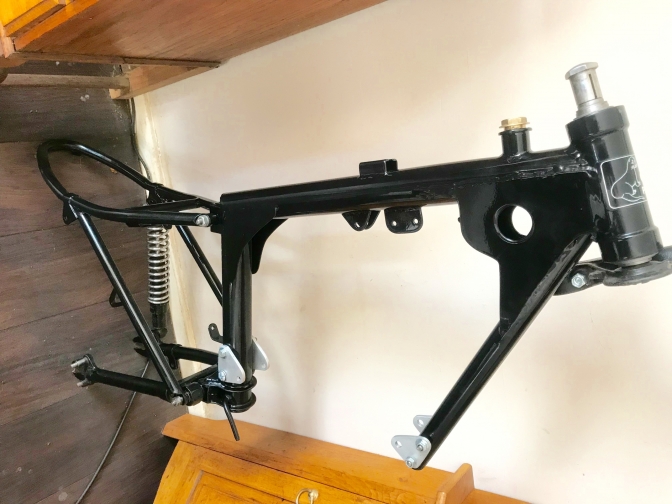
Here are a couple of photos of the frame.
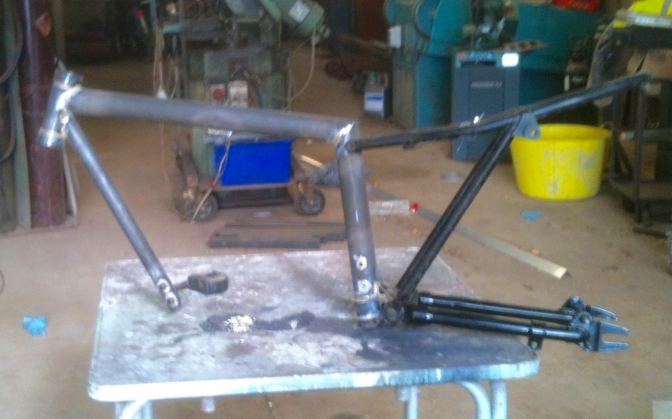
Foster Otter OC Frame looking good.
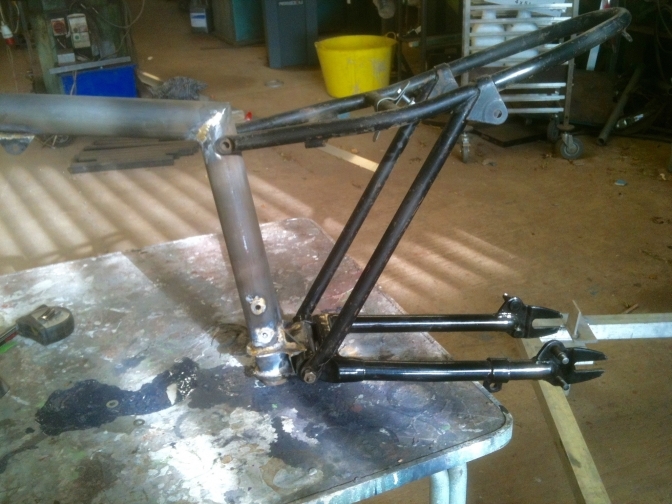
Looking the part don't you think?
The swinging arm cluster works very well with the Triumph TR 20 F6192 swinging arm, and the new old-stock Triumph Cub subframe.
I have now finished the top seat tube mounting, which incorporates a front seat fixing bolt.
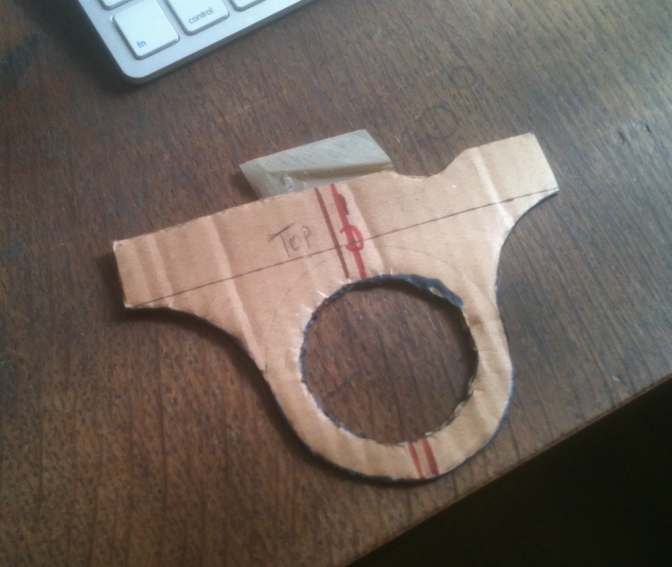
The reinforcing plates (Flinch) are going to copy the plates on the original Scott Ellis bike.
Just because I have never used this pattern before and it would be good to see how they turn out.
So far this exercise has turned out just like I expected and although designing the Swinging arm cluster and having to make other alterations, the frame has gone together well, and proves that adding already available parts does help speed things up on a build.
I have fitted a pair of Feked-Off Triumph Cub footrests and the rest of the kit to a Triumph TR20 Cub this week too.
Well I am going to incorporate a Kit like this on the "OC" Otter bike.
There was a couple of modifications to the kit I had to do to fit it, but I am sure these will be put right when Feked know about it.
And they will...
Photo's below.
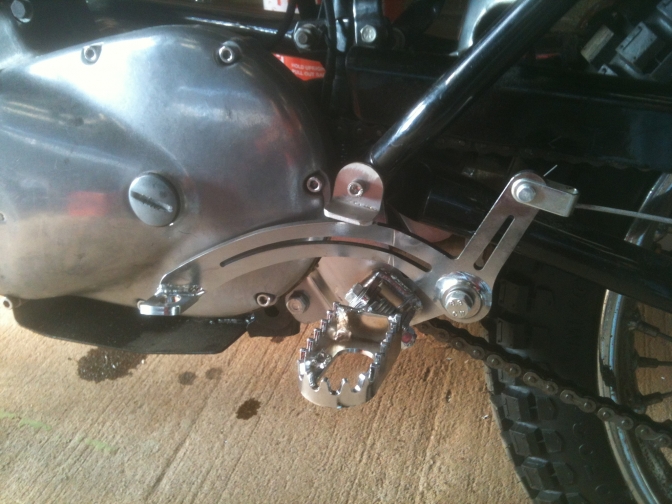
I had to make a brake pedal pivot spacer as that was missing, three footrest spacers had been put into the bag instead .
The cable was also too long, and had to be shortened, I remember this problem from Sammy Miller Products before, when I needed one of these cables for a Faber "Otter", so the kit has just been handed on, to Feked and they are still 22 inches long and not 18" they should be ...
The other problems with the kit was the back actuating lever was too thick for the job, and bound up when the nut was tightened, cure I put it into the Bridgeport milling machine, and with a large end mill took the width in that area down to the original thickness, then with a flat washer fitted into the recess the arm clamped up nicely...
The other modification was to drill out the pivot for the rod to go through, as this was threaded and hindered adjustment.
But all in all a good kit for the price, and again saved a lot of time, that is why one is going onto this "OC" Otter project.
24/09/2018.
So I spent two days last week finishing the "OC" frame, it is the finishing that takes the time, there is always a bracket you have missed somewhere, and plumbing in the "oil in frame system" needs to be right, and all joints double checked for leaks where welded...
Then I had Stuart Bedford help me on Saturday and Sunday, in the afternoons and it took us eight hours to get the engine mounting plates right, we modified and cut three pairs for the back and two for the front, before we got them to how we wanted them. "One Off's" again, but we got there in the end.
And with these plates, it means that you have loads of adjustment to get the chain line right, and can adjust the width with alloy turned up spacers.
The footrests are the last job, and I am still tying with the idea of fitting the Feked Triumph Cub units...
But fitting a subframe to the engine bottom mounting bolt as a stabiliser, which will also incorporate the rear mounting for the sump plate.
Shall I powder coat it or not?
This is supposed to be a Otter Cheaper, but the swinging arm was already powder-coated, It will be down to the price I can get for the Triumph Cub subframe and Foster Otter front diamond.
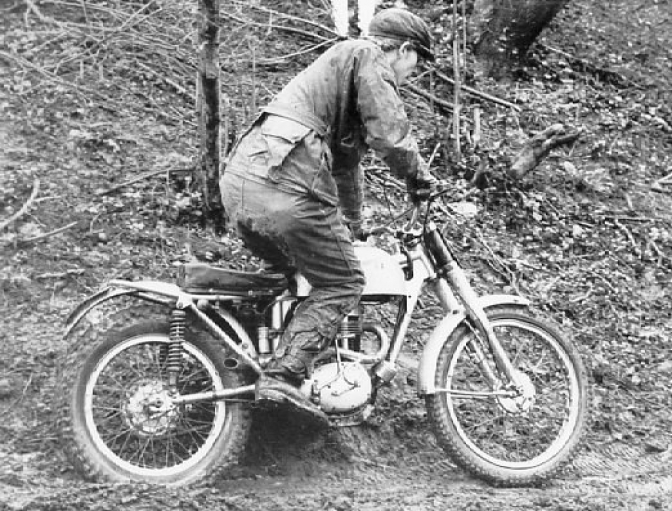
Scott riding the fore runner of the now named "Otter" trials bike.
I have tried to keep the frame very much in the BSA Scott Ellis image I hope it looks like that when we have it finished?
But Scott's second frame was nickel plated so that's thrown a spanner in the works.

Photo's Courtesy Stuart Bedford.
The next thought is which engine to fit into the bike, as the cost of them all are about the same when they have been rebuilt?
~~~~~~~

I have now after thinking "shall- I- shan't I", modified the Triumph Cub standard subframe, by bending the back loop up slightly, and moving the brace tube forward to get a better mudguard run.
This job added up to just over an hour, but no materials bar for the bronze-welding rod to re-weld the tube in was used...
So it did make sense rather than put the bike together and then find out there was not enough wheel clearance...

I have just realised how much the Scott Ellis Replica bike is like the OC project.
When I set out to build the "OC" Foster Otter bike, the only thing I intended doing the same was the gusset-ing around the steering head.

Both frames waiting to go for powder-coat........
I have now purchased an oversize BSA C15 barrel and new Triumph piston, for this OC Foster Otter bike, so the engine can be built up over the next few weeks along with the other two similar engines.
It has taken me a long time to source the parts for these engines, as I don't go out and pay outrages prices, just to get the builds done quicker.
But that is me, and we all know parts are becoming more scarce....
I have been forced to buy "steel Triumph T140" yokes for this bike because the alloy Triumph/BSA Four-Stud yokes are now few and far between, and perhaps time to get some cast and machined I feel......
More Later tomorrow.
06/03/2019.
Yesterday I spent the afternoon fitting together the parts back from the Powder-Coaters at Redditch. (yes I did get it Powder-Coated...)
The same problem as always when you get parts back and forget about holes that have not been masked are now smaller.
So firstly with a small sharp knife, I peeled of the alloy masking on the steering head bearings and swinging-arm pivot.
Not has easy as you would think. The steering head bearing outer races were then fitted, with the puller I designed for the job.
(A length of 10 mm threaded rod two nuts and two 2” alloy discs. Actually cast blanks from the old Norton Rotary works.)
Splendid I thought, big mistake… Just fit the swinging arm and Cub sub frame and we will be laughing …
Now before the frame went to Redditch the spindle fitted the reamed swinging arm bushes and the frame pivot tube just how I like them, a smooth fit.
No time was spent sorting the frame, with razor sheet cleaning out the frame masking foil. That was soon sorted..
But the spindle pin would not fit smoothly into the swinging arm like it did, and this part had not had the holiday like the other parts at Redditch, because it was already powder-coated when I bought it.
I was not getting out the hammer to fit it not even the rubber variety..
So a half hour was again spent with the reamer getting it to again fit nicely… No I don’t know why it happened either?
Only explanation I can think of is, that it was the summer months when I last fitted the parts together, so perhaps the colder temperatures at present reduced the size... So eventually again with more work that fitted how I wanted.
Just the sub frame, same treatment with the small knife so that the bolts fitted smoothly, and I thought the job was done, until I tried to fit the sub-frame over the seat tube mounting, four coats of powder-coat thicker.
So do I file the powder coat off and make a rust trap?
I did not want to do that. So a 8 mm bolt with plenty of thread was used between the holes in the sub frame and the gentle pressure opened the gap slightly so when released it now slid over the top mounting nicely, and we still have powder-coat on all surfaces.
So we have a completed frame even with the fork yokes fitted … Rolling chassis next week, or next year?
More Later with photo's.
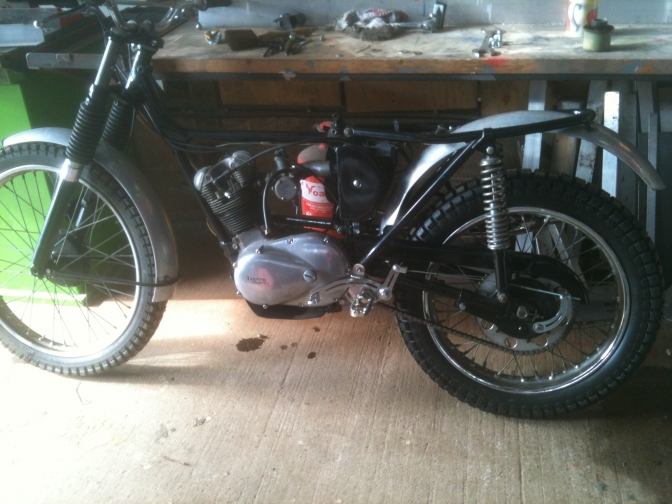
There you go the finished OC Foster Otter frame...
And my favourite I must say..
And it may now have the "Long-stroke" C15 engine fitted when it is done...
Or I may build another "OC"-Foster-Otter frame for that?
More Later...
updat2024...09...
| Visitor Counter: | ||||||||
 |  |  |  | |  | | ||