

Mike Waller's.
"Britannia Motorcycles".
BSA B50 Frame Conversions, And B25 engine rebuild.
And also more about his "Trials Bikes" Past, and Present.
A ***"VIDEO"*** Series.
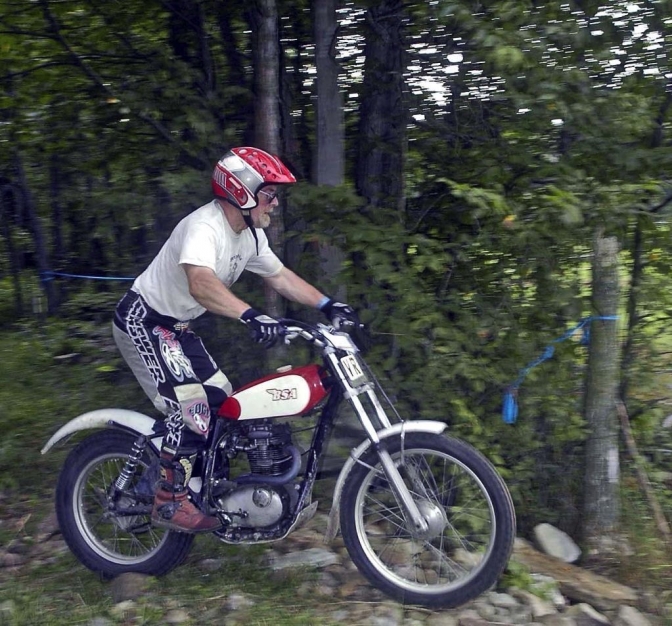
This is Mike riding the Mk 1 BM BSA B25 model.
Here is a bit of History about Mike's B25.
It is now eight years since Mike built this BSA B25 it was built for a company director from the North of England, who then shipped it from the USA to his factory in the UK, and one of his employees then competed on the bike a few time to keep fit, as the company also had its own gym...
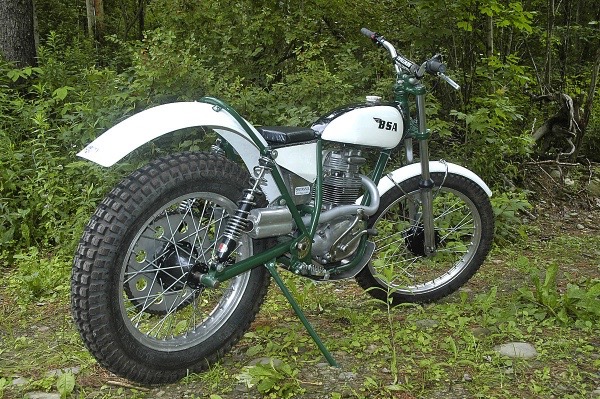
Then checking through the weekly updates on ebay I thought, I know that bike and it was what I thought...the bike is down at a bargin price with all this History at it says £3495.00 so if you want a BSA B25 trials bike with history and not a lot of use, you need to get there quick...Bargin...and you have the build pages below.

Photo Courtesy ebay uk...
The Britannia BSA B25 for sale on ebay on 07/06/2025...

Photo Courtesy ebay uk...
Just a video for you (and us ) Mike about your favourite Trials rider...
Mick Andrews who has ridden your Britannia BSA B25...
Mike Waller mailed me with some interesting News,
He is going to convert a "BSA B50" frame into a trials frame for his
"Britannia Motorcycles",
On YouTube...
Here is the introduction to the series to come. Enjoy. Very interesting Mike.
Here is Episode One... for you.
There are photos of Mike's Bikes in the Gallery. But Now he has the videos running, we will do a Page for his bikes so that you have an easier link. (Well Here it is .)
"Episode Two"...
Of Mike's frame converting Video,
It is a shame that Mike could not keep the camera rolling for the cutting and dressing parts to this conversion, because that is where most mistakes are made.
Update} Mike says he spent a fortune on the camera he bought to film these videos even having to sell one of his bikes to fund it.
So sparks around this piece of kit was not a good Idea, I suggested he may get a Go-Pro Hero for this job when he is famous.
But these give you a good insight into what you need to build a frame from scratch, or convert one like Mike.
I would need another jig to make sure that the steering head is still vertical in its plane.
>Update} Mike now assurers me that the jig he has created works very well and by holding the fork ends it ensures that the steering head is held in the right plane.
But Mick Andrews has ridden Mike's bikes so they must steer OK .
Mike Waller "Britannia Motorcycles"...BSA B25...
Episode Two...
Observations. Just watch the socket spanner move as soon as Mike applies heat to the front down-tube. This tube has been hot and cold for all of its life and by heating it to bend the tube has probably took a lot of stress out of the tube, and has actually help to stabilize the make up of the metal.
Ariel were known to put life back into their trials frames by heating them up once a year on strip down and overhaul.
My other tip is to wear "strong sun glasses" to watch the "Bronze Welding" sequences you can see the operation far better. I was sat with my gas welding glasses on.
Mike weld a handle like a plug spanner onto that fork strainer make life easier. (Now Done).
Episode Three...
Interesting rear subframe modifications in this episode.
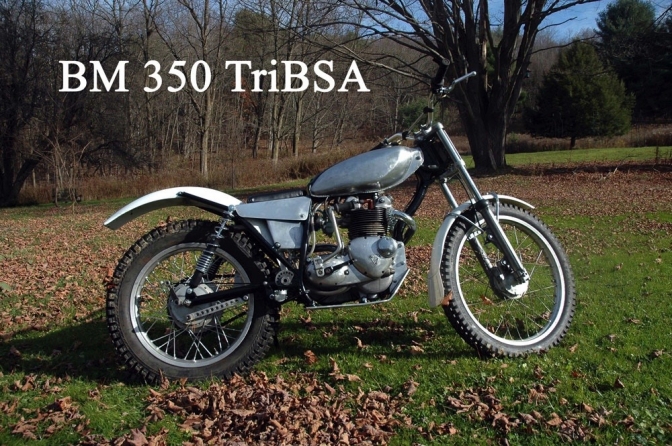
This is the MK2 version, same frame conversion, and a B25 engine again.
I must say that the B25 if tuned right does make a very good choice for a Pre 70's "Britshock".
Episode Four...
Right, this time frame, steering head Gusset making, and fitting in this episode.
Like the green shield Mike still wear the"Sun Glasses" though takes the glare away better.
Listen,
I do like the occasional "burbling" of a Vee Eight truck passing by on the road outside Mike's workshop, places it only where it could be the US of A.
This is the Triumph engined version Mike built, also for an Ex Pat, who was from that famous British trials sales room Comerfords.
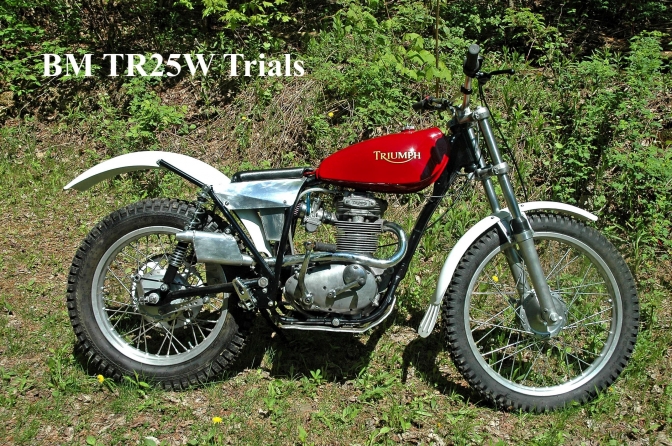
And the Triumph TR25 version. Nice.

Just to prove that Mick Andrews did ride Mike's bikes while he was in the States on one of his worldly coaching tours.
Episode Five...
OK... this is Episode Five and the swinging arm gets the "Britannia" treatment.
Episode Six...
Front Triumph-BSA Four-Stud Forks.
Episode Six, deals with the BSA/Triumph"Four-stud Fork" rebuild, and a mention about the Old type BSA-Ariel fork,
With a few tips and how to make up a tool to remove the Oilseal holders.
Episode Seven, Part One...
Comments later , I do feel so lucky with the tools I have got in the workshop though.
1; Penny Washers in UK That's How Sammy Miller stuff got Famous."Mr Penny Washer".
2; Sammy Miller Products "Adventurer" Mudguard Stay.
3; Use a small block of plywood in your hand so that you don't drill into your hand.when drilling through guards.
I use Big Cloth's pegs to help me hold mudguards while marking.
Tap out the holes to get rid of crud before fitting the Allan bolts to hold the stay.
4; Don't forget to add the width of the alloy on before bending seat pan, and you may find if you anneal the Alloy first you may be able to bend it by hand? Or make a vee block out of angle to use in the press, if you have one.You can use a sacrificial piece of ply under the alloy too to cut out with Jigsaw.
5; That sound track you use is sooooooo relaxing. I do love that.(Traffic)
Mike, I feel for you at times. Good Man.
Episode Seven, Part Two...
Hi Mike, Thank's for the mention, keep up the good work.
And Don't Change a Thing, We love to see it all.
What better insight into building a bike from scratch.
We will make you a ----*StaR*---- yet you mark my words.
Charlie.> ~Oo>.
PS, Love the Seat Great Idea.*********
Observations.
1; (a) Sorry forgot this one. Bronze on the captive nuts to the brackets before you bolt to the seat pan, you could in the long term make a seat base Just for this job with a BIG hole in the top to help when bronzing on the brackets. For things like swinging-arm brackets for example, plates welded to the side-walls of the tube is better than across the top tube surface, for stress reasons and vibration, the hook bracket is fine and the longer the hook the better, try avoiding sharp bends on the actual steel for the brackets a wave form is better.
I will go away now and just watch, with interest, I am liking these Episodes.
( Like American Chopper without the stress,) ...
Quote.
1; Make a template for the seat base saves time with the next, and helps to keep the holes in the right place.
2; Use a lathe centre drill to take the burrs off of holes in alloy.
3; Use a old sharp bread knife to cut the PVA or EVA foam, or cut through half way, turn it over, and you will find the knife will find the cut mark and follow it. (Mind Your Thumb).
Round edge of foam with grinderette or linisher it helps to get a better fit.
Mike, the only answer from upholsterers would be, use your industrial sewing machine, so good job. OK ... You can heat vinyl gently to get rid of ruck's, but why bother.
4; Tap the rest of the staples home with a small hammer gently., Pointless using glue as most boards are Polyethylene or if imported HDPE and glue wont stick.
Looking Forward to the wheels episodes.
Hope you are doing the lasing up of the wheels Mike.
GooD Job and entertaining, as well as relaxing. (maybe not for you).
You have asked about the brakes that Mike uses and have asked about the conversion from right to left.
Episode Eight...
And you can see Mike uses the same method as I do fitting these TY Yamaha front wheels although I run mine on the other side so that I can get a pull on the brake plate with an arm rather than a push, there is photo shots of my set up on the "Mini" Otter page. ETC.
Only two comments.
And this applies to You more than Mike, don't pull hot Sharp lathe cuttings (swarf) from the lathe when it is running, or not, with bare hands, because it will burn and cut you, use a brush to remove it.
Two, yes use "WD 40" has a lubricant when cutting or polishing alloy, it works well, and even using this, be very careful when using a reamer because it will jamb, if you noticed the one Mike was using turned in the chuck. and then the Video stopped.
Problem is it makes the alloy hot, even using suds too.
The other thing to remember especially with alloy is that the measurements will change has the metal cools so the tolerance will change too.
I moan about my old lathe but not any-more.
Enjoy.
As you probably know I use Yamaha TY 175-250 front brakes on all of my bikes Why? well they work, and all or most of my bikes are classed as "Britshocks".
The rear wheel (hub) is very similar to a Pit bike hub you can get here in the UK if stocks are in, these can also be used as a front hub.
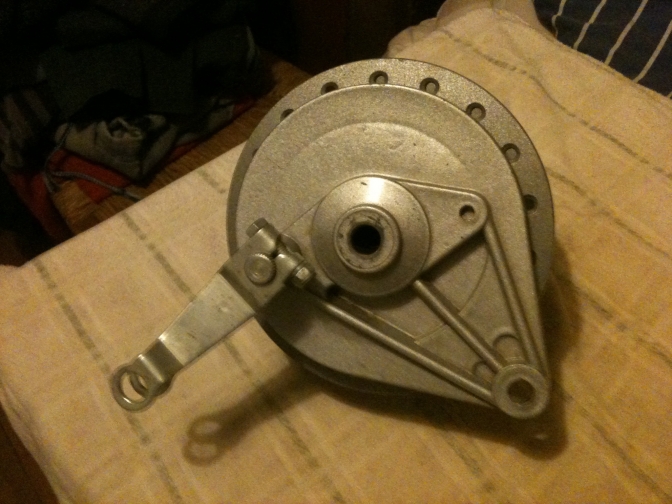
Here is that Pit-Bike hub, bearings can be changed to ones that will except a bigger spindle if necessary.
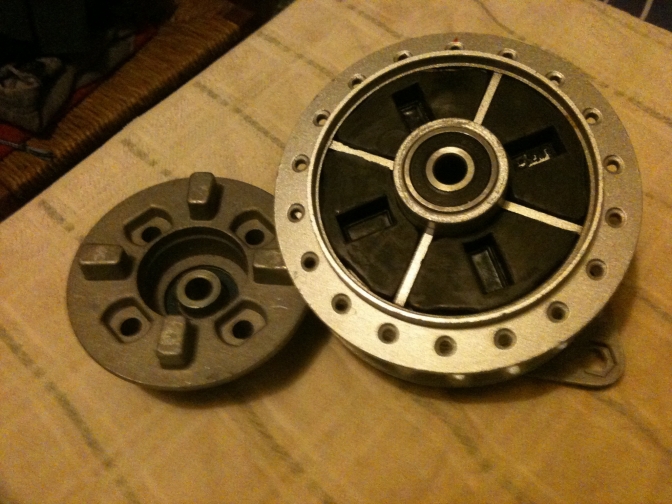
By removing the cush drive rubber and discarding the sprocket carrier the hub can then be used for a front wheel without any other modifications.
I tend to buy the New rear hubs (wheels) for a Jialing JH125L, they are the right price and seem to fit my bill very well.
Episode Nine...
Is the rear wheel, Mike is using the TY Yamaha hub on this build which is not that dissimilar to the Jialing wheel. Has Always Enjoy.
Episode Nine, Part two...
Mike and I will be commenting about the cycle parts later. OK... in later videos.
This short add on video is the part that Mike forgot to tell you about modifying the swinging arm rear spindle hole.
Mike, I woke up in a cold sweat in the middle of the night with the drill press, (Pedestal Drill) operation on my mind.
Now we all know there should be a government health warning with these beasts, because they always "BITE" the under-powered ones are the worse.
Well tell me to mind my own business, but just thinking about the operation and this could probably be done with an uncut swinging arm because the other leg would fit under the Press table.
I came up with thinking, making this (Diagram Below) out of plate steel sensible thickness because I think it would clamp it better to the table using four bolts through the slider holes.
If the arm comes up at a slight angle tack on another bit of flat plate underneath to make that distance up before drilling the centre 16mm hole? yes 16mm because you can use your mandrill on the first drilling and then drill with the 17mm straight through the plate as well
the second side would need centring by eye but has long as it was near enough and the mandrill had set the centre of the part right taking a slight edge off of one side of the plate would not matter as long as it was not that far out as to distort the drill on entry.
What Do you think Mike?
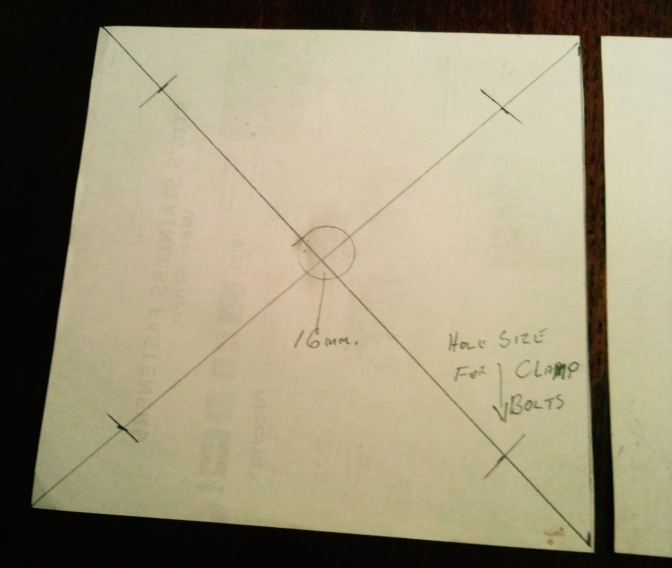 This was just an A4 sheet squared make the size to fit your Drill-Press, and tighten bolts down evenly. Hope this helps some of you.
Back to the good bit bulding wheels.
Episode Ten, Part "One"...
Wheel building...
Episode Ten, Part Two...
About wheel building is the lacing up, (fitting the spokes,) and truing the wheel.
102
I hope if you try your own wheel building if it does not make you to frustrated, just keep putting the kettle on and take a break, it all looks better after relaxing for a few minuets.
Truing , a little at a time never over-tighten anything.
At about 37 Mins in listen for the MV Agusta at full chat , amazing! Thank's Mike another good one.
Next Video and frame finishing footrests etc.
Episode Eleven...
Episode Eleven...
:Fork stops footrests ETC.
Episode Twelve...
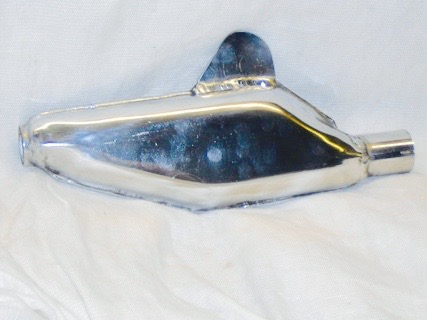
Engine Part One, Silencer Manufacture, and "Shreddies advert."
Mike you could anneal the alloy first (softens it).
"Two young Shakespearian actors leaving school, Juliet says,"per-chance would you like to spy where I had my operation at the top of my thigh"?
Cor yes please says Romeo, going out of character, and thinking both nuts had turned at once.
Yon Theatre over there says Juliet where bonnie babies are heard to cry!( pointing at the City Hospital). "Per-chance to dream", says Romeo getting straight back into character, with a long face."
"Oh Get In There Moreton".

Robert Moreton Comedian.
Died 1956 Suicide.
Sadly, Robert thought he was no longer funny... What a shame .
Unlike John Noakes.
John now lives in Majorca and has Alzheimer's but still cares for dog's as we all do that own them. Or do they own us?
Episode 12, Part Two...
Finishing Silencer (Muffler).
Cone Calculator @ Craig-Rusell.co.uk .
Look Mike has No option to not make his silencers, firstly he enjoys making his own, like I do most of the time, and the cost of getting him one in the USA would make it most uneconomical.
But here in GB there is an alternative and more than one, But the first is always the best?
Terry Weedy.
WE ARE THE ORIGINAL DESIGNER AND MANUFACTURER OF MANY SAMMY MILLERS AIR FILTERS, OIL TANKS, AND SILENCERS.
SO STOP BUYING SECOND HAND ON eBAY, WHICH SELL THEM FOR MORE THAN WE SELL THEM FOR NEW!
IF YOU LOOK THROUGH THE BACK COPIES OF SAMMY'S CATALOGUE YOU WILL SEE THESE ITEMS.
THESE ARE NOT NOS AS MANY TIMES SEEN ON EBAY THESE ARE NEW. WE HAVE BEEN PRODUCING THESE ITEMS FOR MANY YEARS AND SUPPLYING TO SAMMY MILLER,BURTON BIKE BITS,RAY FISHERS,CUB BITS, SURREY CYCLES, AND MANY MORE...
SO STOP PAYING THE MIDDLE MEN AND BUY THEM DIRECT
PHONE TERRY THE MAN WHO MAKES THEM 02380613690 MOB 0775857702
£40+ Post and Packaging.
One Fitted to my MK One Faber "Otter"
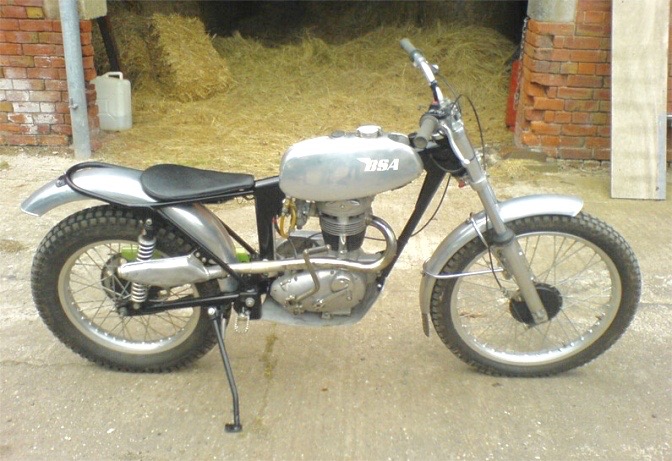 Photo "Otterman"
Episode Thirteen, (Part One)...
Engine top end stripdown.
Episode Thirteen, (Part Two)...
More engine.
Removing the clutch cover (Chain-case) and a rather sticky clutch.
If you have screws too long sticking out like Mike's when you have loosened them wire brush the threads of the part of the screw sticking through this will help stop a rusty screw taking the threads out of the crankcase.
Episode Thirteen, (Part Three)...
The other (timing case) side,
Hi Mike a dob of Red paint on the exhaust cam follower is what I do, the oil holes in them should face backwards on the flat foot B25 and the radiased C15-B40.
Episode Thirteen, (Part Four)...
About 13 minuets in with Mike heating the crankcase, and taping the end of the crank in the speeded up footage. But then taping the end of the Crank with a piece of brass. DON'T
even CONSIDER HITTING this end of the crank with ANYTHING, this is the only way the engine gets it's supply of oil through this spigot and an oil-seal that surrounds it any damage is going to mess with this supply.
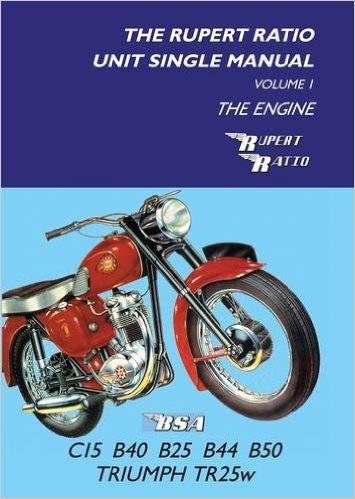
It is suggested that on end fed models IE, BSA B25 you sit the engine in a wooden box with the timing side up.
You then use your puller you have made, and there is a full size pattern for this in the "Rupert" book, to pull the timing side crankcase from the crankshaft, so no need to strike this end of the crank with anything. You then use the same puller to remove the crank from the chain case side.
I am sure that Mike did not intend hitting the crank at all, but with the pressure of filming and the time it was taking his frustration got the better of him.
And there is NO second takes on the footage he is doing. Enjoy the series I most certainly do...
Episode Fourteen, (Part One)...
The Oil-Tank Build.
Mike is doing the oil tank while waiting for engine parts.
"Wally" it is disputed where the start of this term came from, some say it was a misinterpretation of the word "Valley" used by the Scots in Glasgow where a stair case "valley" divided the rich from the poor, in some tenements. Ie. "Wallies".
It is manly used in the place of Idiot, as a term usually when you get something wrong.
The nineteen sixties, seems to be when it started to be used. Another theory is that a guy named Wally or Walter got lost in a pop concert and the public address announced this, where by the crowd started to chant "Where's Wally". So you make up your own mind, I must be a "Wally" for writing this?
Episode Fourteen, (Part Two)...
One thing I would say, especially with a B25 or TR25 engine with white metal big end shells, is to fit some form of in-line oil filter;
There is an argument which line to fit this to, and what size filter, I have a canister one on my TR25 engined bike, but APH in-line on others with roller bearing big ends. You can even make one up using a 1/2" BSP strainer,
Filter Pictures Later.
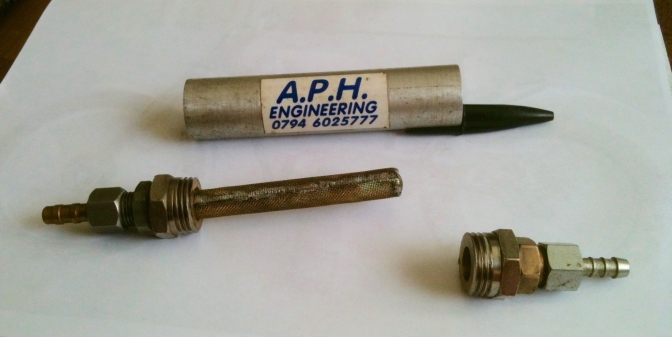
You could make up one of these using a filter from the feed from a BSA or Triumph oil tank.and a 110mm long x 25.59 mm length of alloy machined to 18.89mm internally and tapped to 1/2' BSP to take the BSA filter, and pipe fitting.
The B50 and WD B40's had inline filters fitted as standard...
Episode Fifteen...
Chassis parts, Side Stand.
Two Tip-ets on this episode, Mike, just tack the chain tensioner bracket with your mig, then you can save the tyre and the swinging arm bushes-bearings.
Good idea the spigot on the stand spring retaining post, but you could have just pushed it into the stand using the jaws of the vice.
On some of my stands I find it easier to fit the spring, without the pivot bolt fitted, and then lever out from the bracket with a screwdriver to line the hole ( in the centre of the pivot Bush) in your case. and then drop the bolt in.
It is also a good idea not to bronze weld with plastic bags and aerosols near the flame.
It upsets Mr Alf. N. Saphety. so he tells me.
Part number of the stand spring is, "82-8382" for BSA and Triumph.
Episode Sixteen...
The start of the engine rebuild.
Comments later.
Good to go Mike.
One thing that I did when removing the lip on the drive side oil-seal flange with a sharp wood chisel on one engine in situ, was to fill the bearing, chain side with plasticine, sealing all around this stopped any swarf getting into the engine and any that did go that way stuck to the modelling clay, then gently removing it after the operation meant a swarf free engine.
For viewers. This is the BSA B25- Triumph TR25, engine, That Mike is working on.
And these have Bronze valve guides fitted.
The BSA C15 B40 And Triumph Cub, have the cast iron guides.
The exhaust guide on these generally break up if not while fitted they can when you try to remove them.
There is a directory from Alpha bearings on the engine page if you look that says you should not fit steel to steel guides unless the valves are plated or they will eventually seize...
So if you are rebuilding a C15 or T20 head read what they say.
Episode Sixteen, (Part Two)...
More engine rebuild...
Comments;) Well Mike you have well and truly become a *Star*',
The ease at which you now present the series, is getting polished,
If you dont fluster over jobs, which I know is so easy when we are doing what we do, and things do go wrong all of the time, but you seem to be now Cruising, good man, you have done a really good job. keep it up.
Regards Charlie ~Oo> 0 ;)
Episode Sixteen, (Part Three)...
Happy belated birthday Mike, Great minds I got a New hat this week.
A Henry Cole look alike,
Working on the heavy Black rim glasses now.
You must get a pair Mike, you have to have these when you are famous,
like Michael Cane......
Don't forget Guy's I have a page up on doing the gear-change shaft "My way".
We could go crooning and cruising Mike.
Update...
Just thought Mike you would like this tale of whoa.
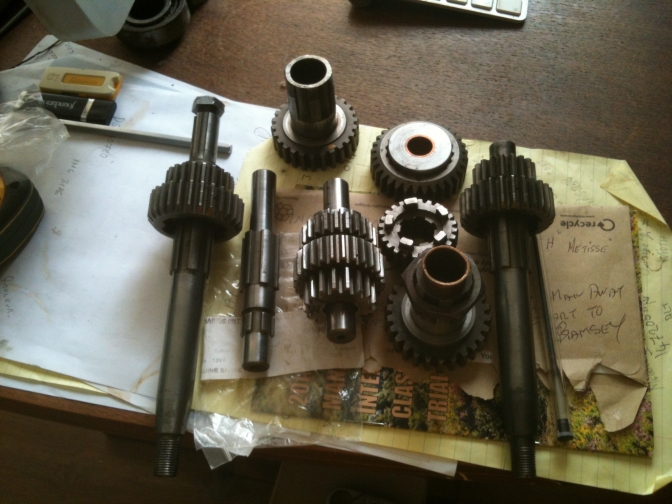
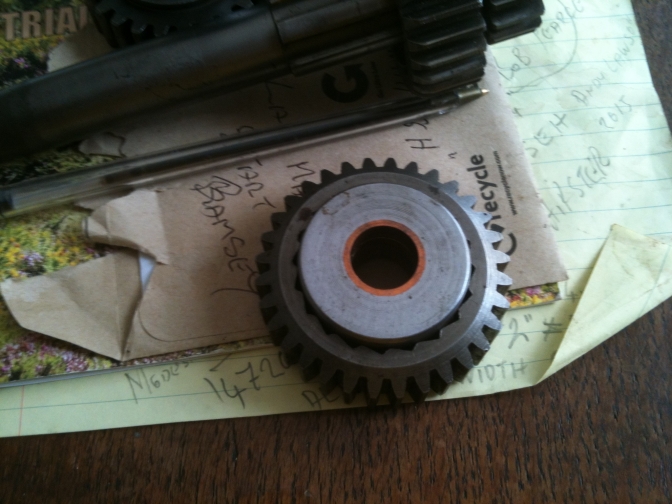
I fitted the two sets of gears and found that I was missing the last layshaft 1st gear with the correct teeth.
So having another set of B25 gears I thought,I will fit that cluster into the BSA C15 "F" type cases.
First problem was that the layshaft would not fit into the bronze bush on the drive side.
Easy I thought I will just heat the case push out the bush and bore it out on the lathe.
Job done with a reheat the bush was fitted back into the cases, and assembly began.
Everything was fine until I checked the clearance of layshaft first gear with a straight edge across the top of the case joint.
The gear was about a 1-2mm too tall,
So I had the gears in and out about ten times with different spacers and none at all,
Trouble is the later cases when fitted with the needle roller bearing were machined deeper in the case.
I continued and bolted the cases together loosely, to determine the gap thinking of using a one off spacer.
Then found someone who made gaskets for this joint. So thought if I use two of them this might solve the problem. They arrived, but even with the two they will not make up the gap and I will also need to make up a thrust washer for the camshaft.
So plan B or C, because I am not going to mess machining B25 gears they are too expensive now even when you can get them.
So I have this jumble of a mix of close and standard gears which with a few moving from one shaft to another I can make a set of gears that will fit.
But I now have to make a spacer like you did for mainshaft 1st gear, and also have to further modify the large thrust washer I have made up to convert a Ceefer Layshaft gear into a type "F", and make a replacement layshaft bush.
Pheww.
Quick update.
I have now decided to use the two B25 1st gears 27-and-16 tooth.
using the "F"Type layshaft, looks like this will then fit OK...
Just need to make a new Bronze layshaft bush that I destroyed trying to be clever.
Just looked at the price of these and the availability and decided two hour on the lathe is cheaper, perhaps I should get Paul Ellis to make some on his little CNC mill.
But This little episode has cost me, I have had to buy new B40WD first gears( 17-33 tooth) to replace the ones I have used. Not Cheap.
Dave Richards(Steamshop Dave) Cuts the valve seats with his rotary stone set.
What really annoys me is that I had one of these sets given to me back in the sixties which I used a lot, then moving house and workshop the valve cutting kit got lost, and I have never been able to replace it.
Such is life...
Episode Sixteen, (Part Four)...
Gearbox, Fitting the gears,Graaaaa.
Mike you did very well, even if you did have to take a break.
You wont believe it but on the 16th August in the afternoon I was doing that exact same job, but two of them, and still had the same problems.
I did find it easier to leave the kickstart Quadrant out, this gives you a bit more movement on the layshaft, I found that you can juggle the forks better to get them into place.
I greased the shim-thrust washer on the 1st gear layshaft, to stick it into place, after it blocked the passage of the layshaft shaft twice.
Every one different, it was that good BSA design?
Episode Sixteen, (Part Five)...
Fitting stubborn timing gears and gear box,
Episode Sixteen, (Part Six)...
Fitting the Clutch and gearbox sprocket.
~~~~~~~
Mike, should there be a bronze faced washer on the Clutch centre before you fitted the basket over the rollers?
I always cut off the little peg from the back of the sprocket cover before the rear chain does. with a small sprocket fitted.
Glad you use a magnet to remove that washer too, is it minds in sync again?
Dont forget that fourth screw in the clutch hub will you!
Episode Sixteen, (Part Seven)...
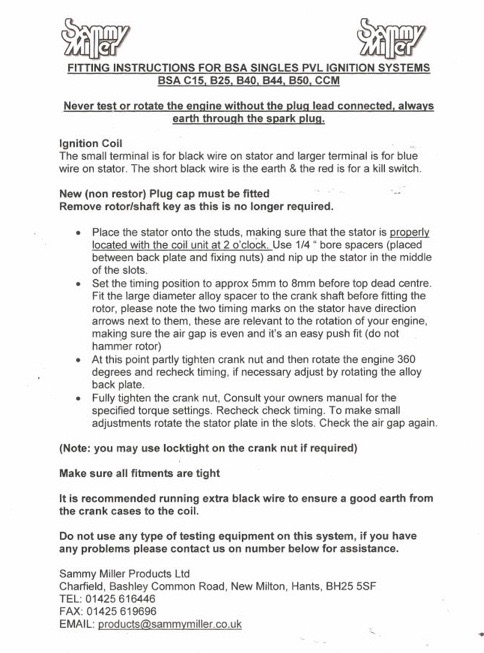
Fitting Piston and Barrel also PVL ignition, and Clutch.
I have done the text in Red Mike as I have a Red face,
Sorry I did not spot that the bronze faced thrust washer was on the clutch centre.
As they say over here "I should have gone to Specsavers."
I had the same problem with fitting the piston on the overbored Bantam because re-boring reduces the taper on the bottom of the barrel spigot,
The only way I could fit that, was fit the piston in the barrel on the desk and then pop in the wrist pin lowering the lot onto the studs. "It is on the Bantam Build page"
I Think Richard from Sammy Miller Products owes you a Drink too Mike.
There you go guy's you now have it as a reference.
As for the clutch parts, the old "Pattern Part" thing again,
You do have to check every thing Twice,
Were The springs ground flat?
Bet not.
You wait until I have finished the "Clutching at Straws" page and then you will see the problem with some of these parts and the trouble they cause.
And to be honest BSA were doing just that Clutching at straws. How many times did they change the ways to stop the clutch nuts undoing?
And only got it right in the end by wiring them as we had done on race bikes for years.
Episode Sixteen, (Part Eight)...
Fitting that well designed cylinder head and rocker box.
Comments!
Spot on, "Just has I do",
Can't believe that people were actually paid a wage to design this engine,
And the B25, development only got worse.
But it was done at BSA's Holiday camp.Umberslade Hall...
Mike I bet you get some comments about, you forgot to fit the "POINTS".
Mike also tells me that he has a little workshop experiment coming up too?
Converting a B25 engine to 300 cc's Should be fun.
Episode Seventeen...
Wiring and carb fitment.
Comments.
Mike you are right about fitting the OKO carb cable nightmare.
Brian lost the white plastic cup trying to fit one he has In the IOM.
And it was cheaper to by a "KOSO" carb for a new white cup than try and get a OKO one, so I bought one, nice carb by the way and as good a build as the OKO. And made in Taiwan the same as OKO.
These carbs are copies of the Japanese Keihin PWK.
Anyway Brian then found the one he had lost when sweeping the workshop floor.
So I now have this KOSO Carb needing a bike to fit too, problem is, it is 28mm.
I have a length of brass rod to make the main jets of any size...if the ones in the kits dont perform right.
"Terry Clips".
Well you are right, and close to home again, as my late partner Kate worked for the Terry family (Redditch) as a groom, well before her shining Dressage career.
And also looked after a young Lord March of Goodwood Fame.
Small World again.
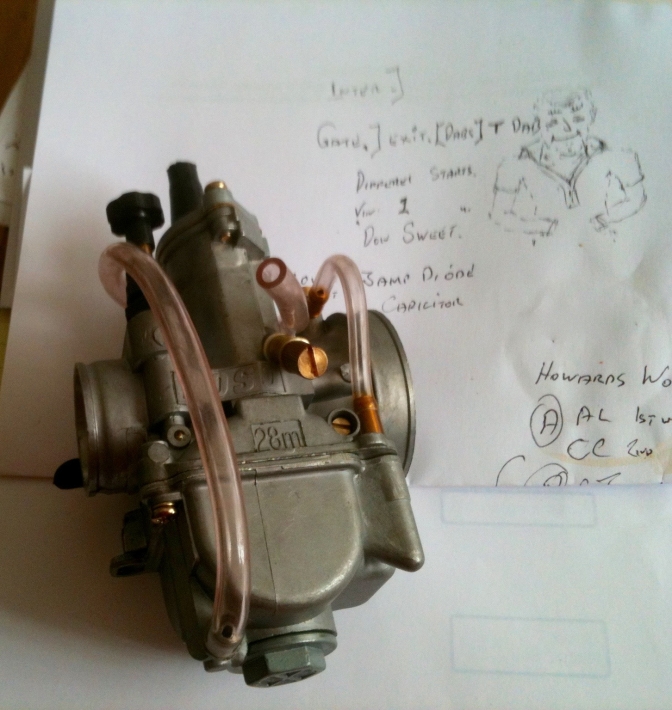
"KOSO" 28 mm carb.
Episode Eighteen.
Chainguard manufacture and fitment, and rear mudguard.
Comments : Alloy is not easy to bend when two bends are together, that is why I have a tool that I clamp to the top of the bench to make my chainguards like a folder, but this leaves like Mike says a rounded top, and he has a point about the tyre (Tire) scraper, perhaps I will rivet one on to the next guard to see if it works.
Mike I use a Morse taper drill chuck in the tailstock of the lathe and put the tap in that, same method as you, but if the tap starts to turn in the chuck you know that is too tight, and might break it so this is a good advanced warning of that.
Episode Nineteen...
The Back Brake.
Comments.
I Do like a bit of Fabrication, and Lathe work. Very therapeutic.
Mike mentioned the Trial using the M&M gate system.
Well I have spoken to the ground owner, and it looks like we will have our First "Otter" trial Next Spring, Near Warwick, Warwickshire. Using the M&M gate system on a self marking principle, and a "suit your self start time". with five hours to do your two laps of twenty sections, there will be a Refreshment Van, and even a pig roast when you finish. If we get the numbers.
So It is up to you. watch this site for further information.
And I would like to thank Mike for putting me onto this system of his.
Episode Twenty...
Last Job.
Sump protection plate manufacture.
Woooooops, Forgot to fit the air filter, and I bet there's a couple more jobs you have missed Mike. I always do...
***
Comments >Well you got there Mike, Nice Job. And the filming has got better all the way through quite the little Star Now.*******
Start Up Next...
That's It People "Job Done"
Nice Plot Michael.
Can't wait for the Next Project,
New Page Waiting.
~~~~~~~~~~~~~~~~~~
I thought I would put this introductory video Of
"David Richards Old Time Steam Workshop"
on for you. But mainly for you Paul Ellis, because I know you will love it!
Just listen to that clock ticking Magic, I can't live without a clock ticking.
More later.
updat2025...06...
| Visitor Counter: | ||||||||
 |  |  | |  |  | | ||