

Ian Ballard’s,
Foster Triumph Otter…
27/07/2022...

First trial for the Triumph Otter...
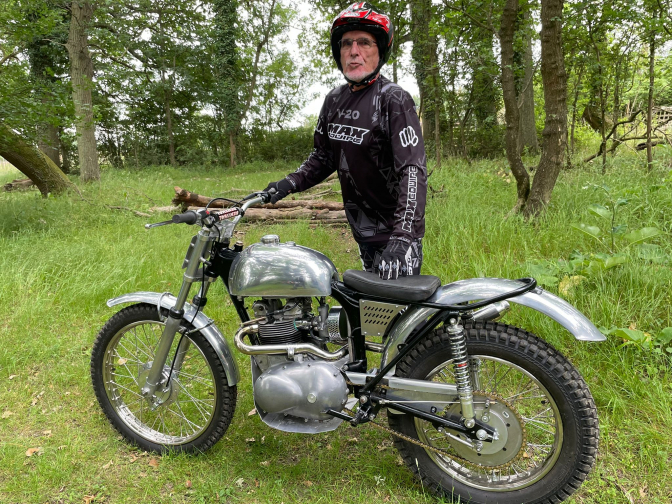
Another succesful Foster Otter build...
02/02/2024...
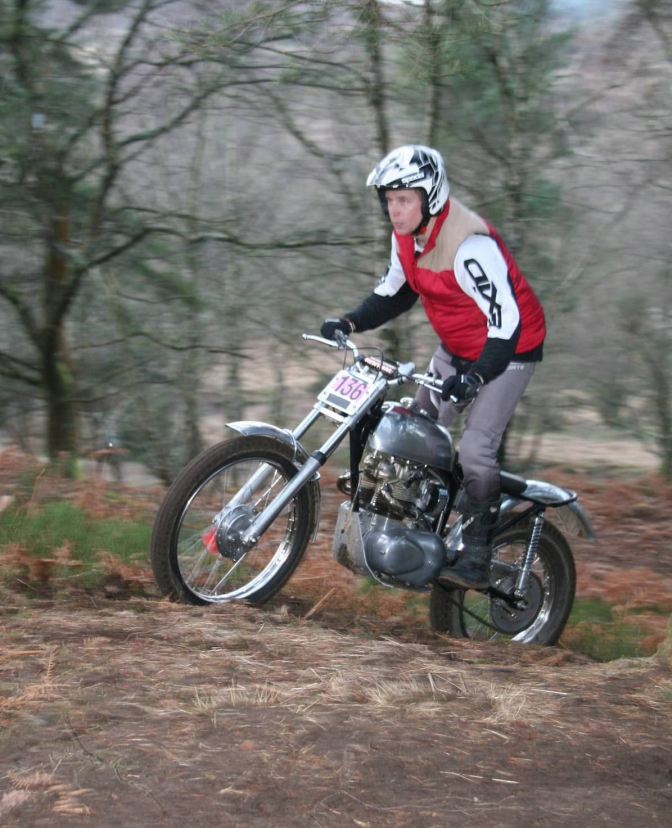
Photo Courtesy Ian Ballard..
Young Paul Chelwin aboard the Foster Triumph twin Otter at this years 2024 TALMAG trial.
Paul riding with a nasty bout of flu still had a good result in the over 300cc Clubmans class...
20/06/2022...
"If you go down in the woods today, your in for a big suprise "....
A newly completed Foster Otter Triumph...
Well done Ian you got there...
06/04/2021...
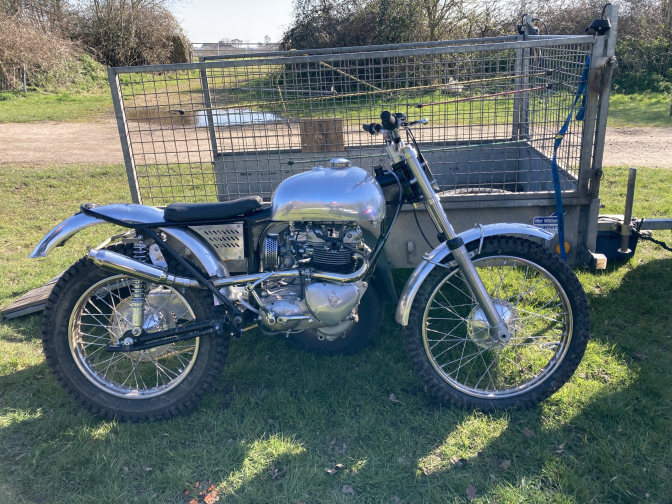
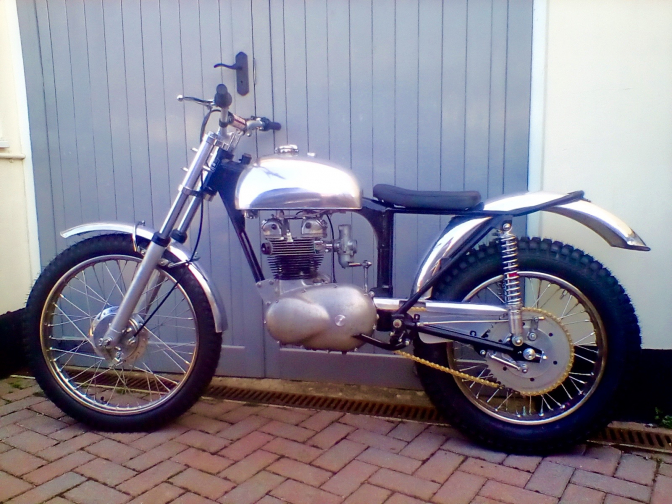
The Foster Triumph Otter is alive...23/03/2022...
One good thing to come out of the Pandemic is that with the "lockdown" time Ian has managed to get this superb Foster Triumph Otter finished...
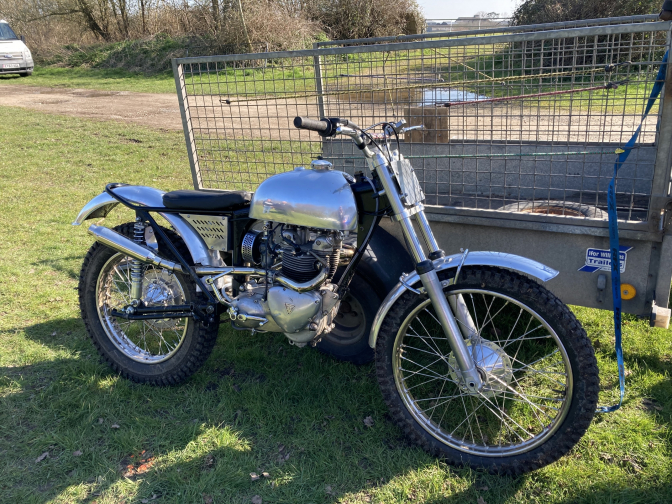
Getting there...
How clean looking is that profile...
Waiting for the Grooowl...
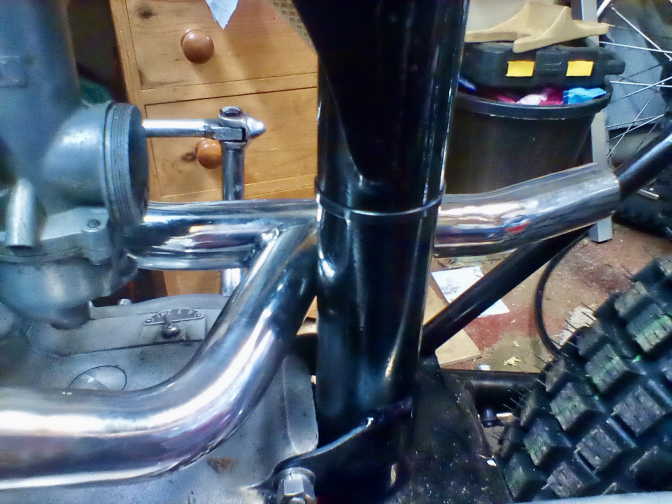
Two pipes with a join clutch side at the rear of the barrel! Different Ian...
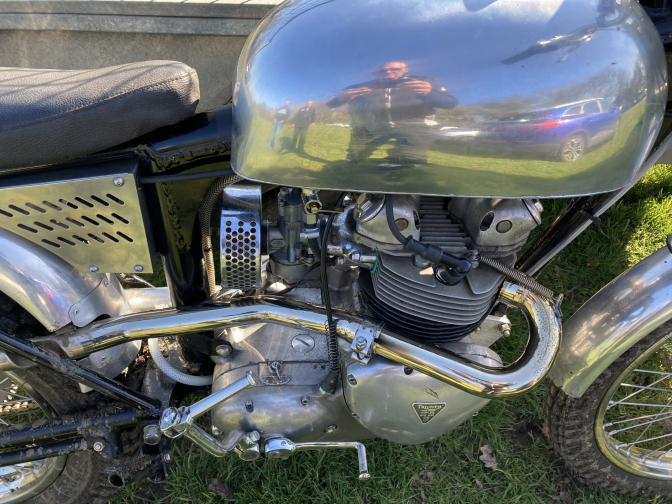
Well Howard from Faber came up with the exhaust system doing just that, with the two stainless pipes joined on the clutch side...behind the barrel...
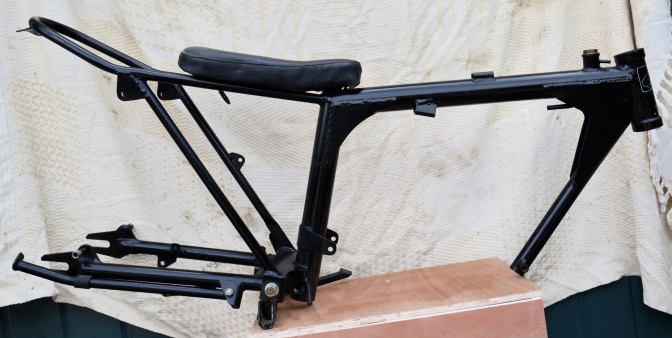
Foster Triumph Otter Frame...
03/03/2020...
Ian has had in his ownership a New Foster Otter frame for a Triumph twin engine since 1980 when Harry Foster built it.
Ian has wanted to build the bike up for a long while but has never had the time up-until this Pandemic appeared… This was the project that would keep him sane… during this Lockdown… And after fixing the mower as the first job, the build began… A set of forks and yokes were purchased as you can see.
And the engine was stripped ready for rebuild after removing it from the loft…
Ian has got the correct sprockets already from Dave Varley.. To take care of the gearing.. And the hubs are ready to go off for lacing…
But I will let Ian explain what he has already done...
Well being of a certain age it looks like we are house or garage bound for the next few months so I thought I would catch up on a few jobs. Had and engine that this year would only run on choke so a quick look on you tube and an hour in the garage. Never worked on one of these but as you can see not like an Amal.
Mower Photo.
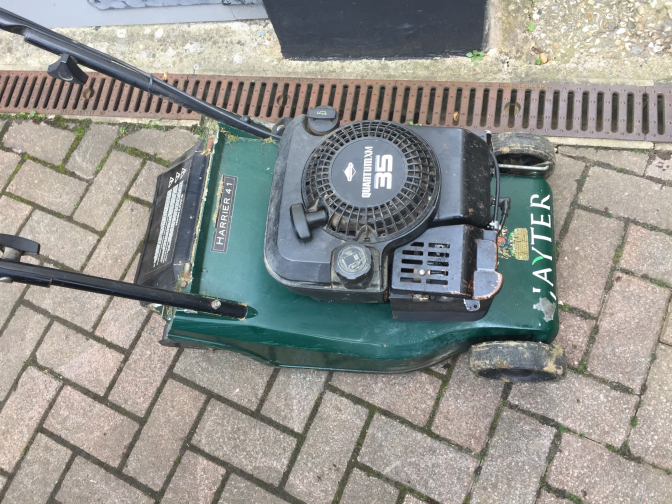
Well that’s the mower fixed now onto more important matters.
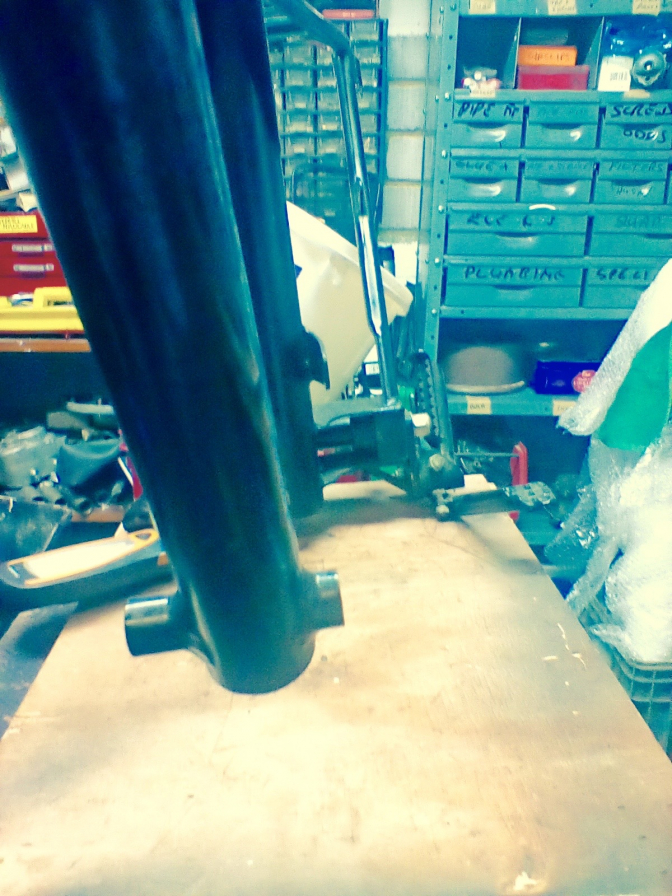
Otter frame out of roof and had head bearings fitted, now waiting for the yokes to be made.
Just bought a good pair of Marzocchi from the usual site, but still in shock at the price (would not have paid that for a bike a few years ago).
Not worried about using them, may even put on “Norton Roadholder” badges and plead ignorance !!!!
Once I get the forks on will post photos, but going to start now on the Triumph motor.
Forks Photo...
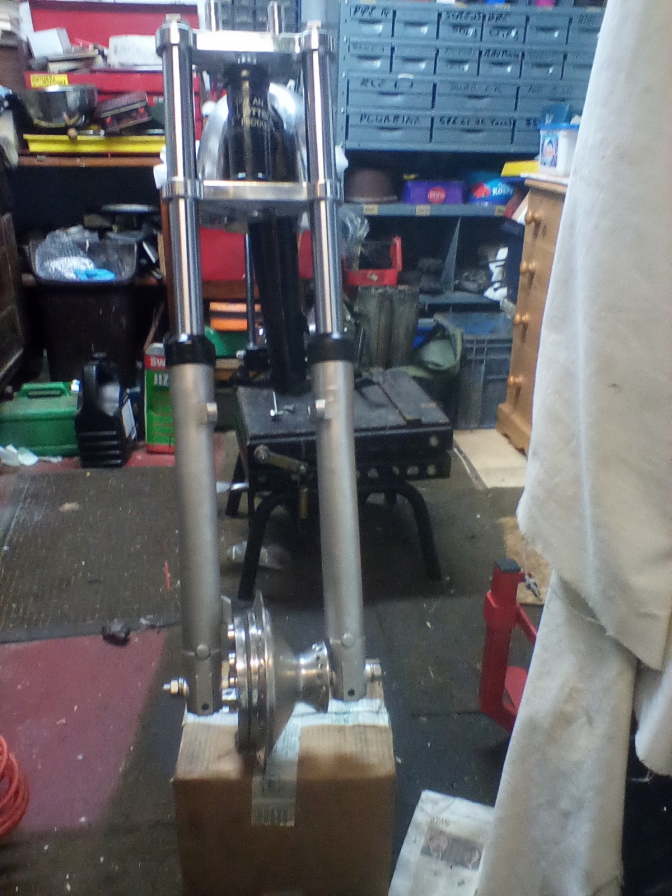
~Oo> Look like "Roadholders" to me Ian...
Yokes arrived today so just put it together to check it all looked alright. Now have to source front spindle, but rear came from a pitbike, stuck now until wheels can be built up.
Just found marking on headstock and it reads T5088038
is this a frame number ? C ~Oo> Think so Ian, now we have someone else with the next number to it...
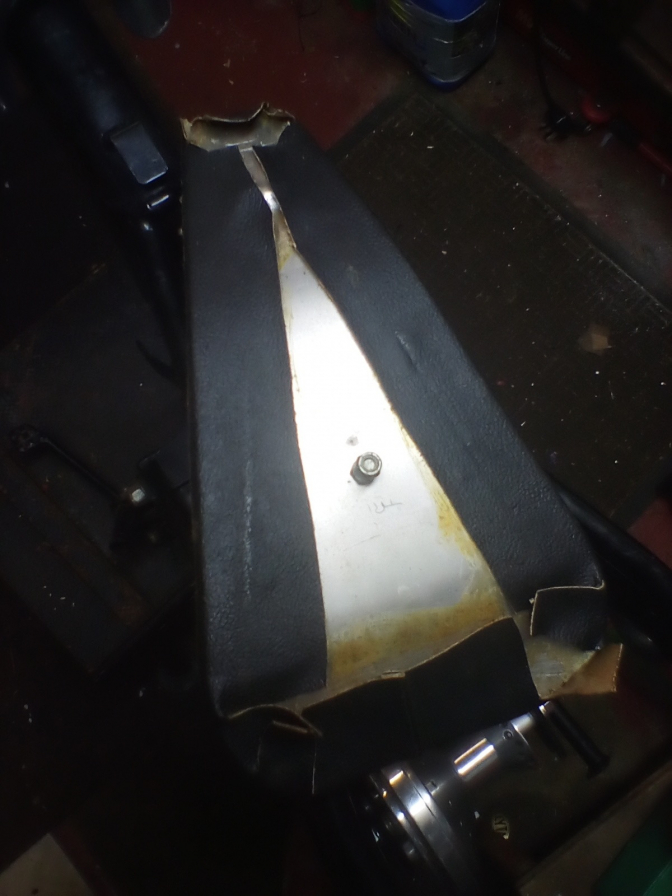
First picture is of the seat Harry supplied, glad he welded better than he glued vinyl, but it will be used. ~Oo> my seat was the same... Next week the Triumph engine gets stripped in between gardening !!!
Seat Photo...
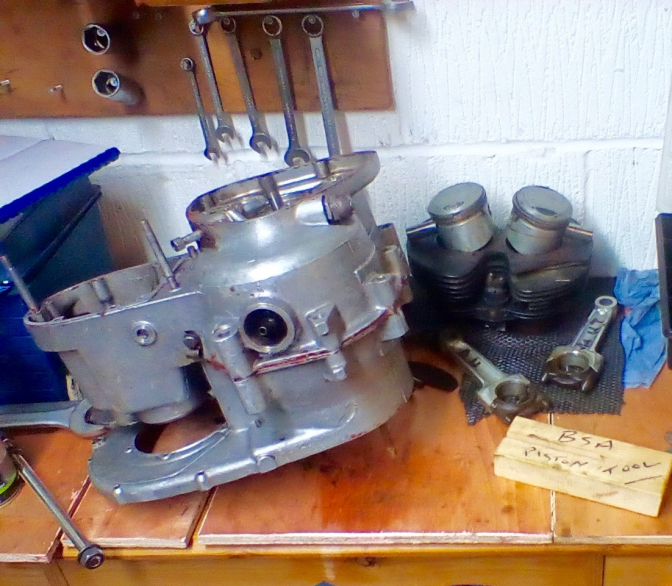
Can-not be too much of a help as using engine I already have, but it is an early 3TA with a distributor and cam with points so a bit of both. Quite pleased at the moment as all looking good now stripped down.
On the carb I picked up some advice on line as to what someone used
622 amal
160 main
106 needle
Pilot RJ17
Slide 3...
Engine Photo...
Been in garage trying to persuade the sludge trap out, drilled through and still stuck so will try again tomorrow !!
While there noted the cam numbers inlet E4038 exhaust E4078.
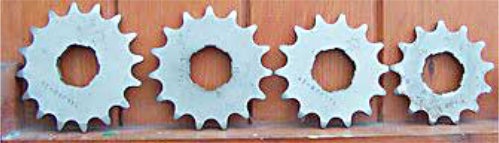
Have obtained a 16t engine sprocket and 14t gearbox sprocket, both from www.dcclassicmotorcycles.co.uk
Dave Varley is the Triumph man and builds trials or trail bikes. Dave suggested a 52 tooth rear sprocket 520 trials chain, but I could only get a 50 tooth one.
The engine sprocket fits ok you just have to shorten the primary chain, slightly tight, but a half link leaves it too loose. Running on a standard Triumph clutch for a 1960 engine which is thinner than the others to suit the narrow chaincase with no adjuster. Mike Waller will be OK... as his is a later engine, and in any case the actual chainwheels are the same. Mine still fouled on the adjusting plug and clutch would not work, so I made a deeper plug although it looks like the spring plate was catching on the inspection plug. Chain is 520, and has I said a expensive non O ring type used in the trials world so fairly thin, but needed a half link which they do not do, so had to modify one from TrialsBits.
~~~~~~~
Sprockets from Dave Varley...
Have attached photos of the frame, and if you need dimensions please give a shout.
Frame Photos...
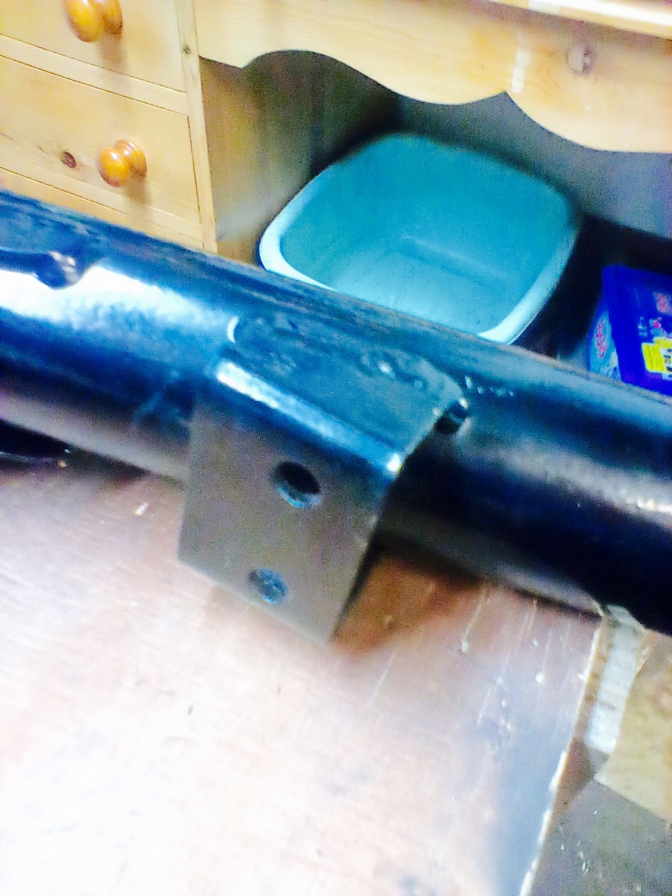
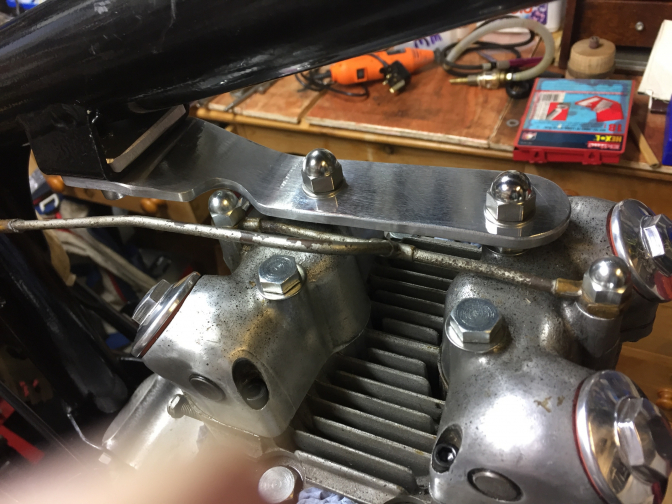
This is the Foster Triumph Otter "Head-Steady" arrangement...
~Oo>..
And the rear engine mounting wrap around bracket...
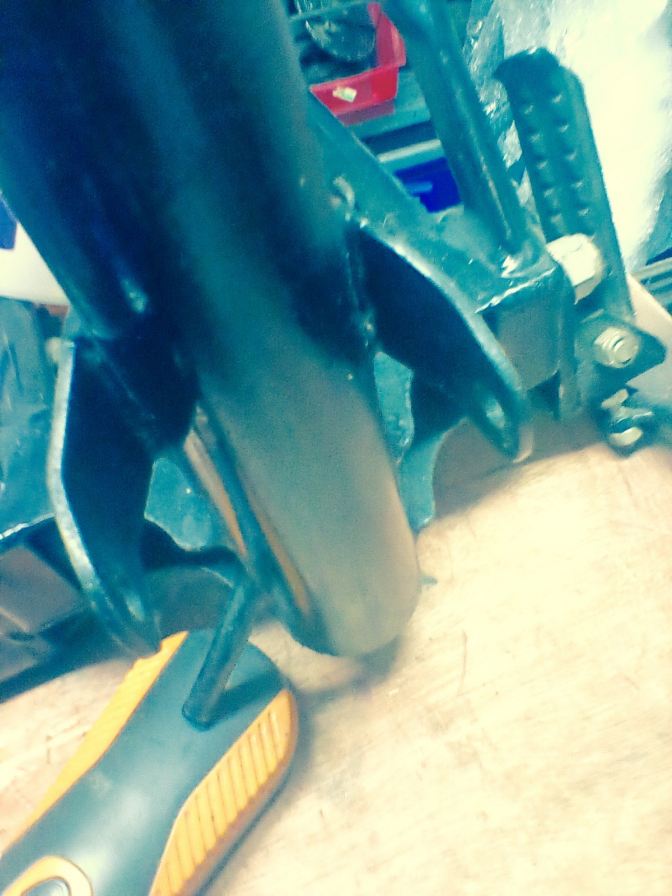
On the New batch frames I have altered this to two through tubes and two alloy plates for better adjustment...Not to say there is anything wrong with the Harry Foster mounting..
Please forget the information on the camshafts as I appear to have a mixture, with the inlet out of a Triumph T100 and the exhaust off a later side point model. The exhaust was worn and it appears Dragonfly Motorcycles stock the correct ones, inlet E3838 and exhaust E3839, and hopefully on their way.
~~~~~~~
Back frame engine mounting Wrap-around...
~~~~~~~
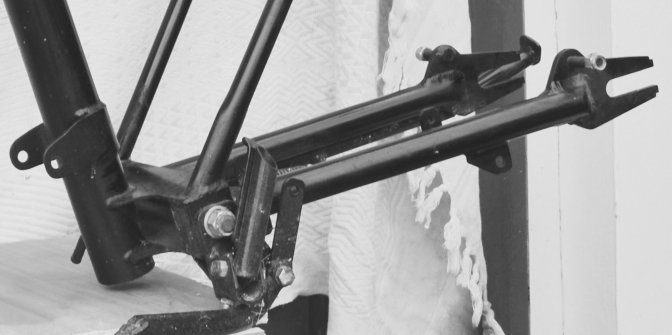
Also thought you may like the following dimensions for the frame.
Front tube 1.250” dia x 14.5” long to headstock on outside nearest wheel,
Engine mounts 5/8” dia x 3/8” bore...The Through tube...
Short one .387”, Long one .626”, both to the frame and 2.242” o/a width
They are .426” up from bottom of tube to bottom of boss.
Engine Front mounting Through-Tube...Strangely the short side is on the chain-case side of the engine... but this must be right with the alloy mounting plates... We will get dimensions of them later...
~~~~~~~
Picture Three above...
OK... just added it again, Until I have Dimension shot...
Engine steady 1.5 “wide 2.375” across frame tapering to 2” at frame
2 holes 3/8” dia 5/8” from front at headstock end
Bracket 5.250” to start from main downtube at back
Just noticed no depth, but it appears enough to get a nut in easily................will measure tomorrow.
~~~~~~~
If its Mike’s first Triumph strip-down I have found the special puller for the cam wheels excellent as they are an interference fit to get off, and the tool also pushes them back on.
It appears if you hammer them on they ruin the ends of the cam shafts and bushes!!! C ~Oo> Mike has the puller Ian,
Sludge trap came out with two grooves ground in and the use of a square shanked screwdriver and large wrench, then tapped the trap 12 mm and fitted studding over a tube spanner, wound the nut on top, and out it came.
More Photos...
09/10/2020...
An update from Ian on the Foster Triumph Otter build...
Please ignore any of this if I am repeating myself, but things are moving slightly slower due to less of a lock-down, and a front bedroom I am having to decorate !
Wheels back and look good, went for stainless steel in the end and have now fitted IRC tyres with rim locks.
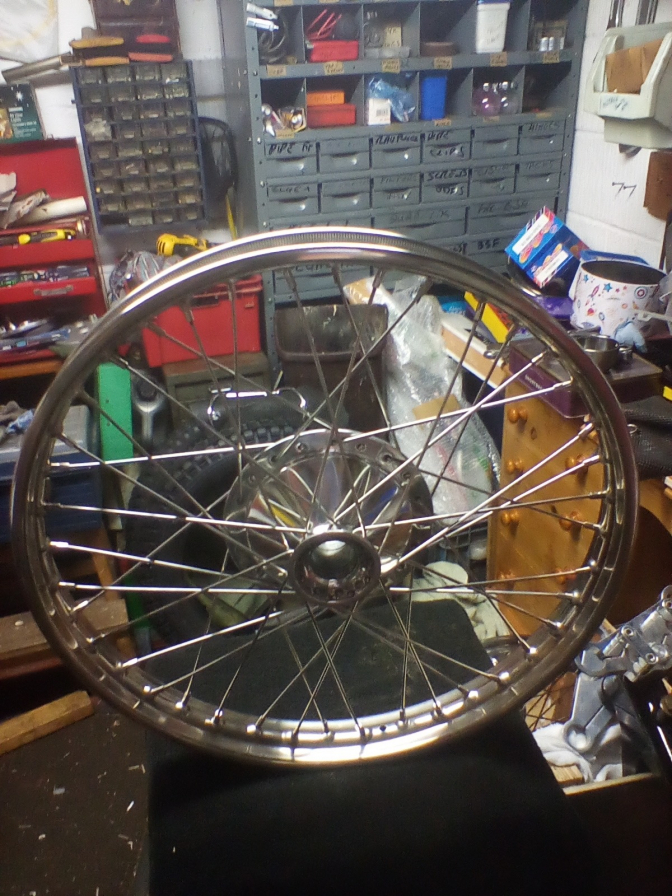
Have also drilled and tapped the rear spindle slot and fitted a couple of 5 mm button head screws to poke through and act as locks for snail cams.
Both wheels now have spindles, but I need to sort out spacers, brake shoes, cams and pivots.
On the engine.
Fitted new piston rings and used tie wraps to hold them in place, barrel went on first time, but back to front............When turned around it took for ever to get the rings in.
I was promised the loan of ring clamps by son in law, but he never could find them, should have just bought a set. The head went on OK... and have had to make the head steady as per the picture (Harry's probably looking down and saying should have used tube), but had some aluminium handy, hacksaw and vice, so we got there in the end.
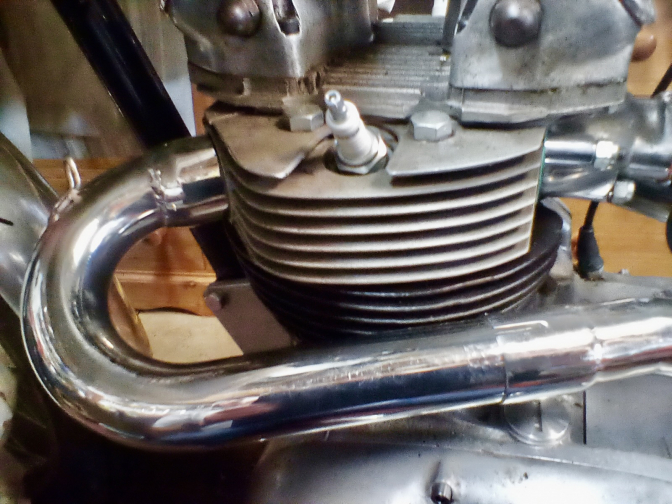
Now one of the other problems was the exhaust, Faber could not help, but Drayton offered me one of theirs, subject to me giving them measurements once the engine was fitted.
The engine has now been fitted, but believe it or not the Faber frame has more clearance than the Foster Otter for the exhaust, but the very nice lads have volunteered to make one for the bike once I can get it there.
-Oo>The Faber Otter is nearly an inch wider at the swinging arm box Ian!
So still plenty to do, but no hurry now most MOD trials look cancelled, so next summer all being well, we hope to be up and running if not before.
Best regards
Ian...
Charlie ~Oo> I will explain who the Mike is later...So be patient, you will be pleased when you find out...
06/04/2021...
You now know who the Mike referred to is, the one and only
Mike Waller.
Ian and I have known about Mike's Triumph Otter build for about a year, and have been collecting data for him.
Not that this does a lot for Mike, because he does is own thing anyway. But it needs someone to keep a check on him.
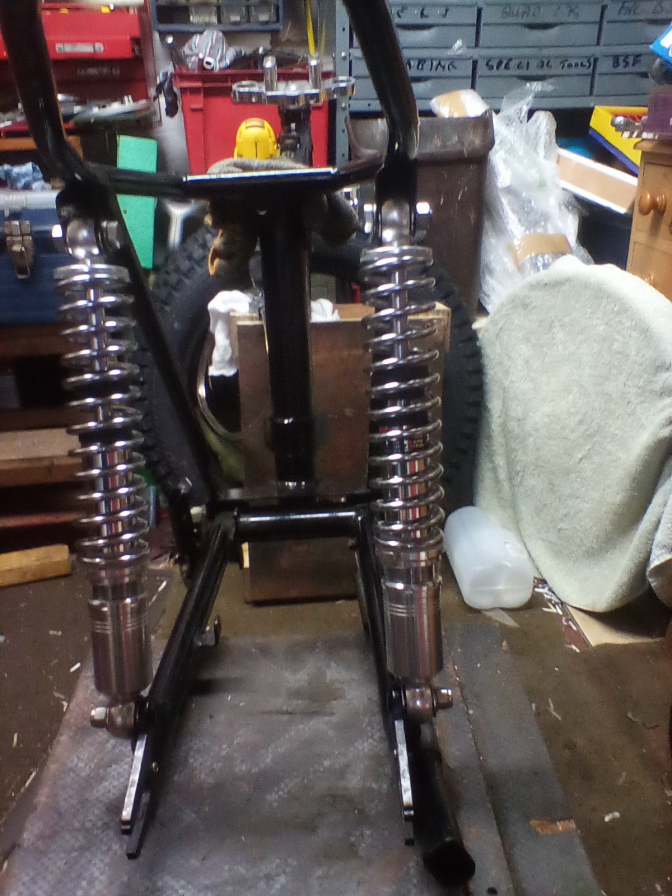
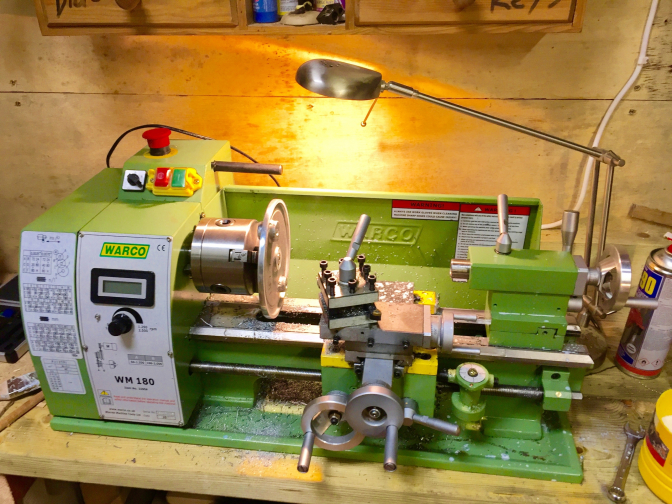
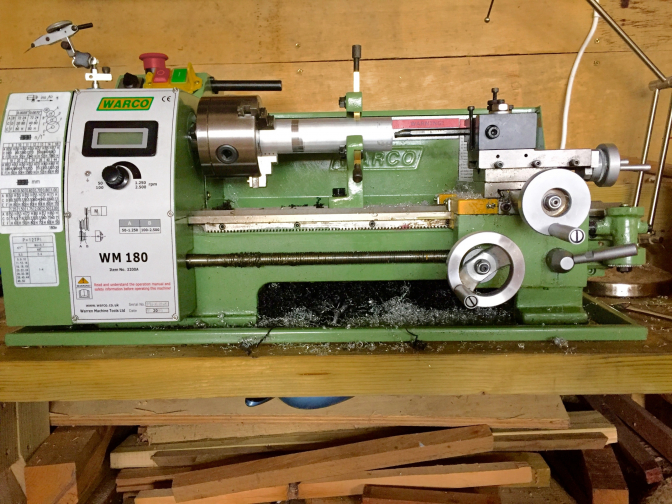
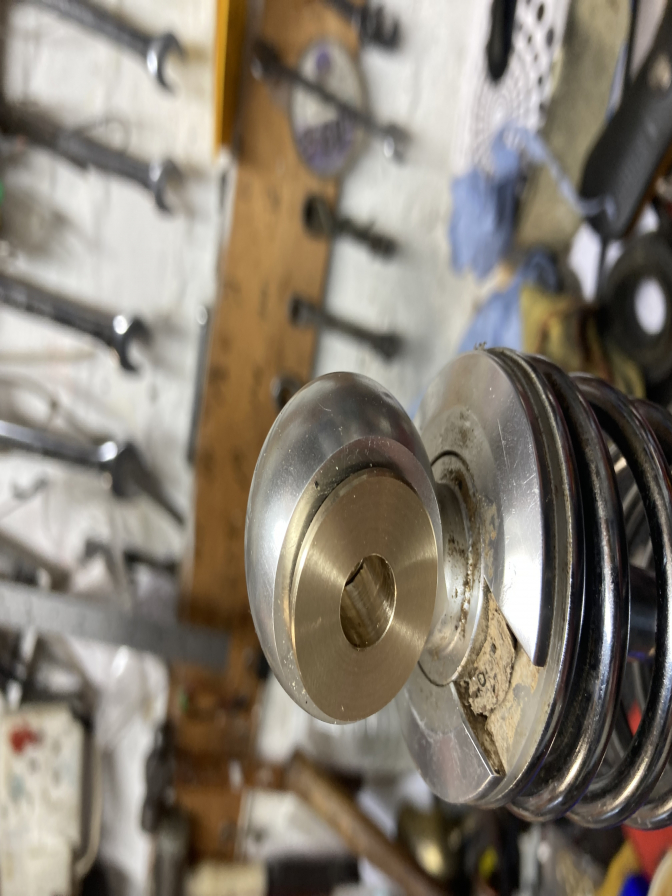
So Ian bought a little Warco lathe so that he can produce the spacers, etc, that he needs on his build. And has come up with a pair of snazzy fork shrouds with lock stops, and number plate fixings, incorporated.
Ian.
The lathe shows the backplate and the tubes being machined for the top of the forks. Have shown these before I get the bosses welded on and a number board attached, will add black delrin to the rear bosses as they act as lock stops. Thought the photos of the bike may be of interest to Mike, as I have sent him a few measurements and put these in the YouTube comments...
Next an aluminium box for the electrics under the seat, proper carburettor, and then get the exhausts made, but it still looks very tight and even wondering about twin pipes one each side joining behind the barrels on the clutch side?
Brake back-plate and shoes get skimmed..
Start of the fork shrouds...
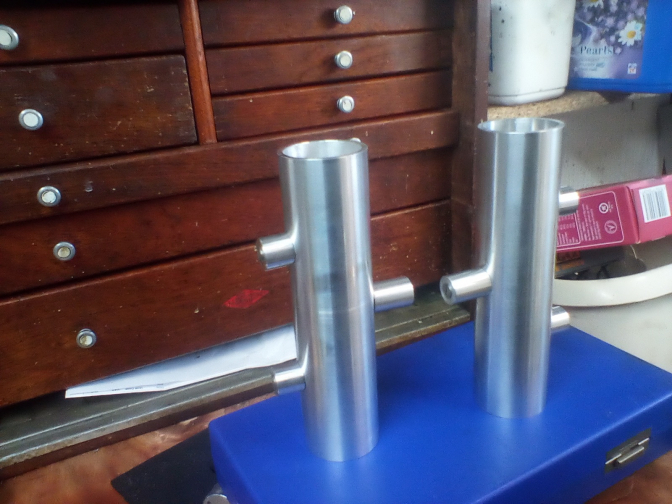
And ready for welding...
Happy days with the little lathe... Hope you are getting a discount from Warco Ian?
09/09/2021...
Ian has now dry fitted the new Faber exhaust system that Ian, Howard, and myself instigated.
The stainless system, Howard Fawkes designed for the Faber Otters, but with a couple of little tweaks they also fit the Foster Otter frames too... Here are the photo's of Ian's Foster with the front pipes in position....
A neat well tucked in design...
And I do like this cross-over, and well away from the carburettor...
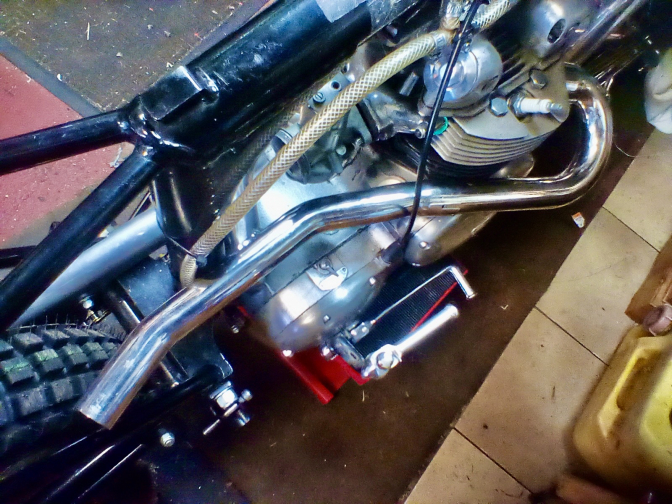
Just a bit tight against the sub-frame down tube, but the Foster frames are an inch narrower here than the Faber tubes.
The run of the pipe is well into the engine and not a leg burner, and a flat on the tail section by the tyre should mean the silencer box is tucked in too...
Yes I like that Faber exhaust system...
18/10/2021...
Hope all well with you as things are a bit peculiar here. Had a couple of days beating on a partridge shoot, and then got a cold, which would not go away so took a covid test, positive and then another positive.
Then had a proper test and that came back positive, so locked in for 10 days. After a weekend sat in front of the tv I decided to isolate in the shed for a couple of hours.
First class job that Ian, you have set a trend now I think...
That little Warco lathe is paying it's way very well...Bet you think "why didn't I buy one before"...

Well Done...
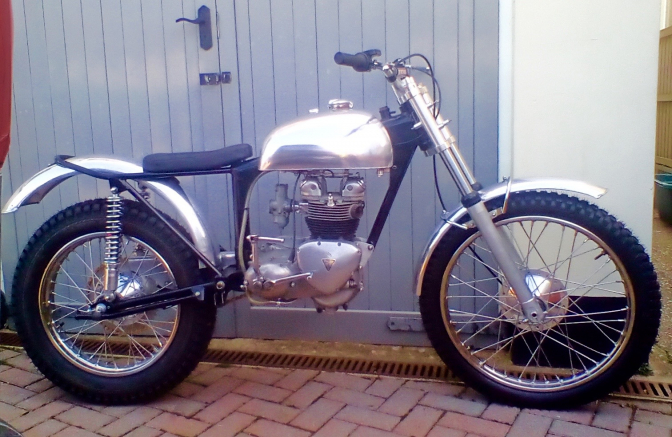
More later...The Foster Triumph Otter. bike is now finished and has competed in four or five trials.. Photos and reports later...
Updat2023...04...
| Visitor Counter: | ||||||||
 |  |  |  |  |  |  | ||